Thursday, March 25, 2021

Whimsy Stamps & Cardstock Warehouse IG Hop

Oh, hi! Cardstock Warehouse and Whimsy Stamps have teamed up for a week-long Instagram Hop filled with inspiration and prizes!  

Now, you all know I ADORE Whimsy Stamps . . .but guess what?!?  I've been using Cardstock Warehouse card stock for quite some time now, so I was super excited about this collaboration, because I LOVE their cardstock!


If you're looking for high-quality card stock in a fantastic variety of colors, weights, and finishes, you've gotta check out their site.

Now. . . about the hop . . . be sure to visit each stop on the hop every day. The more stops you visit, the better your chances of winning! (Click here to head on over to Instagram)

Each company is providing a $25 gift certificate and will select their winner randomly and post the winner on Monday, March 29th.  The giveaway is open until midnight EST on Saturday, March 27th.

Anywho . . . onto my card:

Supplies used are linked in the text in this post. Compensated affiliate links may be used at no additional cost to you. Thank you for your support!}

I used the Whimsy Stamps Slimline Birthday Scallops Die set and die-cut the candles from Pure White card stock and Smoke Grey card stock and adhered them together. I die-cut the candle flames from Pure White card stock and colored them with my Copics.

I die-cut the Happy word once from Banana Split cardstock and once from Dark Grey cardstock, and when I adhered them together, I off-set the yellow die-cut just a bit so there would be a grey shadow behind it.

Next, I used the Lattice A2 Die and die-cut it from Lemon Drop card stock, but left all the little pieces in place. Then, I die-cut that panel using a Rounded Rectangle Die and adhered it to a white Rounded Rectangle die-cut.

I arranged the candles on the front and glued them down. Next, I adhered that to a card base made from Dark Grey card stock. I used a corner rounder on my card base to match the rounded corners on my other pieces.

Next, I stamped the word birthday with VersFine Clair Morning Mist ink and die-cut it with a banner die. I adhered that to the front of my card, and then added a few of the grey dots left over from the candles to draw more attention to the sentiment strip.

The final step was to add some shimmer to the candle flames, and Viola! All done!

Thanks for stopping by!

Tuesday, March 23, 2021

Thanks Bunches!

 Oh, hi! Have you seen the new Gnome Gardeners stamps by Whimsy Stamps?? Oh my goodness these guys are so cute and any card will surely bring a smile to anyone's face!

And when you need to send "big" thanks, the Bold ABC's die set is perfect!

Supplies used are linked in the text in this post. Compensated affiliate links may be used at no additional cost to you. Thank you for your support!}

I started out by stamping and coloring the gnomes (Copics are listed below). Then I ran them through my Brother Scan n Cut.

Next, I cut a piece of card stock to 3.25" x 8.25" and did a bit of ink blending using Garden Party ink and It's a Boy ink. I made sure to leave white space between the two colors.

I die cut the scalloped frame using the Slimline Birthday Scallops die set and adhered that to the ink blended panel and adhered that to my card base.

I die cut the word "thanks" using the Bold ABC's die set three times and stacked them up for added dimension. I arranged them on the front of the card and adhered them using liquid glue.

Next, I arranged the Gnomes and adhered them in place.

To finish it up, I stamped the word "bunches" on a piece of card stock that I colored with a pink marker, cut it out and adhered it to the front of the card.

Supplies Used:

Gnome Gardeners Stamp Set

Bold ABC's Die Set

Slimline Birthday Scallops Die Set

Memento Tuxedo Black Ink

Catherine Pooler Garden Party Ink

Catherine Pooler It's A Boy Ink

Cougar Super Smooth Card Stock

Cardstock Warehouse Pure White Card Stock

Nuvo Deluxe Adhesive

Gemini, Jr. Die-Cutting Machine

Brother Scan N Cut


Copics Used:

Skin - E11, E53, E51

Beards - C5, C3, C1

Shoes - E29, E57, E35

Pink Gnome Clothes - RV09, RV17, RV55

Aqua Gnome Clothes - BG13, BG11, BG10

Orange Gnome Clothes - YR16, YR14, YR12

Flowers & Leaves - Y19, Y08, Y13, Y11, YG17, YG03, YG01

Shovel - E35, C5, C3

Flower Pot - E99, E19, E08

Wheelbarrow - Y28, Y26, Y23, C7, C5, C1

Thanks for visiting today!

Monday, March 22, 2021

Zen Garden - Four Ways

Oh, hi! I am loving the Zen Garden stamp by Whimsy Stamps! There are so many different ways it can be used!

For this card, I stamped the image and left it black and white and decided to add a colorful background with my Copic markers:

Supplies used are linked in the text in this post. Compensated affiliate links may be used at no additional cost to you. Thank you for your support!}

After I had the background colored, I stamped and embossed a sentiment from the Mini Everyday Sentiment set and used my white gel pen to add a few dots on either side of the sentiment.

Copics used: R22, YR02, Y21, G02, BG13, BV13, Colorless Blender

For my next card, I only stamped the blooms on the outer edge of a piece of card stock and embossed them with white embossing powder. Then I did a bit of easy watercoloring with my water brushes.

After the panel was dry, I ran it through my Gemini, Jr. with a Wonky Stitched Rectangle Die and adhered it to a piece of pink card stock cut slightly larger, and then adhered that to the front of my card base. Then, I adhered the  die-cut birthday word and die-cut shadow to the front. I also stamped and embossed the word "wishes" from the Your Birthday stamp set and fussy cut it.

Waterbrushes used: Cadmium Orange, Bumble Bee Yellow, Lemon Yellow, Teal, Turtle Green, Rouge Pink, Bubble Gum Pink

For my third card, I wanted to use the new Slimline Pocket Die, so after I stamped and colored the Zen Garden stamp, I fussy cut the flowers and a few leaves and arranged them on the pocket.

For the pocket, after I die-cut it from dark blue cardstock, I used my white gel pen to accentuate the stitching detail around the edge.

I cut a piece of patterned paper from the Eggstra Bunnies paper pack just slightly smaller than my card base and adhered it to the front of my card. Then I adhered the pocket to the front of my card.

Copics used:

Sunflower - Y19, Y17, Y08, Y11, YR24, E49, E47, E37, E35, E34, YG00
Pink Flower - R22, R20, Y08, Y13
Teal Flower - BG13, G02, BG10
Leaves - YG17, YG03, YG01

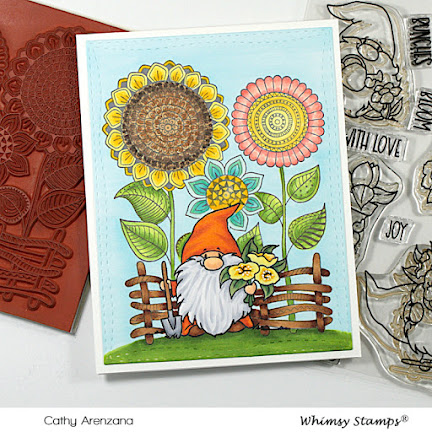
And finally. . .for my last card, I did a bit of simple masking by stamping the super cute Gnome from the Gnome Gardeners stamp set, masked him with a piece of masking paper and then stamped the Zen Garden over it.


Then I colored it up with my Copics, ran it through by die-cut machine with a Wonky Stitched Rectangle die and adhered it to a top folding notecard.

Copics used:

Sunflower - Y19, Y15, Y13, E49, E47, E37, E35, E34, YG00
Pink Flower - R22, R20, Y08, Y13
Teal Flower - BG13, G02, BG10, Y08, Y13
Leaves - YG17, YG03, YG01
Fence - E29, E37, E35, E34
Gnome - E11, E53, E51, C5, C3, C1, YR18, YR09, YR07
Shovel - E34, C5, C3, C1
Gnome's Flowers - Y08, Y11, YG67, YG63
Grass - YG67, YG17, YG03
Sky - B000

Supplies Used:


Thanks for stopping by today!

10