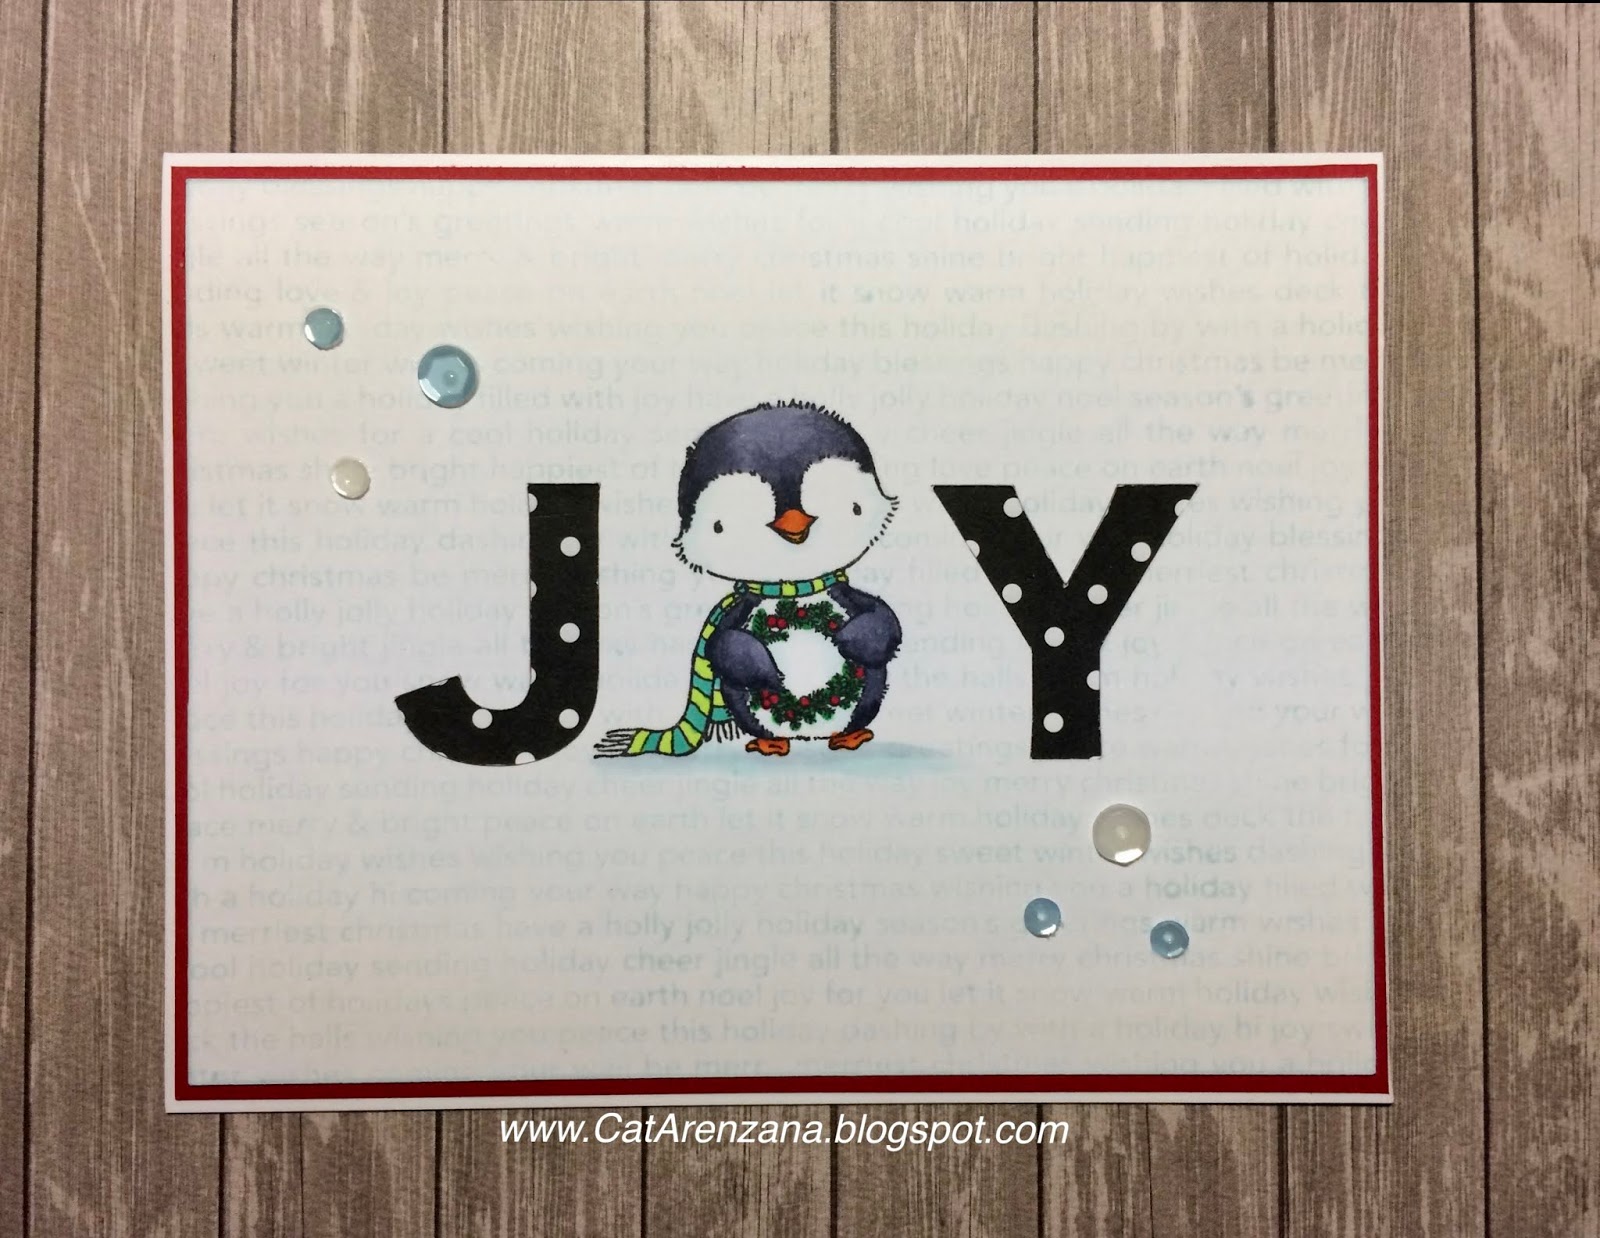
Oh, hi! Whew, I went straight from Halloween cards to a Christmas card. Which is unusual, because I do make Thanksgiving cards every year. But when these little penguins showed up at my door, I just had to whip up a quick card because, well . . . they are just too cute!
{Supplies used are linked in the text in this post. Compensated affiliate links may be used at no additional cost to you. Thank you for your support!}
So, I love the look of inlay die-cuts, but I don't have any alphabet dies, so for this card I used my Cricut to get that look. I even show you how I did it in the video:
So, after I cut out the letters, I used my stamp positioner to get that little guy in just the right place. He's from the Sweet Holiday Penguins set by My Favorite Things. Then I colored him up with the following Copics:
Penguin - BV29. BV25, BV23
Beak and Feet - YR15, YR18
Shading on his face and belly - BG0000
Wreath - G09, R29
Scarf - YG01, BG13
Ground - BG0000, C1
After I was done coloring, I decided it needed a background. So, I cut out a mask for the penguin and stamped the Christmas Background stamp in Sno-Cone Hybrid ink. It added just enough.
I adhered the stamped panel to a red panel and then adhered that to a white A2 notecard. I couldn't decide on whether or not to use the polka dot letters at first, but in the end, I'm glad I decided to use them.
Final step was to add a few sequins and Viola! All done!
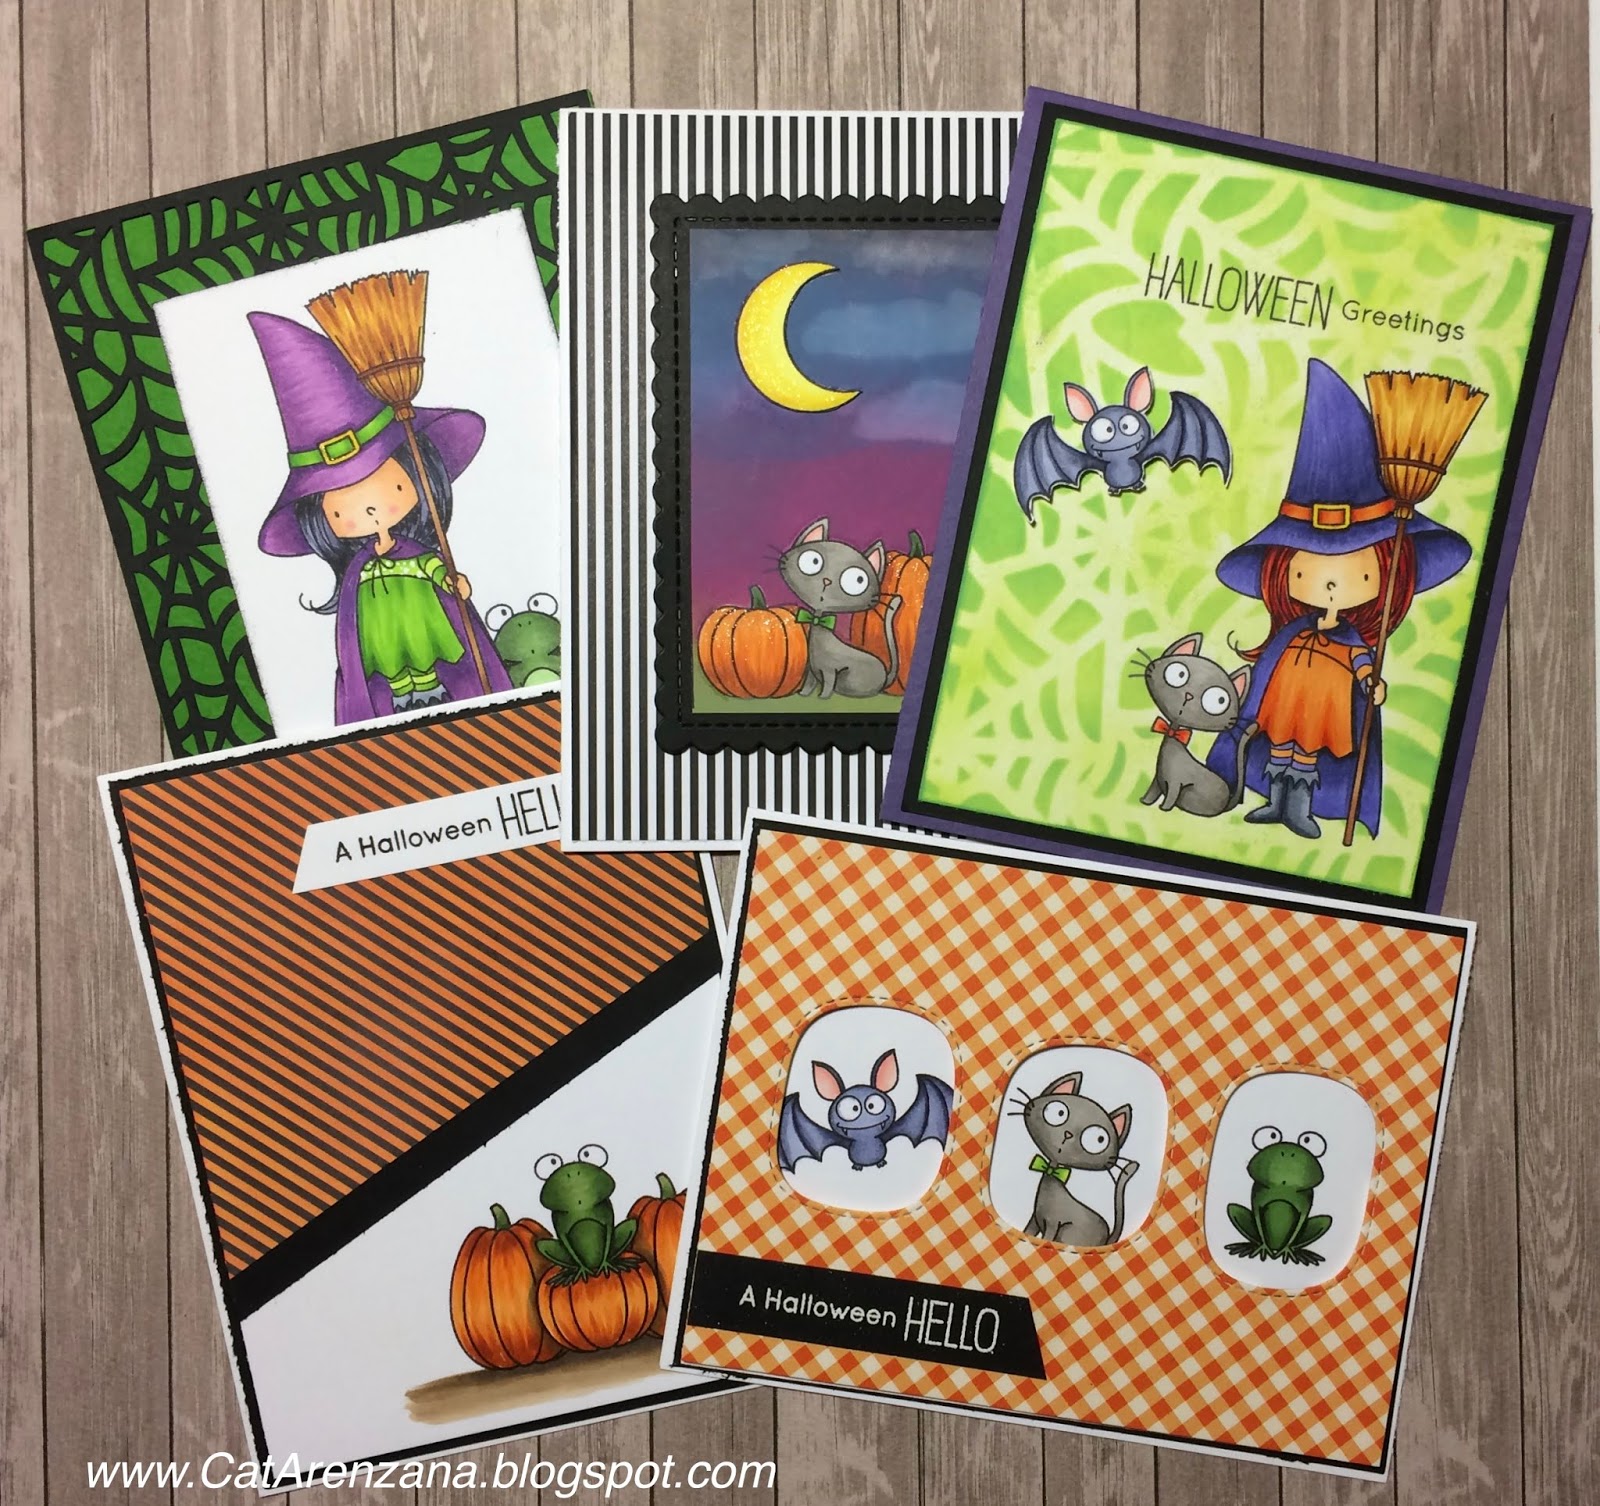
Welp... here's the fifth and final card in my Witch Way is the Candy Halloween Series. I really enjoyed using this set and creating videos. I hope you enjoyed them, too.
{Supplies used are linked in the text in this post. Compensated affiliate links may be used at no additional cost to you. Thank you for your support!}
For this card, I started out by stamping the kitty and witch from the Witch Way is the Candy stamp set onto a piece of 80# Neenah card stock measuring 4. 25" x 5.5" using Memento Tuxedo Black ink.
Then I masked the images and very lightly added a layer of Twisted Citron Distress Oxide ink using a sponge. Then I taped the stencil down and used an ink blending tool with Twisted Citron and Mowed Lawn Distress Oxide Ink.
After all the coloring was done, I trimmed down the stamped panel a bit and adhered it to a piece of black card stock and then finally, added that to a top folding purple A2 card.
Oh, hi! I'm back with the next two cards featuring the Witch Way is the Candy stamp set. Card # 3 went pretty smoothly, however, Card #4 was a challenge . . . I tried to use a ruler. Really, I should know better than that. . .they don't like me . . . which you can see in the video at the end of this post.
Anywho, on to the cards.
Here's Card #3:
{Supplies used are linked in the text in this post. Compensated affiliate links may be used at no additional cost to you. Thank you for your support!}
This one is pretty straight forward. I traced the windows from the Stitched Triple Peek-a-Boo Windows die onto a piece of 80# Neenah card stock measuring 4" x 5.25". Then I stamped the images using Memento Tuxedo Black ink from the Witch Way is the Candy stamp set.
I stamped the sentiment in Memento Luxe Wedding Dress ink and heat embossed with white embossing power.
I used the same window die to cut the patterned paper, and adhered that over the stamped images using an incredible amount of foam tape. I adhered the sentiment using Tombow Multi Mono Liquid Glue.
Then I adhered that to a piece of black card stock measuring 4 1/8" x 5 3/8" and finally adhered that to a white A2 card. Ta-da! All done!
So, Card #4. You guys, this was seriously a hot mess. Not at first, but boy oh boy, I sure did have a few issues with this one towards the end. This card right here is further proof that pretty much anything can be fixed.
I started out by tracing a rectangle using one of the A2 Scallop Frame dies from Honey Bee Stamps so I would know where to stamp the kitty and pumpkins. I used a stamp positioner to get them in just the right spot. . .and I did a bit of masking too so the kitty would be in front of the pumpkins.
Oh, Hi! It's been a minute or two since my last post, but I had this grand idea to create five cards with one stamp set and of course, a video to go along with it. However, one video would have been almost an hour long, even with all the coloring sped up quite a bit, so instead, I'll be doing a series of 3 blog posts (and videos).
{Supplies used are linked in the text in this post. Compensated affiliate links may be used at no additional cost to you. Thank you for your support!}
Here's the video for the first two cards:
And here is the first card:
To get started, I stamped the frog and pumpkins from the Witch Way is the Candy stamp set onto a piece of scratch paper to get an idea for placement. Once I was happy with that, I created masks for the frog and the pumpkins and used my stamp positioner to stamp the images on a 4" x 5.25" panel of Neenah Solar White card stock using Memento Tuxedo Black ink.
After all the stamping was done, it was time to do some coloring!
Frog - G99, G94, G43 and YG93
Pumpkins - YR27, YR15, YR12
Shading around the small pumpkin - W3, W4
Ground - E43, E42, W4
The striped paper is from the Black and White Basics paper pack from My Favorite Things. But, I decided that I wanted it to be black and orange instead of black and white, so I used my Carved Pumpkin Distress Oxide ink and mini ink blending tool to change the color.
I adhered that on top of the stamped panel and trimmed down the excess. I added a strip of black card stock to cover the seam from the patterned paper. Then I mounted that onto a piece of black card stock measuring 4 1/8" x 5 3/8". I adhered that to a top folding white card base and to finish off the card, I stamped the sentiment on a piece of white card stock and attached it with liquid glue. Ta-da! All done!
Next up, Card #2:
I started out by stamping and coloring the witch on a white panel. I decided after I had her all colored that she needed a buddy, so I masked her off and stamped and colored the frog.
Here are the Copics I used:
Hat and Cape - V12, V15, V17
Buckle on the hat - Y08 and Wink of Stella Glitter Pen
Dress, Band on Hat and Tights - YG01, YG03, YG17, YG25
Broom Bristles - Y21, YR23, YR27, E09, E99
Broom Handle - E31, E33, E27
Skin - E21, E00, E0000, R20
Hair - 100, BV23, BV25, BV29
Boots - C1, C3, C5, C7
Frog - G99, G94, G82, G40
Ground - E43, E42
After I was done coloring, I cut the panel down to 2 3/4" x 4" and lightly inked the edges the with black ink.
Once I had it loaded on my digital mat, I resized it to 4.25" 5.5" so it would cover the front of my card. Sent off to my Cricut to be cut from black card stock and Viola! A really cool background!
I used a Ball Point Glue Pen around the edges of the die cut and a few dots of Tombow Multi Mono Liquid Glue in the centers of a few of the spider webs to adhere it to the front of a green top folding card.
I adhered the stamped panel to the front of the card and Ta-da! All done.
Thanks so much for visiting today . . . and check back soon for the second video and the next two cards.
. . . thanks to Distress Oxide Inks, a cloud stencil, a cute bat stamp, and my Cricut.
{Supplies used are linked in the text in this post. Compensated affiliate links may be used at no additional cost to you. Thank you for your support!}
Here's a quick video for ya, too:
Okey dokey! The first thing I did was a quick search in Cricut Design Space to find some spooky Halloween images. And lo and behold! I found exactly what I was looking for.
Take this card for instance:
I just knew that the Spooky Forest Luminary from Rob and Bob would be perfect. So, I added the image to my project mat and sized it to 5.5" x 4.25" and let my Cricut do the rest.
In the meantime, I started inking up a background using Black Soot, Seedless Preserves and Wild Honey Distress Oxide Inks.
I didn't use a mini ink blending tool like I normally do; instead I used a round sponge that I cut into wedges. (I get the sponges at Michael's. They come in a 3 pack and only cost $3.00.) I very lightly dabbed each of the colors onto a piece of gray card stock. Once I had the base layer of ink down, I used the cloud stencil and applied more ink with a heavier hand. After I was happy with the clouds, I went over the panel again to blend some of the areas.
I adhered the Spooky Scene on top of the background using my Ball Point Glue Pen and Tombow Multi Mono Glue. I did trim the tiniest bit off the spooky scene just to show a little bit of the gray card base.
Ta-Da! All done!
For the second card, I had my handy little Cricut cut out the Happy Halloween image from the Dimensional Scenes Spooky Hollow Cartridge. Now then, I gotta tell ya, there is an arch and few more wrought iron spikes, but I trimmed them off so the center would be more open.
For the cloudy sky, I used the same inks as I did for the first card. Then I adhered the Happy Halloween cut out using my liquid glues.
And those bats! How cute are they?? They are from the Witch Way is the Candy stamp set from My Favorite Things.
I stamped them onto a piece of Neenah Solar White Card Stock using Memento Tuxedo Black ink. I colored them up with Cool Gray Copics (C1, C3, C5 and C7) and I colored the inside of their ears with R00 and R20.
After I cut them out by hand, I adhered them to the front of the card with foam tape. Abracadabra! All done!
Oh, hi! So, my intent for this card was to finish it in time for one of the challenges that My Favorite Things had going for World Card Making Day . . . but I'm a little late to the party. Admittedly, my muse decided to take a vacation without me, so I haven't done much stamping lately.
On a good note, the challenges from WCMD definitely gave me the boost I needed to get back into the swing of things. For instance, these very colorful Hippos.
{Supplies used are linked in the text in this post. Compensated affiliate links may be used at no additional cost to you. Thank you for your support!}
And, there's a video, too:
So, why is there a rainbow of Hippos? Because the first challenge that My Favorite Things had for WCMD was to create a card with a rainbow; either literally, or using the colors of the rainbow. And I thought that a bunch of colorful Hippos would be ever so cute.
So, I started by drawing a line with a pencil so I could get those guys (sort of) in a row.
Then I stamped one of the Hippos from the Happy Hippos stamp set in Memento Tuxedo Black ink onto a piece of Neenah Solar White card stock. I did a little bit of masking so some would be in front of the others.
Once they were stamped, I colored them up with the following Copic Markers:
Red - R24, R27, R29, R59
Orange - YR04, YR07, YR09, YR18
Yellow - Y13, Y15, Y17, Y19, Y38
Green - G07, G14, W4
Blue - B02, B04, B06, B18
Purple - V12, V15, V17, V09
Nostrils and . . . toenails? Do hippos have toenails? - C5
Ground - E42, E43
After they were colored, I stamped the sentiment in Smokey Gray VersaFine ink. I adhered the stamped panel to a piece of gray card stock and then adhered that onto a white card base. Viola! All done!
Oh, hi! Happy October! I'm back with another Halloween card with a background technique that I love. Although, you will see in the video that things didn't go quite as planned because I was distracted by a movie I was watching.
{Supplies used are linked in the text in this post. Compensated affiliate links may be used at no additional cost to you. Thank you for your support!}
Oh, no . . .I certainly didn't come up with this technique on my own. I saw it on Instagram. . . or YouTube. . . I can't remember which. But when I saw it, I really wanted to try it out. And even though I was distracted by a movie, I'm still really happy with out it turned out.
So, a huge thank you goes out to Antonia at Taffleberry Lane for the inspiration!
Okay, back to the card. After I was done with the background, I colored up the image with my Copics. (colors listed below). I created a mask to cover the image so I could add some "stars" to my night sky.
I kinda went back and forth about how to create those stars . . . I almost used a White Gel Pen, but that would take forever, so I opted to use my Mr. Huey's Opaque White Color Mist. And that too almost turned into a disaster.
I shook up the bottle really well and when I took off the cap, ink splattered all over my craft mat. I'm so glad my card wasn't anywhere near it.
Anyway, after I cleaned up the mess, I applied the mask over the stamped image and sprayed the white ink. While that was drying, I ran a piece of black card stock through my Gemini Junior with an A2 Scallop die from Honey Bee Stamps (you guys! These seriously are my favorite dies right now).
Once the white ink was dry (and I did help it along with my heat tool, because I'm not too patient when it comes to waiting for things to dry), I ran it through my die cut machine with the same die. Using scissors, I cut off the scalloped edges from my stamped panel. The stitching detail from the die makes it really easy and the rectangle fits perfectly inside the black scalloped panel.
Finally, I put it all together, and Viola! All done!