Monday, July 19, 2021

Shark Fest - Just Chillin'

Oh, hi! Are you a fan of shark week? I'm not . . . BUT . . .I am a fan of these sharks from the new Shark Fest stamp set by Whimsy Stamps.

Seriously . .. just look at this guy chillin' in a hot tub!

Supplies used are linked in the text in this post. Compensated affiliate links may be used at no additional cost to you. Thank you for your support!}

I started out by stamping the Tropical Floral background with All That Jazz ink onto a piece of turquoise cardstock. 

Next, I die-cut a circle from white cardstock and did a bit of ink blending with Tiara, Tiki Torch, and Pucker Up inks.

I stamped the shark and the palm tree using Memento Tuxedo Black ink onto a piece of Cougar Super Smooth cardstock and colored them up with my Copics. Then I had my Brother Scan n Cut machine cut them out. 

I adhered the circle to the background panel and the palm tree on top of that. Next I added a bunch of foam tape to the shark and adhered him in place.

To finish it up, I stamped the sentiment using VersaFine Onyx Black ink above the shark and Viola! All done!


Supplies used:   


Catherine Pooler All that Jazz Ink

Catherine Pooler Tiara Ink

Catherine Pooler Tiki Torch Ink

Catherine Pooler Pucker Up Ink

Memento Tuxedo Black Ink

VersaFine Onyx Black Ink

Brother Scan N Cut

Cougar Super Smooth Cardstock

Copic Markers


Thanks for stopping by today!

Monday, July 12, 2021

Whimsy Stamps Under the Sea

Oh, hi! I've got three cards to share today! Once I started playing with the new Under the Stamp Set by Whimsy Stamps, I just couldn't stop! (all supplies, including the Copics I used, are listed below)

My first card is. . . a slimline shaker, of course! And the Slimline Under the Sea paper pack is a perfect match!

Supplies used are linked in the text in this post. Compensated affiliate links may be used at no additional cost to you. Thank you for your support!}

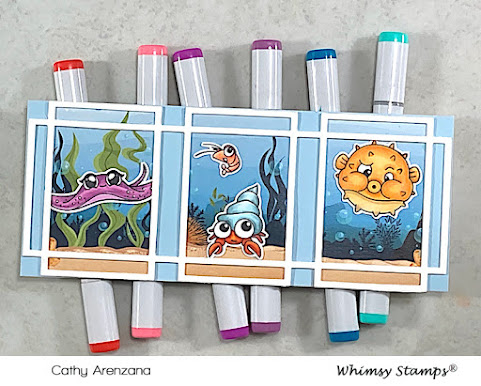
My second card is another slimline using the Slimline Connected Rectangles Die and another piece of cardstock from the Under the Sea Paper Pack.

I cut down the patterned paper so it would fit perfectly behind the large rectangles. I love how this turned out!


And for my third card. . . it's a little punny! Those little shrimp are soooo stinkin' cute and the sentiment made me giggle a little bit:


Supplies used:

Whimsy Stamps Under the Sea Stamp Set

Whimsy Stamps Slimline Under the Sea Paper Pack

Whimsy Stamps Slimline Card Builder Die

Whimsy Stamps Slimline Connected Rectangles Die

Whimsy Stamps Wonky Stitched Rectangle Dies

Whimsy Stamps Stitched & Pierced Circle Dies

Copics Used:

Seahorse - BG57, BG34, BG32, BG11, BG09, E42, E41

Turtle - YG17, YG23, YG01, YG03, E57, E34, E31, E42, E41

Stingray - V06, V05, V01, RV63

Hermit Crab - B32, R17, R08, R05, YR12, BG72, BG70, B000, N2, BG0000

Puffer Fish - BG70, YR65, YR20, YR00, YR31, E43, E42, E41, E95, R12, YR02

Shrimp - R22, R01, R00


Thanks for stopping by today!

Hey, You! Yes, You! YOU Are Awesome!

 Oh, hi! I just wanted to let you know that . . . YOU are awesome!


Supplies used are linked in the text in this post. Compensated affiliate links may be used at no additional cost to you. Thank you for your support!}

When I first saw this bear from the On A Roll stamp set, I knew exactly what I wanted to do. I wanted a really bright and cheery background, so I started out by using Orange Glow Neon Glitz Gel with the Speckled Star stencil.

While that panel was drying, I colored up that little bear with my Copics (colors listed below) and then ran him through my Scan n Cut. I stamped and embossed the sentiment "You Are" and then die-cut it with the Simple Sentiment die set.

Next, I die-cut the word "Awesome" three times from navy blue cardstock and stacked them up for added dimension.

Once my stenciled panel was dry, I ran it through my Gemini, Jr. with a Wonky Stitched Rectangle Die and adhered it to a navy blue card base. I used liquid glue to adhere the sentiment strip and die-cut word and added foam tape to the bear and, Viola! All done!

Supplies used:

Whimsy Stamps On A Roll Stamp Set

Whimsy Stamps Speckled Star Stencil

Whimsy Stamps Awesome Word Die

Whimsy Stamps Wonky Stitched Rectangle Die Set

Simple Sentiment Die Set

Cougar Super Smooth Cardstock

Neenah Classic Crest Cardstock

Orange Glow Glitz Gel

Stencil Pal


Copics Used:

Bear - W3, W2, W1, W0, R20

Skateboard - B32, R17, YR04, Y08, N3, B18, B24, B23

Wheels - C5, BV29, BV25, C3


Thanks for stopping by today!

Sunday, July 11, 2021

The Pretty Card

Oh, hi! Here's my third card using the Animal Tiles stamp set. If you missed the first two, you can see them here and here.

Supplies used are linked in the text in this post. Compensated affiliate links may be used at no additional cost to you. Thank you for your support!}

For this card, I started out by using the Teardrop Splash stencil with Cummerbund ink for my background. Then I die-cut that panel using the Wonky Stitched Rectangle Die Set and adhered it to the front of a top folding notecard.

Next, I stamped the lily pad and the lotus flower three times each onto Cougar Super Smooth cardstock and then colored them up with Copics.

I trimmed them down and arranged them on the front of the card. Then I decided to add a strip of turquoise cardstock on the left side. After I adhered that strip of cardstock, I adhered the stamped and colored images to the front using foam squares.

I stamped and heat embossed the sentiment using the Simple Sentiments stamp set and used the coordinating die to cut it out. I adhered that to the card front with foam tape as well, and Viola! All done!

Supplies used:

Whimsy Stamps Animal Tiles Stamp Set

Whimsy Stamps Teardrop Splash Stencil

Whimsy Stamps Simple Sentiments Stamp Set 

Whimsy Stamps Simple Sentiments Die Set

Whimsy Stamps Wonky Stitched Rectangle Die Set

Memento Tuxedo Black Ink

Catherine Pooler Cummerbund Ink

Ink Blending Brush

Cougar Super Smooth Cardstock

Copic Markers

Tuesday, July 6, 2021

Animal Tiles - Card 2

Oh, hi! So, in my last post I shared a card using the super cute frog from the Animal Tiles stamp set. Today, I'm sharing another card using the same set, but this one has a more masculine feel to it. 


Supplies used are linked in the text in this post. Compensated affiliate links may be used at no additional cost to you. Thank you for your support!}

I absolutely love how versatile this set is . . . the images range from cute to masculine to pretty (which I'll be sharing a pretty card later).

Anywhooooo..... for this card I stamped the Koi fish in Versamark ink and heat embossed the images with gold embossing powder. Then I used my Zig Clean Color Brush markers to color them in. I also colored around the fish with a light blue pen for a watery look.

I cut the images down and rounded the corners. Next I adhered them to some gold glitter cardstock that I had cut to be just slightly larger, and also rounded the corners.

For the background, I ran a piece of navy cardstock through my Gemini Jr. with one of the Slimline Cornered Rectangles dies.  After that, I used the Slimline Scribbles background stamp and stamped it using Juniper Mist ink, and then again with Unicorn White ink.

I stamped Especially for You from the Simple Sentiments stamp set and used the coordinating die to cut it out.

I adhered the navy panel to a piece of light blue cardstock that measure 3.25" x 8.25" and then adhered that to my card base, which measures 3.5" x 8.5".

I added foam tape to the back of the Koi fish and the sentiment and adhered those to the front of the card, and Viola! All done!

Thanks for visiting today!


Supplies Used:

Whimsy Stamps Animal Tiles

Whimsy Stamps Slimline Scribbles Background stamp

Whimsy Stamps Simple Sentiments

Whimsy Stamps Simple Sentiments Die Set

Whimsy Stamps Slimline Cornered Rectangles Die Set

Strathmore Watercolor Card Stock

Versamark Ink

VersaFine Onyx Black Ink

Catherine Pooler Juniper Mist Ink

Hero Arts Unicorn White Ink

Gemini Jr

Zig Clean Color Brush Markers - Scarlet Red, Pale Orange and Haze Blue

Thursday, July 1, 2021

Hoppy Birthday to You!

 Oh, hi! I think this little frog from the Animal Tiles stamps set by Whimsy Stamps is ever.so.cute! And he also pairs quite nicely with the Cutie Alphabet die set . . .and the Scallop Circle Frame die set, too.

Supplies used are linked in the text in this post. Compensated affiliate links may be used at no additional cost to you. Thank you for your support!}
I started out by stamping and coloring the little frog with my Copics (YG23, YG03, YG01, YG00, R20). I fussy cut him out and set him aside.

I used the smallest die from the Scalloped Circle Frame Die Set and die cut that five times and set those aside.

To create the frame, I cut a piece of cardstock from the Rainbow Paper Pack down to 4" x 5.25" and then cut out the center using the second largest die from the Wonky Stitched Rectangle Die Set. I adhered the frame to a top folding A2 sized white notecard using 1/8" foam strips.

Next I stamped the word birthday from the Happy Sayings set in the bottom right corner and then I adhered the Scalloped Circle Frame flowers using liquid glue.

After I die cut the word Hoppy using the Cutie Alphabet die set, I colored the letters using a yellow marker and adhered them to the front of the card.

I added some foam tape to the back of my frog and and adhered him in place. The final touch was to add a few sequins scattered about and Viola! All done!

Thanks for stopping by today!

Supplies used:

10