Monday, August 31, 2020

Whimsy Stamps Build A Graveyard Die Set - Create a Treat Box for Halloween

Oh, hi! I'm super excited to share these little treat boxes today. I used the new Build-a-Graveyard Die Set and Sheets & Giggles Stamp Set by Whimsy Stamps.


{Supplies used are linked in the text in this post. Compensated affiliate links may be used at no additional cost to you. Thank you for your support!}


You can see how they came together in the video. All the measurements and a full list of supplies are listed in the YouTube description box.

Thanks for stopping by today!

Friday, August 28, 2020

SumMore Fun | Ghost Pack | 5 Cards - 1 Kit

ETA - The Ghost Pack sold out, BUT you can still get the stamps here and here.


Oh, hi! I'm super excited to share The Ghost Pack by SumMore Fun Stamps! This kit is soooooooo fun! Limited quantities are available, so hurry hurry! This kit will sell out fast!


{Supplies used are linked in the text in this post. Compensated affiliate links may be used at no additional cost to you. Thank you for your support!}


You can see how all five cards came together in the video.  A full list of supplies and Copic Markers used can be found in the video description.

Thanks for visiting today!

Thursday, August 27, 2020

Whimsy Stamps Slimline Video Hop! And a Giveaway!

Oh, hi! I'm hopping along with the Whimsy Stamps' Team today and we are all showcasing the fabulous Slimline Dies available from Whimsy Stamps. And, one lucky commenter will win a $25.00 Gift Certificate to WhimsyStamps.com!

All the deets for the giveaway can be found here.

I decided to create a Slimline Easel Card using the super fun Slimline Pillows Die and the ever so cute Best Fishes Stamp set.

You can see how the card came together in the video.


{Supplies used are linked in the text in this post. Compensated affiliate links may be used at no additional cost to you. Thank you for your support!}


Thanks for stopping by today!

Whimsy Stamps Halloweeds - A Bonus Card!

Oh, hi! I have a quick post today sharing the Bonus Card that I was able to create from all the leftover bits and pieces when I made this card.


{Supplies used are linked in the text in this post. Compensated affiliate links may be used at no additional cost to you. Thank you for your support!}

I die-cut the patterned paper with the largest Wonky Stitched Rectangle Die and adhered that to a black notecard.  I put foam tape on the back of the Halloweeds and arranged them on the front of the card. I made sure to leave space between the second and third rows of "weeds" so I could add my sentiment.

I stamped the sentiment onto a piece of black cardstock with VersaMark Ink and then coated it with Detail White Embossing Powder. After I heat set the sentiment, I ran it through my Gemini, Jr. Die-Cutting machine with one of the dies from the Quick Strips die set.  I put foam tape on the back of the sentiment strip and added it to the front of the card and, Viola! All done!

Supplies Used:


Copics Used:

Skull - BV23, BV31, B60
Jack-O-Lantern - YR18, YR07, YR15
Leaves - YG67, YG63

Thanks for stopping by today!

Wednesday, August 26, 2020

Pull Out Fun Fold Card - A Collaboration with Marla

Oh, hi! It's time for another collaboration with my friend Marla from MAD About Cards & Crafts. This month we decided to create a fun fold card with a Fall theme.

I used the super cute Happy Fall stamp set by Not 2 Shabby. That crow! He's just adorable!

{Supplies used are linked in the text in this post. Compensated affiliate links may be used at no additional cost to you. Thank you for your support!}

It was rather difficult to take pictures of this card because of the fun fold, but you can see how it all came together in the video.  I also have all the measurements and supplies I used in the video description box.


Thanks for visiting today!

Tuesday, August 25, 2020

Chills, Shivers, & Goosebumps!

Oh, hi! I'm over on the Whimsy Stamps YouTube Channel today featuring the new Chills, Shivers & Goosebumps die set. I'm sharing a fun way to add interest to an ink blended background. Of course, I had to add a row of Halloweeds because, of course they would bloom at night!


{Supplies used are linked in the text in this post. Compensated affiliate links may be used at no additional cost to you. Thank you for your support!}

Supplies Used:

Distress Oxide Inks:

Copics Used:

Skull - BV23, BV31, B60
Jack-O-Lantern - YR18, YR07, YR15
Leaves - YG67, YG63

Thanks for stopping by today!

Not 2 Shabby Giveaway Hop - Scene Building Card Ideas

Oh, hi! I'm super excited to be a part of the Not 2 Shabby Giveaway Hop! The theme for this hop is to create a scene using two sets from Not 2 Shabby shop.

{Supplies used are linked in the text in this post. Compensated affiliate links may be used at no additional cost to you. Thank you for your support!}


You can see how my card came together in the video. This is where you'll also find the next person in the hop, the details for the giveaway, and a list of supplies I used.

Thanks for stopping by today!

Saturday, August 22, 2020

One More Sugar Skull Card

 Oh, hi! I told ya I was having fun with this set by Whimsy Stamps. .. here's one more card for you:

{Supplies used are linked in the text in this post. Compensated affiliate links may be used at no additional cost to you. Thank you for your support!}

I stamped the image with Memento Tuxedo Black ink onto Cougar Super Smooth card stock and colored her up with my Copics.  Then I ran the image through my Brother Scan N' Cut machine to be cut out. (I'm seriously in awe how well that thing cuts around those swirly bits of hair!)

The card was easy to put together. . . I used an orange top folding A2 sized notecard. I cut a piece of dark teal card stock to 4" x 5 1/8" and rounded the bottom right corner with a corner punch. I cut the patterned paper to 3 3/4" x 4 7/8" and rounded the bottom right corner.  I adhered both of those pieces to the card base.

I used the Rounded Rectangle Die to cut the white rectangle and then cut another piece of dark teal cardstock just slightly larger than the white rectangle.  I used my corner rounder (again) on the dark teal rectangle).

Of course, I put foam tape on the Sugar Skull Beauty and adhered her to the white rectangle. I adhered all those layers to the front of the card . . . and Viola! All done!

Which of the three cards was your favorite? You can see the other two cards here and here.

Copics Used:

Face - BG78, BG18, BG57, BG53, C3, C1, C0

Neck & Hands - E53, E50

Dress - BG78, BG18, BG57, BG53, C7, C5, C3, C1, C0

Roses - R89, R29, RV29

Hair - BV29, BV25, B39, B37

Heart & Flames - R59, RV29, YR09, Y15

Thanks for stopping by today!

Friday, August 21, 2020

More Sugar Skull Beauties

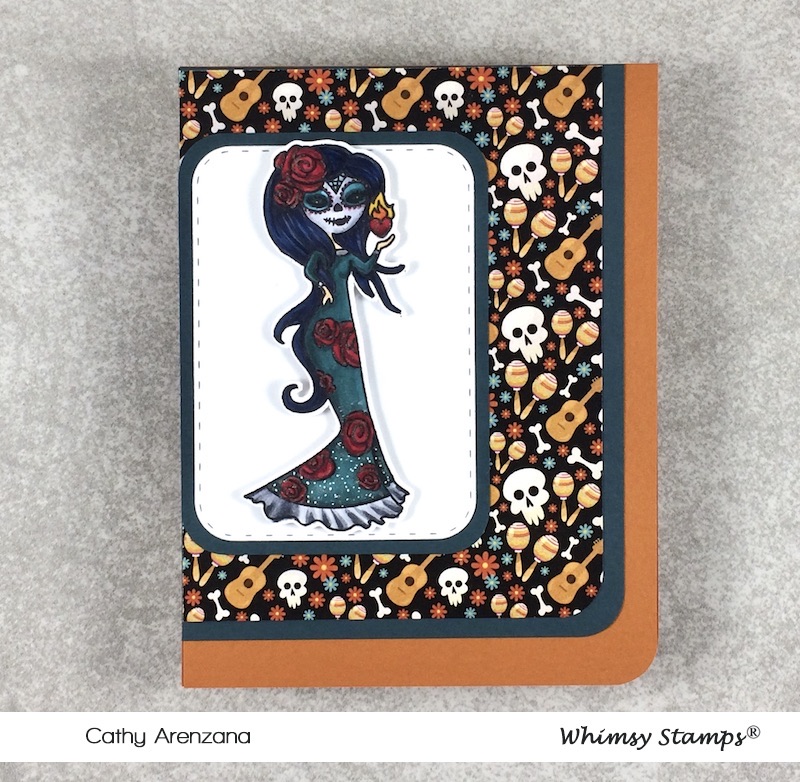
Oh, hi! I've got another card using the Sugar Skull Beauties stamp set and Sugar Skull Paper Pack by Whimsy Stamps today. I've had so much fun coloring up these images!

{Supplies used are linked in the text in this post. Compensated affiliate links may be used at no additional cost to you. Thank you for your support!}

I decided to create a Triangle Fun Fold for this card base. It's really easy to do!

1. Start with a piece of 8 1/2" x 11" cardstock. With the 8 1/2" side at the top of your scoreboard, score at 4 1/4". Then rotate the cardstock so the 11" side is at the top of the scoreboard and score at 5 1/2".

2. Using a craft knife, cut on a diagonal from the upper right corner down to the lower left corner.  You'll actually end up with two cards bases!

3. Fold and burnish the score lines and Viola! You have a Triangle Fun Fold Card.

To finish up my card, I cut the patterned paper down to 4" x 5 1/4" and then cut it at a diagonal.  I adhered each triangle to the card base.

I cut a piece of yellow cardstock with a Wonky Stitched Rectangle Die. I put foam tape on the Sugar Skull Beauty and adhered her to the yellow rectangle.

To adhere the rectangle to the front of the card, I only put adhesive on the bottom edge and about 2/3 up on the right edge.  Any more adhesive than that and I would've glued my card shut. So, definitely keep that in mind when you create your Triangle Fun Fold Card.

Copics Used:

Face - C3, C1, C0, BG78, BG18, BG57, E52, E50

Hair - BV29, V09, V05, RV66, RV04, V01

Dress & Hat - BG18, BG49, BG13, BG07, BG32, BG11, BG0000, Y38, Y17, Y15

Candles and Flowers - Y17, Y15, Y06, YR04

Thanks for visiting today!


Thursday, August 20, 2020

Stretching Your Stencils - Using a Water Stencil for Animal Print & a Giraffe Stencil for Water

Oh, hi! I'm collaborating with my friend Cyn from Stampin' Munchkins today. We decided to use stencils for our collaboration and I'll be sharing how to use a water stencil as animal print and an animal print stencil as water.

{Supplies used are linked in the text in this post. Compensated affiliate links may be used at no additional cost to you. Thank you for your support!}


You can see how the cards came together in the video.

A full list of supplies is available in the video description box.

Thanks for stopping by today!

Wednesday, August 19, 2020

Whimsy Stamps Sugar Skull Beauties & Sugar Skull Paper

Oh, hi! Did you see the new Whimsy Stamps mini-release??  I've got a card to share using the new Sugar Skull Beauties and Sugar Skull Paper Pack.


{Supplies used are linked in the text in this post. Compensated affiliate links may be used at no additional cost to you. Thank you for your support!}

I stamped the images in Memento Tuxedo Black ink onto Cougar Super Smooth cardstock, colored them with my Copics and had my Scan n' Cut machine cut out the images.  

I trimmed the skull paper down to 5 3/8" x 4 1/8" and adhered that to a pink notecard. I adhered a white strip of cardstock to a pink strip of cardstock and adhered that to the front of the card.

I thought the images needed to have something behind them to make them stand out more, so I die cut three black circles. I put foam tape on the back of the images and adhered them to the circles and then adhered the circles to the front of the card. Viola! All done.

Copics Used:

Candles - RV09, RV06, RV04, YR04, Y15

Skull - C5, C3, C1, C00

Flowers - RV09, RV06, RV04, YG25, YG03, YG67

Thanks for stopping by today!

Easy-Peasy Test Tube Halloween Treat Holders

Oh, hi! I'm over on the Whimsy Stamps YouTube Channel today sharing how to create these super cute (and easy!) test tube treat holders featuring the Spooks & Spells Stamp Set.


{Supplies used are linked in the text in this post. Compensated affiliate links may be used at no additional cost to you. Thank you for your support!}

You can see just how easy they are to create in the video.

And, for easy reference, here are the measurements:

For the test tube sleeves:

Cardstock measures 2 1/4" x 3 1/8"
Score at 5/8", 1 1/4", 1 7/8", and 2 1/2"

For the carrier:

Cardstock measures 3 1/2" x 9 1/2"
Score at 3/4" and 2 3/4" on the 3 1/2" side
Score at 2 3/4" and 3 1/2", and a partial score at 6 1/4" on the 9 1/2" side

The labels on the test tubes read "Eye of Newt," "Lizard Tails," and "Frog Toes."

I tried creating the labels a couple of different ways, but I found that printing them out on regular printer paper works best.  Card stock is just too thick and it didn't want to stay put.

I did ink up the labels with Vintage Photo Distress Ink just to "age" them . . .and used my trust tape runner to adhere them to the test tubes.

Supplies used:

Black Licorice Card Stock
Gray Card Stock
Yellow Card Stock
Red Embossing Powder

Copics Used:

Bat - BG49, BG57, BG15, R30, C1, 0
Witch Boots - BV08, BV04, BV01
Stockings - G05, G28, YR18, YR16
Buckle - Y15
Strap - C7
Spider - BV23, BV31
Dirt - E31, E35, E34, E37, E49

Thanks for stopping by today!

Friday, August 14, 2020

#N2SFALLRELEASE Inspiration Hop & Giveaway!

Oh, hi! I'm excited to be a part of the Not 2 Shabby Fall Release Inspiration Hop today!

I decided to use the Pumpkin Spice Everything stamp set and create two fun-fold cards . . .one of which is a gift card holder!

Speaking of gift cards. . . Jamie from Not 2 Shabby will be giving away THREE gift certificates during the hop, so be sure to check out my video for all the deets! And. . .that's where you'll also find the list of supplies I used and the Copic Markers I used to color up both of the images.

{Supplies used are linked in the text in this post. Compensated affiliate links may be used at no additional cost to you. Thank you for your support!}


Enjoy the hop and thanks for stopping by today!

Wednesday, August 12, 2020

Quick & Easy Halloween Banner

Oh, hi! I'm over on the Whimsy Stamps YouTube Channel today and I'll be sharing how to create a quick and easy Halloween Banner featuring the new Halloweeds Stamp Set and the Large Spooky Word Die.

{Supplies used are linked in the text in this post. Compensated affiliate links may be used at no additional cost to you. Thank you for your support!}


Products used:

Halloweeds Stamp Set Large Spooky Word Die Rounded Rectangle Die Set Starring Hearts Paper Pack Licorice Paper Pack Cougar Super Smooth Card Stock
110# Neenah Classic Crest Card Stock
Memento Tuxedo Black Ink
Catherine Pooler Lime Rickey Ink
Copic Markers
Ad-Tech Adhesive
Nuvo Deluxe Adhesive
Foam Tape
Wink of Stella Glitter Pen
Oval Dies
Brother Scan N' Cut
Gemini Jr. Die Cutting Machine

Copics Used:

Skulls - C5, C3, C1, 0
Pumpkin - YR18, YR07, YR16, YG17
Leaves - YG17, YG03
Eyeball - R20, C3, 0, YG17, YG03
Candy Corn - YR07, Y15
Dandeliions - C3, C1
Jar - C5, C1, C1, Y02, Y11

Thanks for stopping by today!

Monday, August 10, 2020

Whimsy Stamps Alfadoodles & Spooks and Spells

Oh, hi! I've got a cute Halloween card to share today using the new Spooks and Spells stamp set by Whimsy Stamps. . .and I'll also be sharing a few tips on how to line up alphabet stamps.

{Supplies used are linked in the text in this post. Compensated affiliate links may be used at no additional cost to you. Thank you for your support!}
You can see a full list of supplies and how this card came together over on YouTube.

Thanks for stopping by today!

Thursday, August 6, 2020

New Release from Not 2 Shabby!

Oh, hi! I'm so excited to share three cards using one of four new stamp sets from Not 2 Shabby! These stamp sets are sooooo cute!!

{Supplies used are linked in the text in this post. Compensated affiliate links may be used at no additional cost to you. Thank you for your support!}
And you can purchase the "I Want it All" Bundle at a discount!


For a full list of supplies used and to see how the cards came together, check out the video.

Thank you for stopping by today!
10