About Me

Showing posts with label Cards. Show all posts

Sunday, September 12, 2021

Whimsy Stamps Just Chicken In - STAMPtember 2021 Exclusive

Oh, hi! I'm super excited to share Whimsy Stamps STAMPtember Exclusive Stamp & Die Set!

Now, I gotta let you know right now that this is limited edition, and once they're gone, they are gone. . .sooooo, hurry! hurry! Get yours today!

You can grab the Just Chicken In stamp set HERE . . . or . . . grab the Just Chicken In stamp set and coordinating dies HERE.

This super cute set just makes me smile. And it can be used for just about anything!

For my first card, I randomly stamped the little chicks, but decided to color around the chicks to have some good contrast. I colored up the rooster and used the coordinating die to cut him out and popped him up with some foam tape on a die-cut hexagon. The patterned paper is from the Slimline Buttercup Paper Pack. I thought the gingham pattern with little flowers was perfect for this card. 

Supplies used are linked in the text in this post. Compensated affiliate links may be used at no additional cost to you. Thank you for your support!}

For my second card, I stamped and colored up all the chickens and cut them out with the coordinating dies. I used the Slimline Cornered Rectangles Die set to create a frame, and used another piece of cardstock from the Slimline Buttercup Paper Pack . . because well. . .it just works so well with these stamps! 


Supplies used:

Whimsy Stamps Just Chicken In Stamps & Dies

Whimsy Stamps Slimline Buttercup paper Pack

Whimsy Stamps Nested Hexagon Die Set

Whimsy Stamps Slimline Cornered Rectangles Die Set

Whimsy Stamps Simple Sentiments Die Set


Copics Used:

Rooster - R59, R56, YR27, YR24, YR23, E42, E41, E40

Chicken - R59, R56, YR23, Y32, YR21

Chicks - Y19, Y15, Y08, YR68

Nest - YR27, YR24, YR23, Y21

Eggs - E42, E41, E40

Background - B34


Thanks for stopping by today!

Monday, July 12, 2021

Hey, You! Yes, You! YOU Are Awesome!

 Oh, hi! I just wanted to let you know that . . . YOU are awesome!


Supplies used are linked in the text in this post. Compensated affiliate links may be used at no additional cost to you. Thank you for your support!}

When I first saw this bear from the On A Roll stamp set, I knew exactly what I wanted to do. I wanted a really bright and cheery background, so I started out by using Orange Glow Neon Glitz Gel with the Speckled Star stencil.

While that panel was drying, I colored up that little bear with my Copics (colors listed below) and then ran him through my Scan n Cut. I stamped and embossed the sentiment "You Are" and then die-cut it with the Simple Sentiment die set.

Next, I die-cut the word "Awesome" three times from navy blue cardstock and stacked them up for added dimension.

Once my stenciled panel was dry, I ran it through my Gemini, Jr. with a Wonky Stitched Rectangle Die and adhered it to a navy blue card base. I used liquid glue to adhere the sentiment strip and die-cut word and added foam tape to the bear and, Viola! All done!

Supplies used:

Whimsy Stamps On A Roll Stamp Set

Whimsy Stamps Speckled Star Stencil

Whimsy Stamps Awesome Word Die

Whimsy Stamps Wonky Stitched Rectangle Die Set

Simple Sentiment Die Set

Cougar Super Smooth Cardstock

Neenah Classic Crest Cardstock

Orange Glow Glitz Gel

Stencil Pal


Copics Used:

Bear - W3, W2, W1, W0, R20

Skateboard - B32, R17, YR04, Y08, N3, B18, B24, B23

Wheels - C5, BV29, BV25, C3


Thanks for stopping by today!

Sunday, July 11, 2021

The Pretty Card

Oh, hi! Here's my third card using the Animal Tiles stamp set. If you missed the first two, you can see them here and here.

Supplies used are linked in the text in this post. Compensated affiliate links may be used at no additional cost to you. Thank you for your support!}

For this card, I started out by using the Teardrop Splash stencil with Cummerbund ink for my background. Then I die-cut that panel using the Wonky Stitched Rectangle Die Set and adhered it to the front of a top folding notecard.

Next, I stamped the lily pad and the lotus flower three times each onto Cougar Super Smooth cardstock and then colored them up with Copics.

I trimmed them down and arranged them on the front of the card. Then I decided to add a strip of turquoise cardstock on the left side. After I adhered that strip of cardstock, I adhered the stamped and colored images to the front using foam squares.

I stamped and heat embossed the sentiment using the Simple Sentiments stamp set and used the coordinating die to cut it out. I adhered that to the card front with foam tape as well, and Viola! All done!

Supplies used:

Whimsy Stamps Animal Tiles Stamp Set

Whimsy Stamps Teardrop Splash Stencil

Whimsy Stamps Simple Sentiments Stamp Set 

Whimsy Stamps Simple Sentiments Die Set

Whimsy Stamps Wonky Stitched Rectangle Die Set

Memento Tuxedo Black Ink

Catherine Pooler Cummerbund Ink

Ink Blending Brush

Cougar Super Smooth Cardstock

Copic Markers

Tuesday, July 6, 2021

Animal Tiles - Card 2

Oh, hi! So, in my last post I shared a card using the super cute frog from the Animal Tiles stamp set. Today, I'm sharing another card using the same set, but this one has a more masculine feel to it. 


Supplies used are linked in the text in this post. Compensated affiliate links may be used at no additional cost to you. Thank you for your support!}

I absolutely love how versatile this set is . . . the images range from cute to masculine to pretty (which I'll be sharing a pretty card later).

Anywhooooo..... for this card I stamped the Koi fish in Versamark ink and heat embossed the images with gold embossing powder. Then I used my Zig Clean Color Brush markers to color them in. I also colored around the fish with a light blue pen for a watery look.

I cut the images down and rounded the corners. Next I adhered them to some gold glitter cardstock that I had cut to be just slightly larger, and also rounded the corners.

For the background, I ran a piece of navy cardstock through my Gemini Jr. with one of the Slimline Cornered Rectangles dies.  After that, I used the Slimline Scribbles background stamp and stamped it using Juniper Mist ink, and then again with Unicorn White ink.

I stamped Especially for You from the Simple Sentiments stamp set and used the coordinating die to cut it out.

I adhered the navy panel to a piece of light blue cardstock that measure 3.25" x 8.25" and then adhered that to my card base, which measures 3.5" x 8.5".

I added foam tape to the back of the Koi fish and the sentiment and adhered those to the front of the card, and Viola! All done!

Thanks for visiting today!


Supplies Used:

Whimsy Stamps Animal Tiles

Whimsy Stamps Slimline Scribbles Background stamp

Whimsy Stamps Simple Sentiments

Whimsy Stamps Simple Sentiments Die Set

Whimsy Stamps Slimline Cornered Rectangles Die Set

Strathmore Watercolor Card Stock

Versamark Ink

VersaFine Onyx Black Ink

Catherine Pooler Juniper Mist Ink

Hero Arts Unicorn White Ink

Gemini Jr

Zig Clean Color Brush Markers - Scarlet Red, Pale Orange and Haze Blue

Thursday, July 1, 2021

Hoppy Birthday to You!

 Oh, hi! I think this little frog from the Animal Tiles stamps set by Whimsy Stamps is ever.so.cute! And he also pairs quite nicely with the Cutie Alphabet die set . . .and the Scallop Circle Frame die set, too.

Supplies used are linked in the text in this post. Compensated affiliate links may be used at no additional cost to you. Thank you for your support!}
I started out by stamping and coloring the little frog with my Copics (YG23, YG03, YG01, YG00, R20). I fussy cut him out and set him aside.

I used the smallest die from the Scalloped Circle Frame Die Set and die cut that five times and set those aside.

To create the frame, I cut a piece of cardstock from the Rainbow Paper Pack down to 4" x 5.25" and then cut out the center using the second largest die from the Wonky Stitched Rectangle Die Set. I adhered the frame to a top folding A2 sized white notecard using 1/8" foam strips.

Next I stamped the word birthday from the Happy Sayings set in the bottom right corner and then I adhered the Scalloped Circle Frame flowers using liquid glue.

After I die cut the word Hoppy using the Cutie Alphabet die set, I colored the letters using a yellow marker and adhered them to the front of the card.

I added some foam tape to the back of my frog and and adhered him in place. The final touch was to add a few sequins scattered about and Viola! All done!

Thanks for stopping by today!

Supplies used:

Friday, June 11, 2021

It's a Good Day . . .

Oh, hi! Have you seen the new Cutie Alphabet Die Set by Whimsy Stamps?? I just love how whimsical it is . . and I think it pairs quite nicely with the new Scribbles Background Stamp, too!


Supplies used are linked in the text in this post. Compensated affiliate links may be used at no additional cost to you. Thank you for your support!}

I started out by stamping the Scribbles Background onto a piece of Cougar Super Smooth cardstock with Versamark ink. Then I covered it with Detail White Embossing Powder and heat set it with my heat tool.

Next, I did a bit of ink blending using make-up brushes with Catherine Pooler inks in Sweet Sixteen, It's a Boy, Garden Party, Limoncello, Bellini, and It's a Girl.

Next I ran my ink blended panel through my Gemini, Jr with the new Slimline Cornered Rectangle Dies.

I die-cut the words using the Cutie Alphabet Die Set and used foam tape to adhere them to my ink blended panel. I adhered that to a piece of black cardstock, and then adhered that to the front of my card base. Ta-Da! All done!

Supplies used:

Whimsy Stamps Scribbles Background Stamp

Whimsy Stamps Slimline Cornered Rectangles Die Set

Whimsy Stamps Cutie Alphabet Die Set

Catherine Pooler Sweet Sixteen Ink

Catherine Pooler It's a Boy Ink 

Catherine Pooler Garden Party Ink

Catherine Pooler Limoncello Ink

Catherine Pooler Bellini Ink

Catherine Pooler It's a Girl Ink


Thanks for stopping by today!

Saturday, May 1, 2021

Sometimes, You Just Gotta Color...

Oh, hi! The new Gerbera Daisy stamp & die set by Whimsy Stamps just made my heart flutter! I couldn't wait to sit down and color it . . . so I did . .. three times . . . three different ways.

For my first card, I reached for my trusty Copics (colors used are listed below). I've been practicing underpainting and I love how this turned out.

Supplies used are linked in the text in this post. Compensated affiliate links may be used at no additional cost to you. Thank you for your support!}
For my second card, I thought I'd try out my new Zig Clean Color Brush Markers (colors used are listed below). Watercoloring is not one of my strengths, but I thought I'd give it a shot . . .I figured I could do "loose" watercoloring to warm up a bit. The colors are much softer, but I really like how this turned out, too . .. especially because I usually struggle with watercolor.


For my third card, I decided to only color some of the flowers . . . because you don't always have to color everything. And, I used my Zigs for this card, too. I wasn't too sure how the silver embossing would look, but I was pleasantly surprised.

I also used the coordinating border die to cut up along the top of the flowers, and to add some texture, I stamped the Tartan Plaid background stamp onto pink paper with Hero Arts Unicorn White Pigment Ink.

And. . .since I embossed the image in silver, I thought a silver frame around the sentiment would tie it all together.


Supplies used:


Copics used:

Sky - BG000
Purple Flowers - BV02, BV00, B60
Tall Purple Flowers - B63, B66, B60, BV31
Red Flowers - R17, R14, R02, underpainted with B32
Peach Flowers - YR02, E95, YR00, E99, Y19, Y08, Y06, underpainted with B00
Yellow Flowers - Y19, Y08, Y06, underpainted with BV000
Leaves - BG75, BG72, YG61, BG90, YG67, YG17, G24, YG63
Berries - BG72, BG90

Zig Brush Markers used:

Pink, Orange, Yellow, Light Green, Persian Green, Light Violet, Pale Violet, Shadow Mauve, English Lavender, Light Brown, Pale Gray

Zig Brush Markers used on silver embossed flowers:

Pink, Yellow

Thanks for stopping by today!

Monday, April 19, 2021

Whimsy Stamps Build a Castle Die Set

Oh, hi! I'm so excited about this one that I don't even know where to start! You guys!! The Build a Castle Die Set from Whimsy Stamps is soooooooooo awesome! And it can be used soooooo many different ways!

For this card, I decided to create a castle that would fill up the entire front of my slimline card. I die-cut the main castle pieces from Barely Grey cardstock, the trim, turrets, flags and banner from Blu Raspberry cardstock, the wall from Real Grey cardstock and the dragons from Smoke Grey cardstock.

Supplies used are linked in the text in this post. Compensated affiliate links may be used at no additional cost to you. Thank you for your support!}


After I adhered all my castle pieces together, I adhered that to a piece of patterned paper from the Slimline Enchanted Kingdom paper pack and then adhered the dragons, and finally adhered that to my card base, which is made from Pure White cardstock. Ta-da! All done!

But wait! Not all castles have to be grey! After all . . .I think unicorns would have a PINK castle! So I die-cut the castle this time using Cotton Candy cardstock for the main castle and Razzleberry for the turrets, trim, flag and banner.


I die-cut the Slimline Cloud die from Pure White cardstock and adhered that to a Pink Lemonade card base. Next I adhered my castle and added two more clouds to the bottom of the castle.

I colored up those sweet unicorns from the Unicorn Wishes stamp set and cut them out using my Brother Scan N Cut and adhered them using foam tape. Viola! All done.

Oh . . but wait. . .here comes the darker side of things . . . . and I didn't even use the any of the castle dies for this one. . . I only used the border die and the dragons.


I did add some texture to the "wall" using the Brick Pattern stencil and for the sky, I used Speckled Egg, Chipped Sapphire and Crackling Campfire Distress Oxide inks. To create the clouds, I just "swooshed" a wet paint brush in random spots. . .I added some splatter using my white Zig Brush Pen and BOOM! All done!

So . .. there ya have it! Three very different ways to use the Build a Castle Die Set . . .and don't be surprised if you happen to see a card with a purple and silver castle inhabited by fairies . . . .

Supplies used:


Thanks for stopping by today!

Thursday, March 25, 2021

Whimsy Stamps & Cardstock Warehouse IG Hop

Oh, hi! Cardstock Warehouse and Whimsy Stamps have teamed up for a week-long Instagram Hop filled with inspiration and prizes!  

Now, you all know I ADORE Whimsy Stamps . . .but guess what?!?  I've been using Cardstock Warehouse card stock for quite some time now, so I was super excited about this collaboration, because I LOVE their cardstock!


If you're looking for high-quality card stock in a fantastic variety of colors, weights, and finishes, you've gotta check out their site.

Now. . . about the hop . . . be sure to visit each stop on the hop every day. The more stops you visit, the better your chances of winning! (Click here to head on over to Instagram)

Each company is providing a $25 gift certificate and will select their winner randomly and post the winner on Monday, March 29th.  The giveaway is open until midnight EST on Saturday, March 27th.

Anywho . . . onto my card:

Supplies used are linked in the text in this post. Compensated affiliate links may be used at no additional cost to you. Thank you for your support!}

I used the Whimsy Stamps Slimline Birthday Scallops Die set and die-cut the candles from Pure White card stock and Smoke Grey card stock and adhered them together. I die-cut the candle flames from Pure White card stock and colored them with my Copics.

I die-cut the Happy word once from Banana Split cardstock and once from Dark Grey cardstock, and when I adhered them together, I off-set the yellow die-cut just a bit so there would be a grey shadow behind it.

Next, I used the Lattice A2 Die and die-cut it from Lemon Drop card stock, but left all the little pieces in place. Then, I die-cut that panel using a Rounded Rectangle Die and adhered it to a white Rounded Rectangle die-cut.

I arranged the candles on the front and glued them down. Next, I adhered that to a card base made from Dark Grey card stock. I used a corner rounder on my card base to match the rounded corners on my other pieces.

Next, I stamped the word birthday with VersFine Clair Morning Mist ink and die-cut it with a banner die. I adhered that to the front of my card, and then added a few of the grey dots left over from the candles to draw more attention to the sentiment strip.

The final step was to add some shimmer to the candle flames, and Viola! All done!

Thanks for stopping by!

Monday, March 22, 2021

Zen Garden - Four Ways

Oh, hi! I am loving the Zen Garden stamp by Whimsy Stamps! There are so many different ways it can be used!

For this card, I stamped the image and left it black and white and decided to add a colorful background with my Copic markers:

Supplies used are linked in the text in this post. Compensated affiliate links may be used at no additional cost to you. Thank you for your support!}

After I had the background colored, I stamped and embossed a sentiment from the Mini Everyday Sentiment set and used my white gel pen to add a few dots on either side of the sentiment.

Copics used: R22, YR02, Y21, G02, BG13, BV13, Colorless Blender

For my next card, I only stamped the blooms on the outer edge of a piece of card stock and embossed them with white embossing powder. Then I did a bit of easy watercoloring with my water brushes.

After the panel was dry, I ran it through my Gemini, Jr. with a Wonky Stitched Rectangle Die and adhered it to a piece of pink card stock cut slightly larger, and then adhered that to the front of my card base. Then, I adhered the  die-cut birthday word and die-cut shadow to the front. I also stamped and embossed the word "wishes" from the Your Birthday stamp set and fussy cut it.

Waterbrushes used: Cadmium Orange, Bumble Bee Yellow, Lemon Yellow, Teal, Turtle Green, Rouge Pink, Bubble Gum Pink

For my third card, I wanted to use the new Slimline Pocket Die, so after I stamped and colored the Zen Garden stamp, I fussy cut the flowers and a few leaves and arranged them on the pocket.

For the pocket, after I die-cut it from dark blue cardstock, I used my white gel pen to accentuate the stitching detail around the edge.

I cut a piece of patterned paper from the Eggstra Bunnies paper pack just slightly smaller than my card base and adhered it to the front of my card. Then I adhered the pocket to the front of my card.

Copics used:

Sunflower - Y19, Y17, Y08, Y11, YR24, E49, E47, E37, E35, E34, YG00
Pink Flower - R22, R20, Y08, Y13
Teal Flower - BG13, G02, BG10
Leaves - YG17, YG03, YG01

And finally. . .for my last card, I did a bit of simple masking by stamping the super cute Gnome from the Gnome Gardeners stamp set, masked him with a piece of masking paper and then stamped the Zen Garden over it.


Then I colored it up with my Copics, ran it through by die-cut machine with a Wonky Stitched Rectangle die and adhered it to a top folding notecard.

Copics used:

Sunflower - Y19, Y15, Y13, E49, E47, E37, E35, E34, YG00
Pink Flower - R22, R20, Y08, Y13
Teal Flower - BG13, G02, BG10, Y08, Y13
Leaves - YG17, YG03, YG01
Fence - E29, E37, E35, E34
Gnome - E11, E53, E51, C5, C3, C1, YR18, YR09, YR07
Shovel - E34, C5, C3, C1
Gnome's Flowers - Y08, Y11, YG67, YG63
Grass - YG67, YG17, YG03
Sky - B000

Supplies Used:


Thanks for stopping by today!

Saturday, February 13, 2021

Gnome One Else

Oh, hi! I'm back with another card using the super cute Gnome One Else stamp set. This time these two cuties are are enjoying a day in an enchanted forest.

Supplies used are linked in the text in this post. Compensated affiliate links may be used at no additional cost to you. Thank you for your support!}


I started out stamping the gnomes onto Cougar Super Smooth card stock and colored them with my Copics. Then I fussy cut them out.

I trimmed a piece of the Enchanted Forest background paper down to fit the front of a slime line card that measures 3.5" x 8.5".

Next I cut a piece of green card stock using the grassy border die from the Build a Fairy Garden die set. I also cut some mushrooms from the same die set. I adhered the grassy border to the patterned paper, making sure to not add adhesive to the top of the grassy border so I could tuck the mushrooms behind it.

Next, I adhered the gnomes and thought it still needed something . . . so I added some flowers and butterflies that I had die-cut from the Slimline Scallop Pocket Die.

Once I had everything adhered down, I added that to the front of my card base.

Supplies Used:

Whimsy Stamps Gnome One Else stamp set

Whimsy Stamps Enchanted Forest Paper Pack

Whimsy Stamps Build a Fairy Garden Die Set

Whimsy Stamps Slimline Scallop Pocket Die


Copics Used:

Boy Gnome - BG75, BG18, BG72, E13, E21, E51, E27, E25, E35, E33

Girl Gnome - YR65, E95, YR02, R12, E13, E21, E51,Y26, YR21, YR20, E27, E23

Mushroom - E43, E42, E41, R59, R24, R14, White Gel Pen

Flower R22, R12, Y15


Thanks for visiting today!

Friday, February 5, 2021

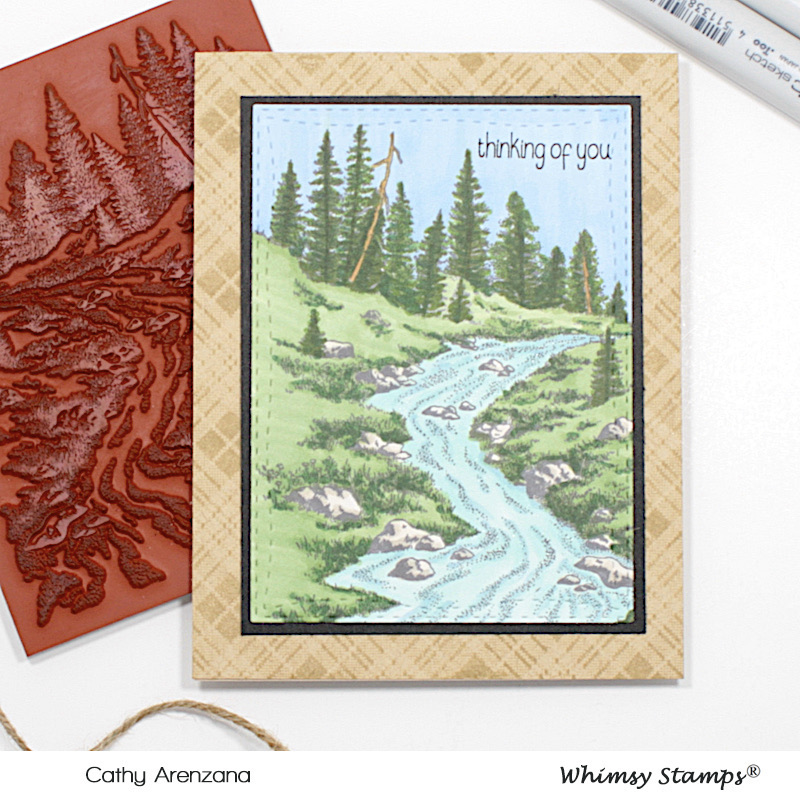
Whimsy Stamps Forest Stream

 Oh, hi! I've got a masculine card to share today. I know it appears like there's a whole lot of coloring going on, but this Forest Stream stamp by Whimsy was so easy to color! And I love all the detail on this stamp . . .which is what really made it so easy to color.

{Supplies used are linked in the text in this post. Compensated affiliate links may be used at no additional cost to you. Thank you for your support!}

I started out by stamping the image using Memento Gray Flannel Ink onto Cougar Super Smooth Cardstock. By using the gray ink, it softened the lines a bit so I kind of got a no-line coloring look.

Next . . . yep. .. you guessed it. I colored the image with my Copics and then ran the panel through my Gemini, Jr. with a Wonky Stitched Rectangle Die. I adhered that to a piece of black cardstock cut just a a little bit bigger.

Before adding it to the front of my card base, I decided to add a bit of texture by stamping the Tartan Plaid Background stamp using Kraft ink. I think the background stamp is just what I needed to make this card have a more masculine feel.

After I stamped that background and adhered my stamped and colored image to the front, I finished it up with a simple sentiment and added the smallest amount of shimmer on the stream with my Wink of Stella Glitter pen. Viola! All done!

I've also used this stamp for a few other cards, too . . 


You can see how I created these two cards here.


Thanks for stopping by today!

Products used:

Whimsy Stamps Forest Stream Cling Stamp

Whimsy Stamps Tartan Plaid Background Stamp

Whimsy Stamps Everyday Mini-Sentiments Stamp Set

Whimsy Stamps Wonky Stitched Rectangle Dies

Cougar Super Smooth Card Stock

Cardstock Warehouse Speckled Oatmeal Card Stock

Cardstock Warehouse Black Licorice Card Stock

Memento Gray Flannel Ink

Copics Used:

Grass - G21, G24, G28

Rocks - W3, W2, W1

Trees - YG67, G28

Tree Trunks - E35

Sky - B21

Water - BG11, BG10, BG0000, B52

Tuesday, January 12, 2021

Valentine Schmalentine

Oh, hi! If you know me, you know that Halloween is my favorite holiday. . . but did you know that Valentine's Day is my second favorite holiday? I love all the hearts and red and (dare I say) pink! And as much as I love a super cute Valentine's Day card. . . .I do love a good snarky card, too. Case in point:

{Supplies used are linked in the text in this post. Compensated affiliate links may be used at no additional cost to you. Thank you for your support!}

I love the look on this lady's face from the new Nope stamp set by Whimsy Stamps. She just cracks me up. And even though I did a bit of paper piecing for her shirt using paper from the Heart to Heart paper pack, I just had to use a snarky sentiment from the Kiss Off stamp set.

No, really . . .I was able to get red, pink, hearts and snark all in one card!

And it came together pretty quickly, too. I did a bit of copic coloring on her face, hair, and glasses. I paper pieced her shirt and then fussy cut the image.

I stamped the sentiment in black ink (just to make sure she's getting her point across) onto a piece of pink card stock and die cut it using the Rounded Rectangle die set. I adhered that to a darker piece of pink paper just a tad bit bigger and rounded the corners with a punch.

I adhered a pink strip of cardstock on top of two different patterns from the Heart to Heart paper pack and then used a Wonky Stitched Rectangle die to cut it down a bit. I adhered everything to the front of a white notecard, and Viola! All done!


Supplies used:

Whimsy Stamps Nope Stamp Set

Whimsy Stamps Kiss Off Stamp Set

Whimsy Stamps Heart to Heart paper pack

Whimsy Stamps Rounded Rectangle Die Set

Whimsy Stamps Wonky Stitched Rectangles Die Set


Copic Markers Used: 

Skin - E53, E51, E50

Glasses - RV19

Hair - E27, E57, E35, E23


Thanks for visiting today!

Friday, November 20, 2020

Whimsy Stamps Twinkle Scribble Circle & Snowy Watermill. . .

 Oh, hi! Have you seen the new Twinkle Scribble Circle die by Whimsy Stamps?? It's so delicate and pretty! And look look look how it frames the Snowy Watermill stamp!


{Supplies used are linked in the text in this post. Compensated affiliate links may be used at no additional cost to you. Thank you for your support!}

This card came together pretty quickly, too! I started by stenciling white ink with the Polka Dot stencil onto a piece of blue card stock and then I die-cut that panel with a Wonky Stitched Rectangle die. I adhered that to a piece of light tan card stock and then adhered that to the front of a top folding A2 sized notecard.

Next, I stamped the Snowy Watermill stamp on to a piece of white card stock with Stone Blue ink and die cut it using a Pierced & Stitched circle die. I used a make up blending brush with the same Stone Blue ink and added just a touch of color around the edge of the circle and then adhered that to the front of the card.

Then, I ran the Twinkle Scribble Circle die through my Gemini, Jr. with some silver glitter paper and adhered that on top of the Snowy Watermill.

To finish up my card, I stamped "Season's Greetings" from the Holiday Mini Sentiments set and used the stitched fish tail banner die from the Quick Strips die set to cut it . . and Viola! All done!


Supplies Used:

Twinkle Scribble Circle Die

Snowy Watermill Cling Stamp

Holiday Mini Sentiments Stamp Set

Polka Dot Stencil

Wonky Stitched Rectangles Die Set

Pierced & Stitched Circle Die Set

Quick Strips Die Set

Catherine Pooler Stone Blue Ink

Hero Arts Unicorn Pigment Ink


Thanks for visiting today!


10