About Me

Friday, February 5, 2021

Whimsy Stamps Forest Stream

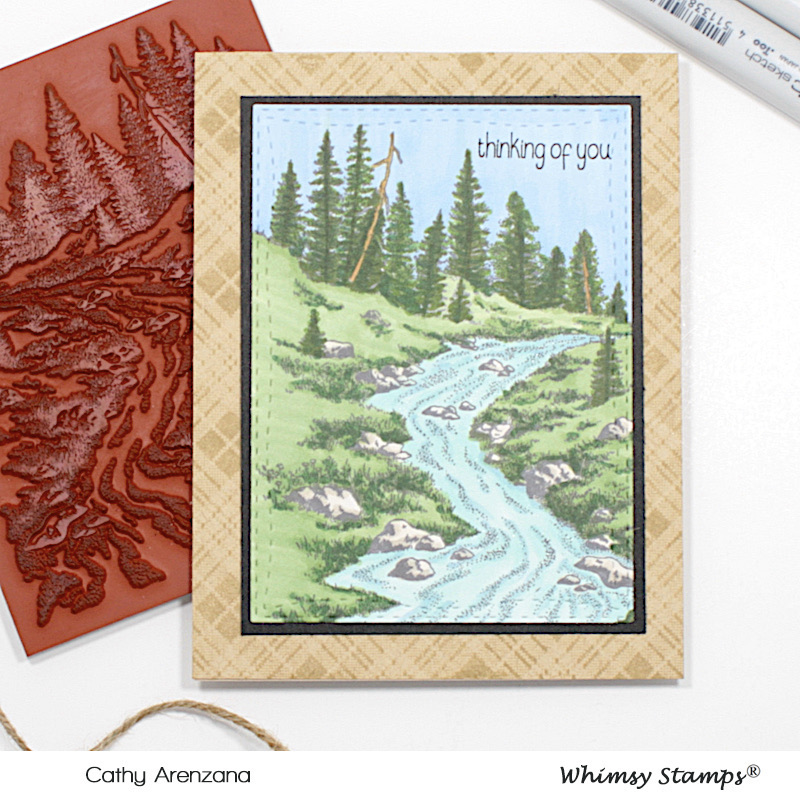
 Oh, hi! I've got a masculine card to share today. I know it appears like there's a whole lot of coloring going on, but this Forest Stream stamp by Whimsy was so easy to color! And I love all the detail on this stamp . . .which is what really made it so easy to color.
{Supplies used are linked in the text in this post. Compensated affiliate links may be used at no additional cost to you. Thank you for your support!}

I started out by stamping the image using Memento Gray Flannel Ink onto Cougar Super Smooth Cardstock. By using the gray ink, it softened the lines a bit so I kind of got a no-line coloring look.

Next . . . yep. .. you guessed it. I colored the image with my Copics and then ran the panel through my Gemini, Jr. with a Wonky Stitched Rectangle Die. I adhered that to a piece of black cardstock cut just a a little bit bigger.

Before adding it to the front of my card base, I decided to add a bit of texture by stamping the Tartan Plaid Background stamp using Kraft ink. I think the background stamp is just what I needed to make this card have a more masculine feel.

After I stamped that background and adhered my stamped and colored image to the front, I finished it up with a simple sentiment and added the smallest amount of shimmer on the stream with my Wink of Stella Glitter pen. Viola! All done!

I've also used this stamp for a few other cards, too . . 


You can see how I created these two cards here.


Thanks for stopping by today!

Products used:

Whimsy Stamps Forest Stream Cling Stamp

Whimsy Stamps Tartan Plaid Background Stamp

Whimsy Stamps Everyday Mini-Sentiments Stamp Set

Whimsy Stamps Wonky Stitched Rectangle Dies

Cougar Super Smooth Card Stock

Cardstock Warehouse Speckled Oatmeal Card Stock

Cardstock Warehouse Black Licorice Card Stock

Memento Gray Flannel Ink

Copics Used:

Grass - G21, G24, G28

Rocks - W3, W2, W1

Trees - YG67, G28

Tree Trunks - E35

Sky - B21

Water - BG11, BG10, BG0000, B52

Tuesday, January 12, 2021

Valentine Schmalentine

Oh, hi! If you know me, you know that Halloween is my favorite holiday. . . but did you know that Valentine's Day is my second favorite holiday? I love all the hearts and red and (dare I say) pink! And as much as I love a super cute Valentine's Day card. . . .I do love a good snarky card, too. Case in point:

{Supplies used are linked in the text in this post. Compensated affiliate links may be used at no additional cost to you. Thank you for your support!}

I love the look on this lady's face from the new Nope stamp set by Whimsy Stamps. She just cracks me up. And even though I did a bit of paper piecing for her shirt using paper from the Heart to Heart paper pack, I just had to use a snarky sentiment from the Kiss Off stamp set.

No, really . . .I was able to get red, pink, hearts and snark all in one card!

And it came together pretty quickly, too. I did a bit of copic coloring on her face, hair, and glasses. I paper pieced her shirt and then fussy cut the image.

I stamped the sentiment in black ink (just to make sure she's getting her point across) onto a piece of pink card stock and die cut it using the Rounded Rectangle die set. I adhered that to a darker piece of pink paper just a tad bit bigger and rounded the corners with a punch.

I adhered a pink strip of cardstock on top of two different patterns from the Heart to Heart paper pack and then used a Wonky Stitched Rectangle die to cut it down a bit. I adhered everything to the front of a white notecard, and Viola! All done!


Supplies used:

Whimsy Stamps Nope Stamp Set

Whimsy Stamps Kiss Off Stamp Set

Whimsy Stamps Heart to Heart paper pack

Whimsy Stamps Rounded Rectangle Die Set

Whimsy Stamps Wonky Stitched Rectangles Die Set


Copic Markers Used: 

Skin - E53, E51, E50

Glasses - RV19

Hair - E27, E57, E35, E23


Thanks for visiting today!

Sunday, January 3, 2021

Snow Fun Penguins Slimline Card

Oh, hi! I've got a card to share with you today using the new Whimsy Stamps Snow Fun Penguins stamp set. I just knew that it would pair perfectly with the new Slimline Frozen paper pack, too! And I had BIG plans for this particular piece of patterned paper.

Big, HUGE plans . . . but then . . .my plans were disrupted because I decided to refill a yellow Copic marker . . .and my patterned paper was too close . . .and then . . . yep, you guessed it . . . disaster struck. A big old drop of yellow ink landed right smack in the center of my patterned paper.

{Supplies used are linked in the text in this post. Compensated affiliate links may be used at no additional cost to you. Thank you for your support!}

So, after a brief moment of panic . . . I sat down and rearranged things a bit. Even though I didn't get to do what I really wanted to, I'm still happy with how this card turned out. . . 


. . . and you can't even tell that there's a big yellow blob of ink under the snowboarding penguin.

So, the moral of the story is  . . . don't give up . . .everything can be fixed.

Thanks for stopping by today!

Products used:


Copic Markers used:

Penguins - YR24, BV29, BV25, BV23, N2, N0, Y38

Scarves & Hats - B34, G09, YG17, YG13, R43, BG49, BG13, BG32

Skis - BG32, BG13

Snowboard - G09, YG17, YG13

Snowman - C7, B60, V20

Carrot Nose - YR07, YR04


Saturday, January 2, 2021

Whimsy Stamps Cottage Landscape

Oh, hi! I've got two cards to share today using the new Slimline Cottage Landscape Die by Whimsy Stamps. For both cards, I die cut it from white card stock, and then just used my Copics to color it up. 

For this first one, I used the new Slimline Frozen paper pack for my background. I love this paper pack! It finishes a scene quite nicely, don't you think?

{Supplies used are linked in the text in this post. Compensated affiliate links may be used at no additional cost to you. Thank you for your support!}


For my second card, I decided to change it up and give it a more springtime feel. For the background on this one, I die cut another piece of white card stock using the Slimline Card Builder Die Set and ink blended some big puffy clouds. . . .but I didn't use a stencil . . I created my own by using the Grass & Cloud Edger die set!


Supplies used:

Whimsy Stamps Woodland Cottage Slimline Die

Whimsy Stamps Card Builder Die

Whimsy Stamps Grass & Cloud Edger Dies

Whimsy Stamps Slimline Frozen Paper Pack

Tumbled Glass Distress Oxide Ink

Thanks for stopping by today!

10