So, I did a short video on how I color pleats and decided to finish coloring the image and make a card. After all, she is ever so cute!
I started by stamping Lacey has a Letter by Stamping Bella onto a piece of Neenah 110# Solar White card stock with Memento Tuxedo Black ink.
Here are the Copics I used:
Dress - Y21, YR23, YR24, YR27
Hearts - E99
Petticoat - C1, E0000
Headband - YR27, YR24, Y21
Button on her Headband - Y21, YR24
Shoes - YR27, YR23
Buttons on Shoes - Y21, YR24
Socks - C1
Ruffles on Socks - Y21
Skin - E21, E00, E0000, R20
Hair E34, E37, E79
Ground - E42, E41
After I colored her, I used the Classic Ovals Dies by Spellbinders to cut her out. Then I cut a piece of yellow card stock using the Classic Scallop Oval Dies, also by Spellbinders.
I used foam tape to pop up the ovals on a piece of patterned card stock measuring 4" x 5 1/4". I adhered that to a yellow mat measuring 4 1/8" x 5 3/8" and finally, onto an A2 top folding card.
Thanks so much for visiting today!
Wednesday, September 26, 2018
Monday, September 24, 2018
Witchy Kitty
It's the most wonderful time of the year! You guys! The first day of fall actually felt like fall! It was cool and cloudy and rainy. That's pretty unusual in these parts . . . and, it appears that it's not going to last because we're going to be right back up in the 90's this week. But, I'll take what I can get.
Along with fall comes Halloween! My absolute favorite! And there are so many great Halloween stamps out there, too! Take this one, for example:
Who doesn't love a kitty in a hat, scarf, and sweater just chilling on a crescent moon wrapped in purple ribbon??
Oh yes, there is a video, too:
Okay, so this stamp is called Witchy Kitty 2 and it's by Impression Obsession. I know, I know . . . I've said it before, but gosh, you guys, I just love images that are unique. And there are a few other Witchy Kitties too, just in case you need more than one. (because, I do!)
Anywho. . . on to the card:
I stamped the image using Memento Tuxedo Black ink on to Neenah Solar White card stock. Then I colored it up using Copics (colors listed below). And then. . . I got stuck. Seriously, I sat and stared at it for at least 20 minutes before figuring out how I was going to finish up the card.
I knew I wanted to have clouds in the background and I also knew that the only way to do that was to use my Cloud Stencil. But, I didn't want to get ink all over all that coloring I just did, so I made a mask.
I just stamped the image onto a piece of scrap paper and used my Zig 2-Way glue pen as a temporary adhesive. Here's an important note: The glue is only temporary if you let it dry before placing over your stamped image.
Once my mask was in place, I used a sponge and very lightly dabbed VersaFine Smokey Gray ink all over. Then I went in with my cloud stencil and sponged more ink. I applied the ink pretty generously, but only along the top edge of the stencil to keep some separation between all the clouds. After I was done, there were a few spots that need more gray ink, so I just did a bit more light dabbing in those areas.
When I was happy with my cloudy sky, I removed the mask and I gotta tell ya. . . I was really happy with how it turned out! I was going to use Black Soot Distress Ink, but I'm sooooooo glad I went with the gray!
To finish up the card, I adhered the patterned paper to a piece of black card stock and adhered that to my card base. Then I adhered the Kitty to a piece of black card stock using liquid glue and added that to the card front with foam tape.
Finally, I stamped the Happy Halloween onto black card stock in Memento Luxe Wedding Dress ink and heat embossed it with White Embossing Powder. Trimmed that down a bit and adhered that to the card using foam tape. And, of course, I had to add some glitter to the stars with my Wink of Stella Glitter Pen. And, Viola! All done!
Thanks for stopping by today!
Along with fall comes Halloween! My absolute favorite! And there are so many great Halloween stamps out there, too! Take this one, for example:
![]() |
| {Supplies used are linked in the text in this post. Compensated affiliate links may be used at no additional cost to you. Thank you for your support!} |
Oh yes, there is a video, too:
Okay, so this stamp is called Witchy Kitty 2 and it's by Impression Obsession. I know, I know . . . I've said it before, but gosh, you guys, I just love images that are unique. And there are a few other Witchy Kitties too, just in case you need more than one. (because, I do!)
Anywho. . . on to the card:
I stamped the image using Memento Tuxedo Black ink on to Neenah Solar White card stock. Then I colored it up using Copics (colors listed below). And then. . . I got stuck. Seriously, I sat and stared at it for at least 20 minutes before figuring out how I was going to finish up the card.
I knew I wanted to have clouds in the background and I also knew that the only way to do that was to use my Cloud Stencil. But, I didn't want to get ink all over all that coloring I just did, so I made a mask.
I just stamped the image onto a piece of scrap paper and used my Zig 2-Way glue pen as a temporary adhesive. Here's an important note: The glue is only temporary if you let it dry before placing over your stamped image.
Once my mask was in place, I used a sponge and very lightly dabbed VersaFine Smokey Gray ink all over. Then I went in with my cloud stencil and sponged more ink. I applied the ink pretty generously, but only along the top edge of the stencil to keep some separation between all the clouds. After I was done, there were a few spots that need more gray ink, so I just did a bit more light dabbing in those areas.
When I was happy with my cloudy sky, I removed the mask and I gotta tell ya. . . I was really happy with how it turned out! I was going to use Black Soot Distress Ink, but I'm sooooooo glad I went with the gray!
To finish up the card, I adhered the patterned paper to a piece of black card stock and adhered that to my card base. Then I adhered the Kitty to a piece of black card stock using liquid glue and added that to the card front with foam tape.
Finally, I stamped the Happy Halloween onto black card stock in Memento Luxe Wedding Dress ink and heat embossed it with White Embossing Powder. Trimmed that down a bit and adhered that to the card using foam tape. And, of course, I had to add some glitter to the stars with my Wink of Stella Glitter Pen. And, Viola! All done!
![]() |
| Copics Used: Moon - Y11, Y13, Y08, Y15; Stars - Y11, Y13, Y08; Ribbon - V0000, V01, V05, V06; Kitty - W0, W1, W2, W3, W4; Hat - YG01, YG03, YG17, YR12, YR68, V01, V06 Scarf - YG01, YG17, YR12, YR68; Sweater - YR12, YR15, YR68, V06 |
Sunday, September 23, 2018
In Praise of Sunflowers
I really did have every intention on having a video to go with this card. But, I forgot to turn the camera back on after a short break. . . sooooo, there's no video. I know, I know . . . bummer.
But, I still wanted to share the card, because I'm really happy with how it turned out.
I started by stamping the sunflowers from the In Praise of Sunflowers set by Power Poppy onto Neenah 80# Solar White Cardstock with Memento Tuxedo Black ink.
I used the following Copics to color the image:
Flowers - Y21, YR23, YR24, YR27, E99
Flower Centers - E79, E34, E35
Leaves - YG63, YG67, G99
Vase - BG09, BG57, BG53, BG11
Shadow - C1, C3, C5
After the coloring was done, I used the Fancy Edged Oval dies from Spellbinders to cut it out. I adhered that to a Scalloped Rectangle that I cut using the Scallop A2 Frame dies from Honey Bee Stamps.
I adhered that to a piece of patterned card stock measuring 4" x 5 1/4". I wanted even more yellow, so I adhered it to a piece of yellow card stock measuring 4 1/8" x 5 3/8".
And finally, I adhered that to an A2 Top Folding card. Viola! All done!
Thanks for visiting today!
But, I still wanted to share the card, because I'm really happy with how it turned out.
![]() |
| {Supplies used are linked in the text in this post. Compensated affiliate links may be used at no additional cost to you. Thank you for your support!} |
I started by stamping the sunflowers from the In Praise of Sunflowers set by Power Poppy onto Neenah 80# Solar White Cardstock with Memento Tuxedo Black ink.
I used the following Copics to color the image:
Flowers - Y21, YR23, YR24, YR27, E99
Flower Centers - E79, E34, E35
Leaves - YG63, YG67, G99
Vase - BG09, BG57, BG53, BG11
Shadow - C1, C3, C5
After the coloring was done, I used the Fancy Edged Oval dies from Spellbinders to cut it out. I adhered that to a Scalloped Rectangle that I cut using the Scallop A2 Frame dies from Honey Bee Stamps.
I adhered that to a piece of patterned card stock measuring 4" x 5 1/4". I wanted even more yellow, so I adhered it to a piece of yellow card stock measuring 4 1/8" x 5 3/8".
And finally, I adhered that to an A2 Top Folding card. Viola! All done!
Thanks for visiting today!
Thursday, September 20, 2018
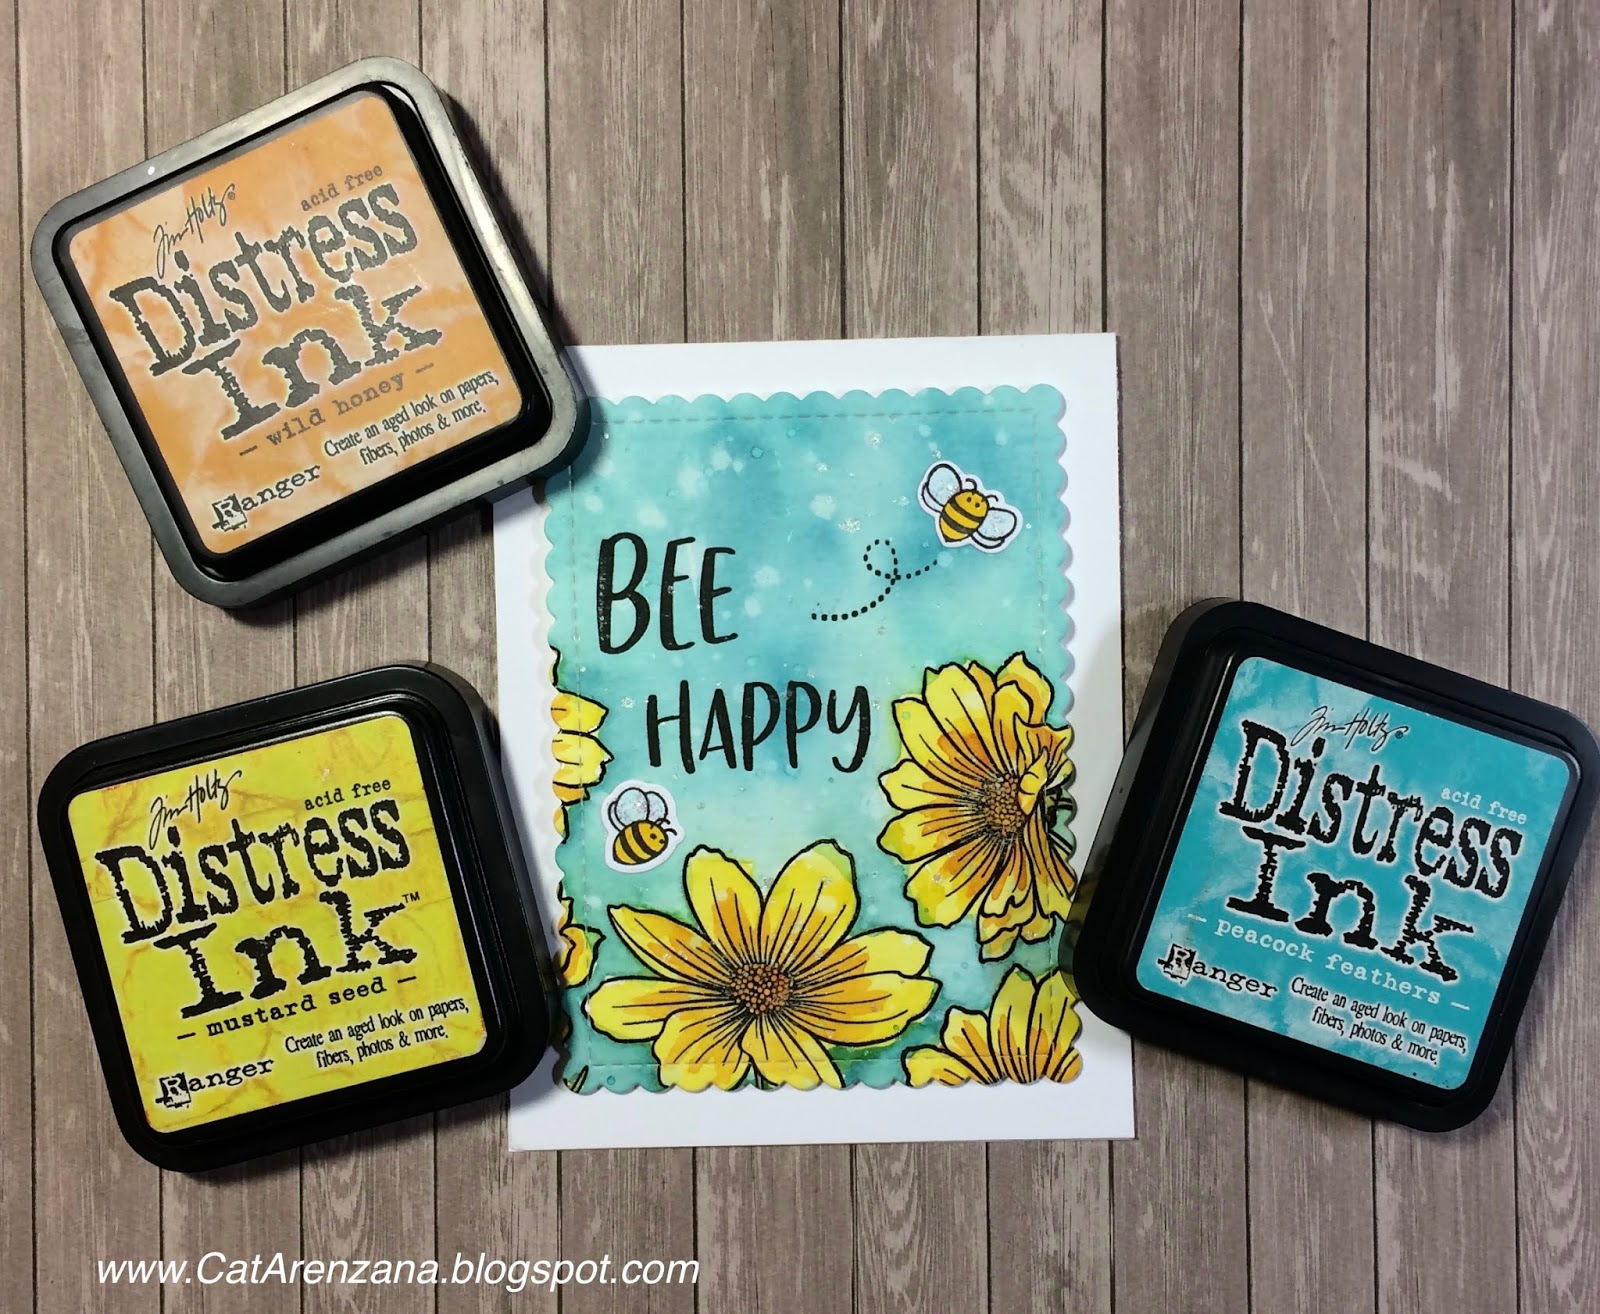
Bee Happy - Watercoloring with Distress Inks
Oh, hi! I may or may not be slightly obsessed with these stamps and dies from Honey Bee Stamps. And, I really stepped out of my comfort zone and did some watercoloring using Distress Inks.
Here's a video showing the process . . . and a bit of yada-yada on my part. Yep, I'm still getting used to voice overs.
![]() |
| {Supplies used are linked in the text in this post. Compensated affiliate links may be used at no additional cost to you. Thank you for your support!} |
So, I started out by stamping the Cosmos flowers onto a piece of Canson Watercolor paper with VersaFine Onyx Black Ink. Then I embossed them with Clear Embossing Powder.
Once I was done with that, I smooshed Distress Inks directly onto my Ranger Craft mat and used it as a palette to pick up color with a wet paint brush.
For the flower petals, I used Mustard Seed and Wild Honey. For the flower centers, I used Spiced Marmalade. The stems were done with Peeled Paint and the background was done in Broken China and Peacock Feathers. (pssst . . . Honey Bee has a great price on the Mini Distress Ink Cubes.)
After all the watercoloring was done and completely dry, I die cut it with the second largest die from the A2 Scallop Frame set.
I masked off a portion of the sentiments from the Hi Honey stamp set before inking them up so I could get just the words wanted. I added a few bees from the Bee Hive stamp set, colored them up using Copics and die cut them with the coordinating dies.
The final step after adhering the bees to the card was to add some Stardust Stickles to their wings. And there ya have it! All done.
Thanks for buzzing by today!
see what I did there?
Subscribe to:
Posts (Atom)