After I colored her, I used the Classic Ovals Dies by Spellbinders to cut her out. Then I cut a piece of yellow card stock using the Classic Scallop Oval Dies, also by Spellbinders.
I used foam tape to pop up the ovals on a piece of patterned card stock measuring 4" x 5 1/4". I adhered that to a yellow mat measuring 4 1/8" x 5 3/8" and finally, onto an A2 top folding card.
I decided to sit down and just play with the My Monthly Hero August Kit from Hero Arts and came up with 5 cards using a few different techniques. This kit sold out so fast! I sure am glad I got my hands on one!
{Supplies used are linked in the text in this post. Compensated affiliate links may be used at no additional cost to you. Thank you for your support!}
Oh! And there's a video, too.
Okay. . . so here's the first card:
The kit came with this super cute Cafe Die. To create the card, I inked up a white panel using Tumbled Glass, Salty Ocean and Blueprint Sketch Distress Oxide Ink.
I then placed the die on my inked panel and ran it through my Gemini Junior (which cuts these detailed dies like.a.dream.!). I adhered it to a white panel cut slightly larger than the die, and then adhered that to a top folding A2 sized card.
For the little coffee cup on the sign, I just ran the die through my machine again and cut out one of the cups that is sitting on the table. I used a White Gelly Roll pen to add some steam coming out from the cup. Easy Peasy!
Onto the second card:
I started by stamping the mug in Memento Tuxedo Black ink onto a piece of Neenah Solar White cardstock. I colored that up using Copic Markers: BG02, BG05 and BG09. For the coffee, I used E23, E25, and E27.
Then I stamped the sentiment on the cup in Memento Luxe Wedding Dress ink and heat embossed it with Nuvo Glacier White Embossing Powder.
The next step was to create a mask so I could stamp a bunch of sentiments in the shape of a circle for a background. I did that by using circle die on a piece of regular printer paper. I used temporary adhesive to hold it in place while I stamped the sentiments. You'll see in the video that I arranged all of the sentiments on one acrylic block to make it a bit easier. For the stamping, I used Jumbo Java VersaMagic ink.
After adhering all the pieces to a card, I used foam tape on the mug for some dimension. And there ya go! All done.
Card #3:
The first thing I did for this card was to randomly stamp the sentiment onto a piece of Canson Watercolor card stock. I used Memento Luxe Wedding Dress ink so I could heat emboss it. After that, I used Gathered Twigs Distress Ink to do a watercolor wash over the embossed sentiments.
The coffee cups were also stamped on watercolor card stock, but I used VersaFine Onyx Black ink and heat embossed with Nuvo Clear Embossing Powder. Then I watercolored the saucers using Tumbled Glass Distress Ink, the cups in Broken China Distress Ink, and the coffee in Gathered Twigs Distress Ink.
Once it was nice and dry I stamped the foam in Memento Luxe Wedding Dress ink and used the White Puff Embossing Powder that came with the kit. It doesn't show very well in the picture, but that powder really does get puffy!
I thought that at least one of those cups needed a spoon, so I used my Cricut to cut that out. And there ya have it! Finito.
Ah . . .Card #4. . . Sunflower Cups
I was inspired to put sunflowers on these cups because they reminded me of cups that I actually saw at Pier 1 (at least one hundred years ago). But I loved those cups. I loved the contrast of the cobalt blue and yellow/orange sunflowers.
Anywho. . . to get those sunflowers on those cups, I created a "reverse" mask by stamping the images on a sticky note and I only cut out the inside of the image. (You can see how I did that in the video). Once I placed the mask over my stamped image, I stamped the sunflowers from the Sunny Harvest Stamp Set by Power Poppy right over the mask.
Then I colored them up using Copics. For the mugs, I used B23, B24, B18 and B27. For the Sunflowers, I used YR12, YR14, YR18. For the flower centers I used E23, E25, E27 and E29. I used the same browns except E29 for the coffee in the cups. For the shadow under the cups, I used C1, C3 and C5.
I put it all together, and Viola! All done.
And here's the fifth card. . .
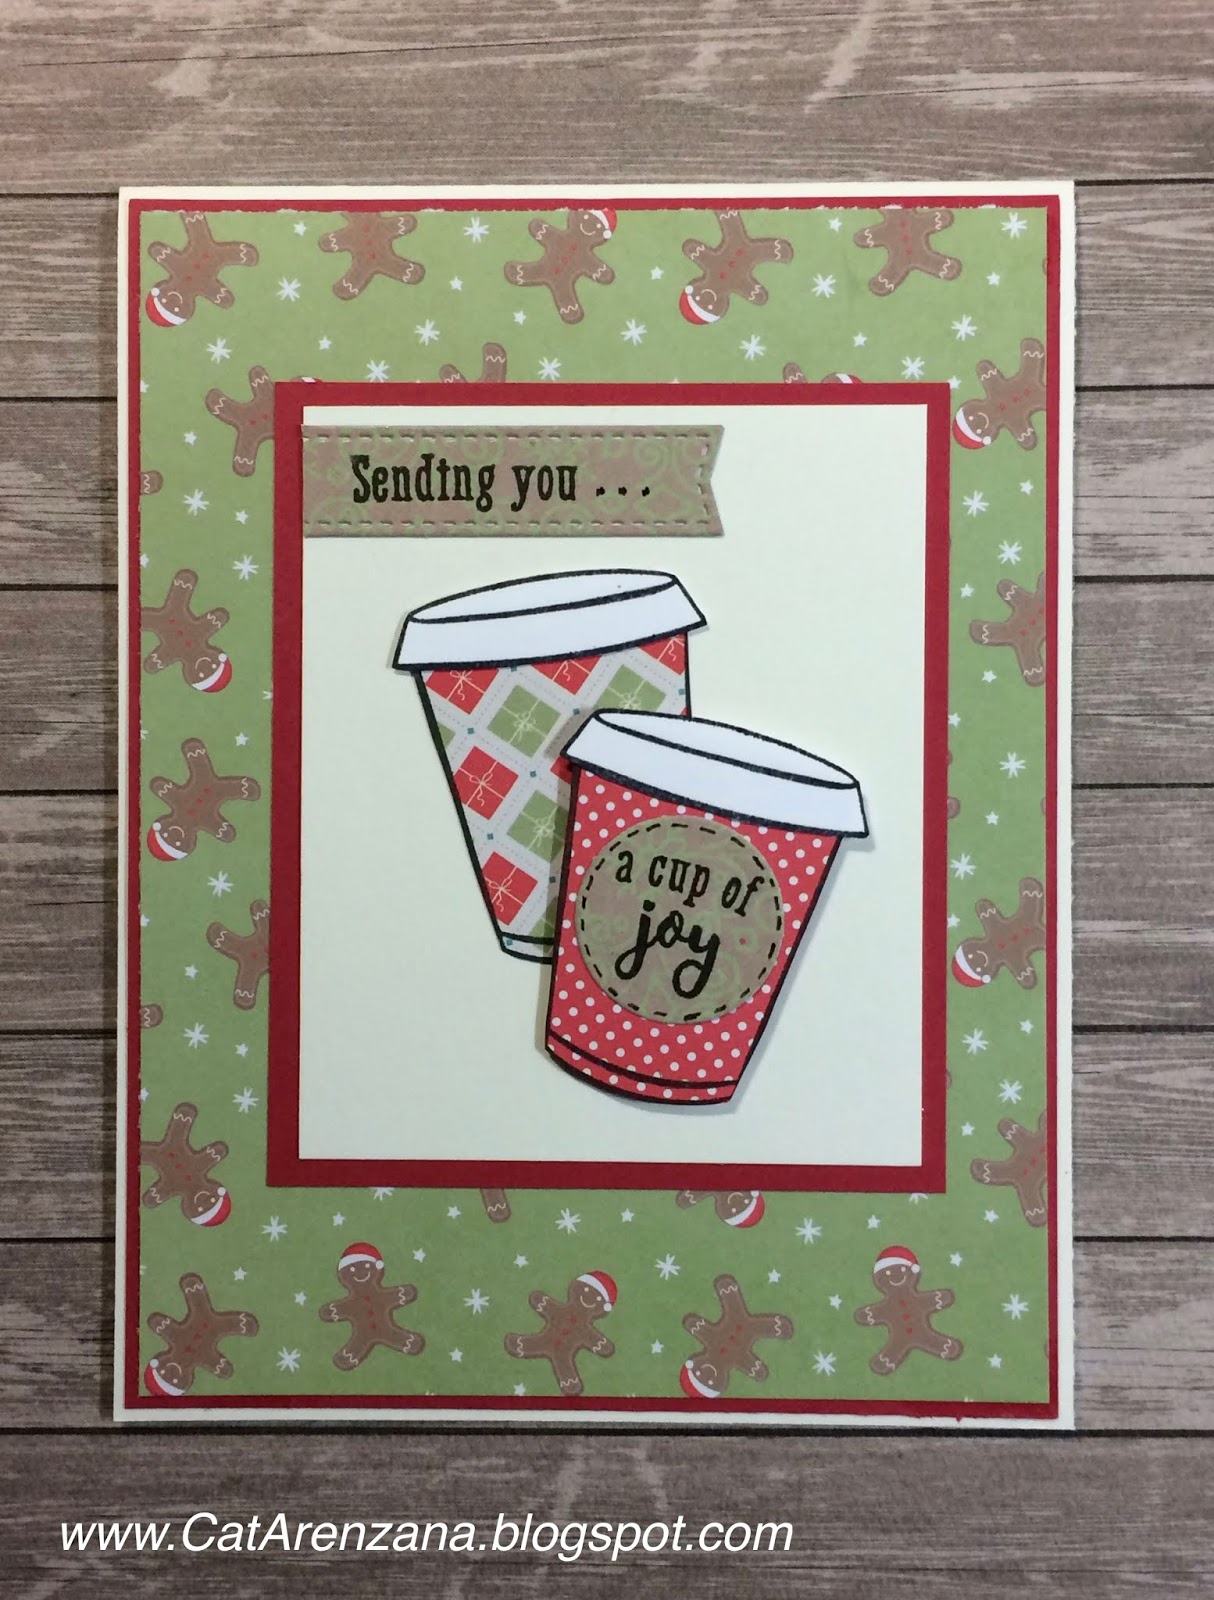
This card was pretty quick and easy. I stamped the to-go cup using Memento Tuxedo Black ink onto patterned paper and cut them out with scissors. Then I stamped the lids onto white cardstock and also cut them out by hand.
To get the "Sending you," I performed a bit of stamp surgery and cut the stamp apart. The full sentiment reads "Sending you a Latte Love". . . but I wanted to send "a cup of joy." Sometimes, surgery is necessary.
So, after the surgery, I stamped "Sending you" onto a fishtail banner that I die cut from patterned paper. The circle is also a die and that sentiment fit on it perfectly! Here's a little tip: stamp first and then die cut. I added little dashes around the edge of the circle using a fine tip black pen.
I adhered the plaid cup with Tombow Mono Multi Glue and the polka dot cup with foam tape. Put it all together and Ta-Da! All done.
Oh, hi! I'm back with not one. . . not two. . . but 3 cards today! I had a grand time playing with some new dies AND glitter AND Copics AND Alcohol Ink. By the time I was done, I was a sparkly, inky mess.
{Supplies used are linked in the text in this post. Compensated affiliate links may be used at no additional cost to you. Thank you for your support!}
Oh. . .and there's a video showing how I got all that glittery goodness, too! Yep! I finally got set up to do craft videos. I'm pretty excited about that! So, if you have 14 minutes and 8 seconds, please check it out and let me know what you think. Feedback would greatly be appreciated being that this is my first video and all.
For the card above, I used the Lovely Lilacs Die by Spellbinders. I love that it's a set of two dies because it makes it super easy to get all that glittery goodness.
I used foam tape to pop up the flowers and the ovals on a panel of patterned paper, then adhered that to a black panel, and finally, added that to a top folding card from the same Natural White Neenah card stock. Viola! All done.
For the second card, I decided to try Tim Holtz Alcohol inks. I figured if Copics worked, then they should too. Ta-Da! They do!
Those coffee cups are from the August My Monthly Hero* kit from Hero Arts. I stamped them onto patterned paper and then cut them out. I adhered the bigger mug onto a white circle using a tape runner. Then I used foam tape for the smaller mug. I thought the white circle needed a border, so I cut a circle from yellow card stock.
The sentiment is stamped on white card stock and I added a yellow frame to match the circle. I used foam tape to adhere the circles and the sentiment on top of the Wagon Wheel die. Then I adhered that to a yellow panel, and finally onto a white top folding card. Ta-Da! Finito!
For the third card, I thought I'd try Copic Refills. Lo and behold! They worked too!
For this card, I cut a black frame using Oval Dies from Spellbinders. For the glittered oval, I used the larger of the two oval dies. The Bellina Butterfly Stem die is from Poppy Stamps. I love how delicate it is.
I used G02 and BG34 Copic Refills and applied it using an Alcohol Ink Applicator Tool. Easy Peasy, Quick and Easy! I adhered the glittered oval to a white panel that was embossed with a Cuttlebug Folder. Then adhered that to a black panel and finally, a white top folding card. Viola! All done.
And there ya have it! Three cards full of glittery goodness!
Oh, hello! So, have you seen the August My Monthly Hero kit? Dude! It's all about coffee! I used to be quite the coffee drinker . . . all day, every day. Not so much anymore, but I do love a good coffee stamp set. And this one has it all.
{Supplies used are linked in the text in this post. Compensated affiliate links may be used at no additional cost to you. Thank you for your support!}
For this card, I stamped the coffee cup using Rich Cocoa Memento ink onto the tea-dyed paper that came with the kit. I thought it would be a perfect pattern for that cup. I colored the coffee using E25 and E27 Copic Markers and added the highlights using a White Gel Pen. Then, I fussy cut the image with scissors.
Now then, that tea-dyed paper is pretty fragile, so to beef it up a bit, I used the coordinating coffee cup die and cut it twice from Neenah Solar White card stock. I adhered the stamped image to the die cut coffee cups and viola! Nice and sturdy.
I used my Standard Circle Nestabilities to cut a circle, also from Neenah Natural White card stock. I adhered that to a scalloped circle cut from Kraft card stock and used foam tape to adhere the coffee cup and steam.
The patterned paper panel is from a stack that has been living in my studio for quite some time. But seriously, you guys, it's perfect with all the coffee stains on it . . . or, I suppose they could be tea stains.
I added ribbon, which also came with the kit by the way, to cover up where the two patterned pieces meet. I mounted that onto a piece of 4 1/8" x 5 3/8" Kraft card stock, and added that to the card base, which is also Natural white, because Solar White was just too stark for this card.
Finally, I adhered the circles with the coffee cup to the card with foam tape (because one can never use too much of that stuff) and then stamped the sentiment using Jumbo Java VersaMagic ink.
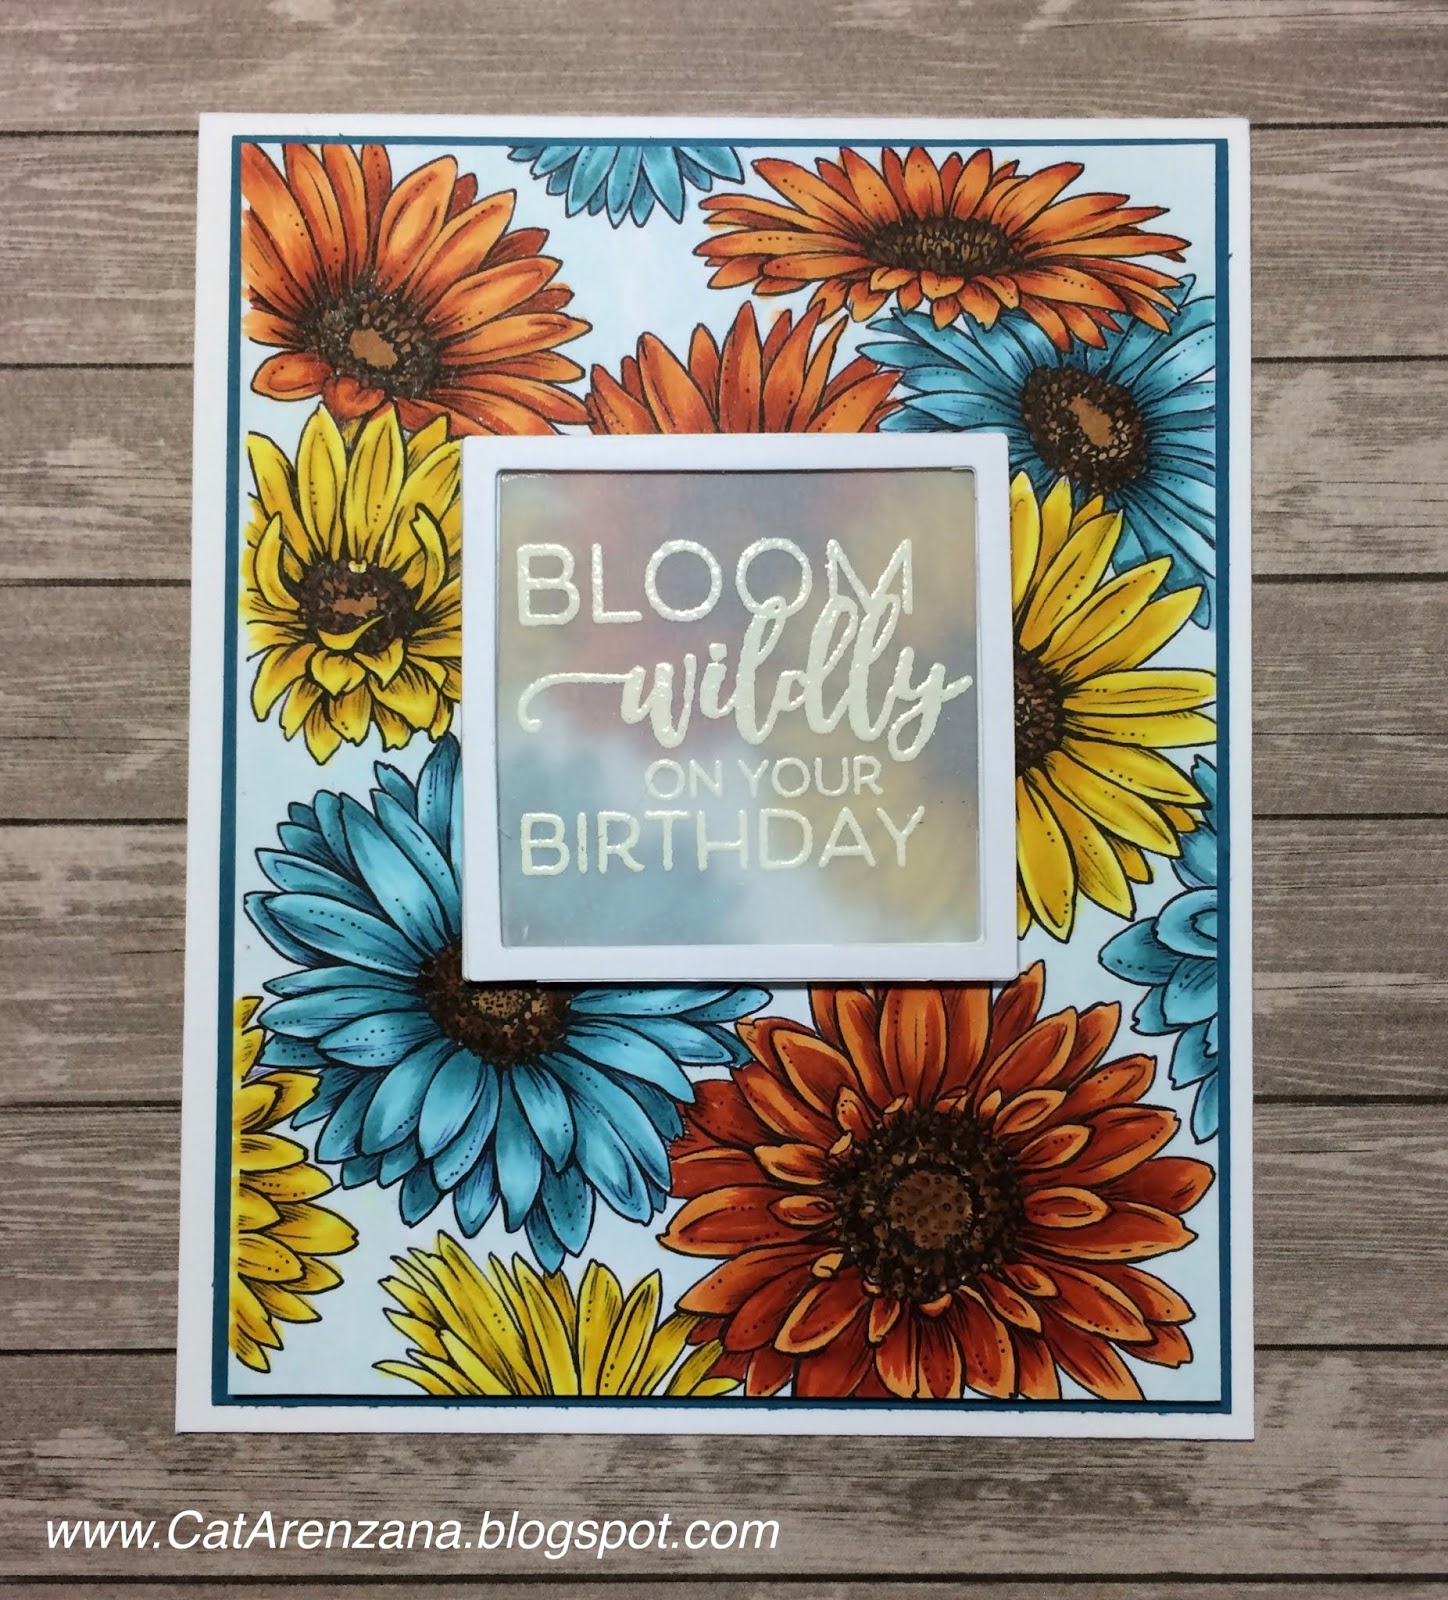
Oh, hi! How's the weather where you are? It's sort of starting to cool off here . . . Mid to Low 90s. I am so ready for Fall. so.very.ready. And with Fall on my mind, I chose a Fall-ish color palette for this card. I do love teal, orange and yellow together.
{Supplies used are linked in the text in this post. Compensated affiliate links may be used at no additional cost to you. Thank you for your support!}
Obviously that's a whole lotta Copic coloring going on. . . but you guys, when a fabulous company offers a free digital stamp and another fabulous company offers a free class to learn how to color that digital stamp . . . well, you jump on that!
I have learned so much good stuff in this class offered by Kit & Clowder! And the Kindness is the Way digital stamp set by Power Poppy is beautiful. BEAUTIFUL!
I totally encourage you to check it out. . . did I mention that it's free? As in, Zero Dollars.
Okay . . . on to the card. I printed out the daisy background onto Neenah Solar White card stock. I've always been afraid of digital stamps. But you know what? This was super easy to download and you can even re-size the images. By the way . . . there are a couple of different images in this digital set.
I colored (for days and days) using Copic Markers and when I was all done, I thought, "Well now. . . what am I going to do for a sentiment?? I don't want to totally cover up all that work." Lucky for me, I had just watched a video by Jennifer McGuire where she used a frame with vellum so the background would be muted, but not covered up. Perfect.
So, I cut three frames using the Large Classic Squares and Small Classic Squares Nestabilities dies from Spellbinders. I stacked the frames just to give it a bit of dimension.
Then I stamped and embossed the sentiment from the Pure Prairie Spirit stamp set onto Vellum using VersaMark ink and White Embossing Powder. I used the larger square die to cut the vellum so it would fit behind the frame perfectly.
I did use foam tape behind the frame for some extra lift. Here's a hint . . . cut the foam tape in thin strips and only adhered it to the card stock frame. I also used foam tape on the daisy panel. . . because, you know me. . . I love my foam tape!
Finally, I adhered that to a dark teal panel and then onto a white card base. And there ya have it. . .
In case you haven't noticed, I'm currently on a flower kick. So many pretty flower stamps out there! And flowers are always versatile.
{Supplies used are linked in the text and thumbnails in this post. Compensated affiliate links may be used at no additional cost to you. Thank you for your support!}
When coming up with the layout for this card, I had fully intended on using a background die, but it just wasn't working for me. I really wanted those flowers to be the focal point.
I did, however, want some sort of background so I opted for patterned paper. And then I decided that I wanted the patterned paper to be behind the flowers so I created an open frame with dies.
So, I'm really trying to break out of my box, and the One Layer Wonders class has been awesome. Don't get me wrong, I still love lots of layers and patterned papers, but I'm really starting to like one layer cards.
For Lesson 2, it was all about rainbow backgrounds and making a masked shape stand out. Here's my card:
{Supplies used are linked in the text and thumbnails in this post. Compensated affiliate links may be used at no additional cost to you. Thank you for your support!}
Now, I didn't have a background stamp that would fit a full card front, so I had to adjust accordingly and use it sideways. Thank goodness for stamp positioners!
I decided to make another card using Bess the Butterfly with a totally different color palette this time. I also used a past card sketch from My Favorite Things.
{Supplies used are linked in the text and thumbnails in this post. Compensated affiliate links may be used at no additional cost to you. Thank you for your support!}
Dress: Y11, Y13, Y15 and Y08
Wing: BG10, BG23, YG00, YG01, YG03, Y21, Y13, and Y11
Flowers: I used Y11, Y21, and Y38 Skin: E50, E51, E53, R00 Hair: E23, E33, E35, E25, E27 Shoe: C5
The polka dot paper is from Memory Box that has been in my stash forever. One really good thing about creating so much is that I am definitely using up my paper! The striped paper is from My Favorite Things. I love their patterned paper!
I created the square frame using Classic Square Nestabilities and Classic Scalloped Square dies by Spellbinders.
In addition to the incredibly super cute stamps that My Favorite Things has to offer, they also have a resource page with all of the challenge sketches. I love sketches. And MFT has some really great ones!
Case in point, this card was inspired by Sketch #369.
{Supplies used are linked in the thumbnails at the end of this post. Compensated affiliate links may be used at no additional cost to you. Thank you for your support!}
I stamped the dragon onto Neenah Classic Crest Cardstock and colored him with Copics:
Dragon body - BG13, BG15, BG23, BG49
Horns, Wings, Spikes and Belly - Y11, Y13, Y15, YR24
Claws - W2
Then I cut him out using the coordinating die.
I sponged Tumbled Glass Distress Ink using a cloud stencil on a white panel and adhered that to the card front.
Next I used Classic Circles Die by Spellbinders to cut a frame from the patterned paper. I used foam tape to pop up the patterned paper and that darling dragon.
I stamped the sentiment onto white card stock and cut it out using the fishtail banner from the Blueprints 2 Die-namics set. I added a few sequins for a little bit of bling and Bingo! It's a card.
Do you use sketches when you're making cards? If you do, where is your favorite place to find them?
So, I guess I really like this color combination. Especially when using Happy Hippos by My Favorite Things. I dunno . . . there's just something about those colors.
This little creation is a somewhat simple card for my husband's birthday. Normally, I would have a few more layers and die cut the hippo and, most likely, the balloons, too.
But, as I had been a tad bit obsessed with learning how to color pleats, which I am still practicing by the way, his birthday snuck up on me pretty quickly, hence the simplicity of it all.
{Supplies used are linked in the text and in the thumbnails at the end of this post. Compensated affiliate links may be used at no additional cost to you. Thank you for your support!}
I stamped that cute little dude first, and created a small mask for his hand (wait, do hippos even have hands??) and then stamped the balloons.
I die cut a circle with my ever-so-trusty Classic Circles by Spellbinders. I used a black pen to add the stitching around the circle. Then, I mounted that on a slightly larger yellow circle and used foam tape to adhere it to the patterned paper.
Even though it's pretty simple, I'm really happy with how it turned out.
What about you? Do find that you have a specific color combination that you use when you're in a pinch?
I wasn't too sure where I was going with the colors on this one. I just knew that I wanted to use more earthy tones . . . which worked out quite well with the patterned paper I found in my stash. And I found it pretty quickly, too. I can spend a serious amount of time just digging through all my paper to find what I'm looking for. . . even though it's all organized by color.
What about you? Do you choose paper first and then color images? Or vice versa?
No matter what sentiment I decide to add to this card, I had fun coloring him. And, I've been trying to practice blending yellows because, ugh! I always struggle with the brighter tones. Overall, I'm pretty happy with how this turned out.
So, when using Copics, do you find that you struggle with certain colors?
Really early. And, it has been hot, hot, hot! Triple digits in early June! This type of weather calls for ice cold lemonade. . . both literally and in stamp form.
The yellow polka dot paper is from My Favorite Things and the blue flower paper is from Hampton Arts KI Growing Garden Paper Pad. I used gingham ribbon to "connect" the patterned papers and add some texture.
So, how's the weather been where you are? Hot enough for lemonade?
After I colored this stamp from the Tea in the Garden set by Power Poppy, I suddenly had a craving for cake. Can you blame me?? I mean, just look at it! Of course, I'd have to give the strawberries to my husband because I'm allergic, but that cake! I could probably polish it off in one sitting. Okay, maybe two.
Oh, and the patterned paper? I've had it F.O.R.E.V.E.R. I've pulled it out a number of times to use it, but always changed my mind. I guess I was saving it for just the right stamp. Glad I finally found it.
So, do you have paper that you've been "saving" for the perfect project? How long have you been saving it?
The color palette I chose for this card was very heavily inspired by a card I found on Pinterest created by Michelle Boyer. Her color combinations are Ah-mazing.
And I admit, I was a bit nervous about using some of these markers together because I was so afraid of ending up with a muddy look. But, lo and behold! I did it!
This stamp is by Stamping Bella. Isn't she so sweet?! I can't wait to try different color combinations, now that I'm feeling brave and all.
I've been obsessed with the You Gnome Me set by My Favorite Things for quite some time. I still don't know why it took me so long to actually purchase the set! So, be forewarned, there are gonna be a whole lotta Gnomes on the Blog over the next few days.
I hafta admit that I surprised myself using these peachy tones again. . . I tend to gravitate towards bright colors. But, my friend who's getting married later this year, had shown me a bunch of pictures of bouquets that she leaning towards and the flowers were cream, ivory, blush pink and sort of peachy. I guess that's where my inspiration came from for this card:
This stamp is from the Go Wild set by Power Poppy. I know. . . I know. . . I've mentioned this in every Power Poppy post, but Gosh! The quality of these stamps is amazing! I just love them!
Any who . . . here are the markers I used for this card:
And the dies? Oh . . . yes, the Stitched Oval is from Memory Box, the Scalloped Oval is from Spellbinders, and the Fishtail Banner is from Lawn Fawn.
Me? Oh my, but this was a challenge! Yep . . .from this week's Tic Tac Toe Challenge. So, here's the latest Tic Tac Toe Board:
I chose the center vertical line (Sponge/Brush, Sunset, & Single Layer). And, as I mentioned, it was definitely a challenge to do a single layer card. I'm so used to using lots of dies and lots of patterned paper, which of course, leads to lots of layers.
So here's my card for this weeks challenge:
The first thing I did was use painter's tape to create a mask for a rectangle in the center. Next, I sponged Candied Apple, Spiced Marmalade and Wild Honey Distress Oxide Inks to create the sunset. With the painter's tape still in tact, I stamped the small mandala and sentiment using Onyx Black VersaFine ink from the Sunflower Good Vibes stamp set from Spellbinders. And finally, I used a fine point black pen to draw a frame.
And . . . yep. . . I had to spritz water on the Distress Oxide ink . . .I just couldn't help myself!
I'll just jump right to it. Here it is . . . the Moon Flower:
I was going to use the same layout I did with the Feather stamp, but the angle wasn't working for me. So, I sat and thought about it. . . and ended up with a full inked panel highlighted with all the other stamps that came in the set.
I inked the panel using Broken China, Peacock Feathers, and Pistachio Distress Oxide inks. Yes, I splattered water. Then I randomly stamped all the individual flower stamps using White Pigment ink.
Here are the markers I used:
I finished it up by heat embossing the sentiment (Hampton Art).
Be still my heart. When I saw these stamps, I was awestruck, but when I got them in my hands. . .oh my! Again, the detail. . . the art. . . the quality of the stamps and die. Perfection.
{Supplies used are linked in the thumbnails at the end of this post. Compensated affiliate links may be used at no additional cost to you. Thank you for your support!}
I stamped the feathers in Tuxedo Black Memento Ink and then colored them with Copics. Then I die cut them using the coordinating die.
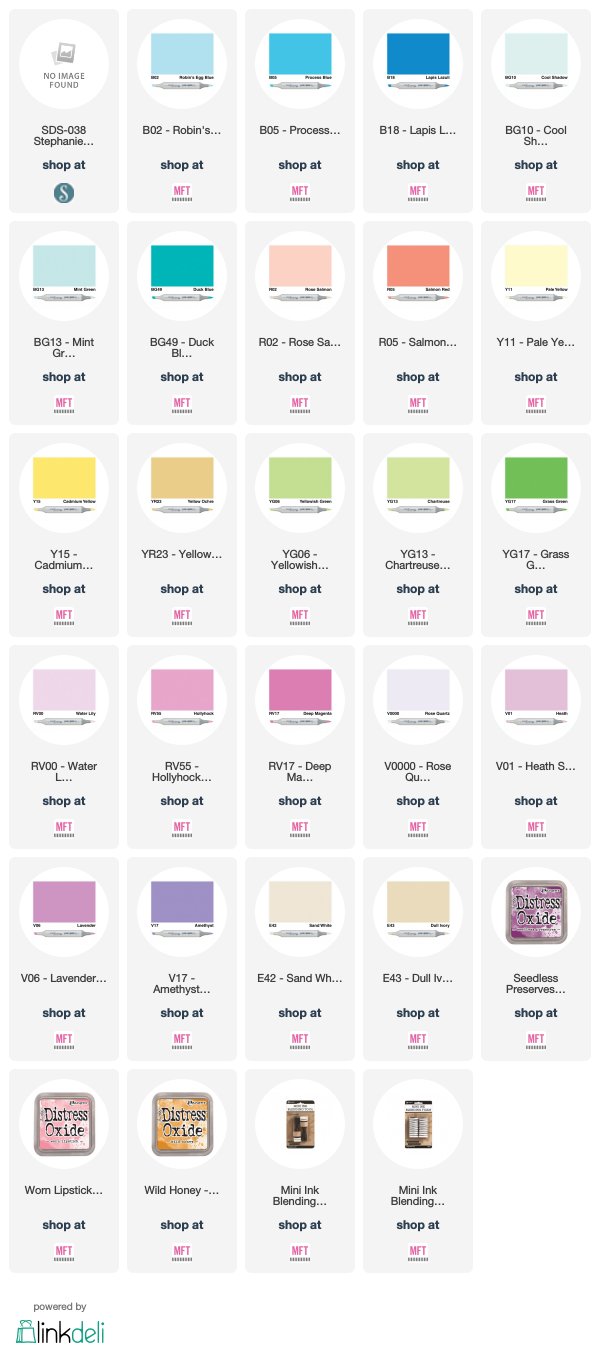
I created the background by applying Seedless Preserves, Worn Lipstick and Wild Honey Distress Oxide inks using a Mini Ink Blending Tool. I applied a light layer of ink and then stenciled over the top again with the same colors to add some depth. Of course I splattered water, because I can't not do that.
The sentiment is from Hampton Arts. I used Onyx Black Versafine Ink to get a really bold impression.
I finished it off with a few sequins and droplet embellishments.