About Me

Showing posts with label Power Poppy. Show all posts

Monday, April 22, 2019

Abundant (Floating) Petals

Oh, hi!  I was anxious to try the floating die-cut technique that Jennifer McGuire did on her channel, and I really wanted to use the Abundant Petals stamp set from Power Poppy . . . but, it's not a layering set, and I really didn't want to color all those flowers.

So, I decided to try a somewhat monochromatic-ish look instead. I'm pretty happy with how they turned out!

{Supplies used are linked in the text in this post.
Compensated affiliate links may be used at no additional cost to you.
Thank you for your support!}


There's a video, too. . . and in the video, I link to Jennifer McGuire's video.


Supplies used:

Abundant Petals Stamp Set
Abundant Petals Dies
Peach Bellini Ink
Coral Crush Ink
VersaFine Onyx Back Ink
Peach Bellini Card Stock 
Coral Crush Card Stock
Neenah 80# Solar White Card Stock
Stitched Oval Dies
Stitched Rectangle Die-Namics Stax 1
Stitched Rectangle Die-Namics Stax 2
Blueprints 27 Die-Namics

Thanks for visiting today!

Friday, December 7, 2018

Poinsettia & Pomegranates

Oh, hi!  I'm back with two more Christmas cards, although, this time I used a digital image.  But don't worry, if you prefer a clear stamp, this image is also available in a set.  Yes, that is one thing that I do love about Power Poppy. . . many of her images are available in both formats.

{Supplies used are linked in the text in this post.
Compensated affiliate links may be used at no additional cost to you.
Thank you for your support!}


To get that nice "halo" around the poinsettia, I used a sponge
with  Antique Linen Distress Ink
Now, there is a video, too . . . but I only show how I colored the image on the Desert Storm card stock.  I used the same colors for both images. . . I mean, I had already printed it out onto Solar White card stock and the markers were sitting on my table, so I figured I might as well get two cards out of it, right?


Anywho . . . here are the supplies I used:

Neenah Desert Storm Card Stock

Neenah Solar White Card Stock

Poinsettia & Pomegranates Digital Stamp

Poinsettia Clear Stamp Set

Copic Markers:

 Poinsettia - R39, R37, R35, R22, YR24, Y35, Y38
 Pomegranates - R05, R08, R14, R17, YR24, Y35
 Pomegranate Greenery - YG03, G24, G29
 Pine Needles - G99, YG95, YG93

Thanks for visiting today!

Sunday, September 23, 2018

In Praise of Sunflowers

I really did have every intention on having a video to go with this card.  But, I forgot to turn the camera back on after a short break. . . sooooo, there's no video.  I know, I know . . . bummer.

But, I still wanted to share the card, because I'm really happy with how it turned out.

{Supplies used are linked in the text in this post.
Compensated affiliate links may be used at no additional cost to you.
Thank you for your support!} 

I started by stamping the sunflowers from the In Praise of Sunflowers set by Power Poppy onto Neenah 80# Solar White Cardstock with Memento Tuxedo Black ink.

I used the following Copics to color the image:

Flowers - Y21, YR23, YR24, YR27, E99
Flower Centers - E79, E34, E35
Leaves - YG63, YG67, G99
Vase - BG09, BG57, BG53, BG11
Shadow - C1, C3, C5

After the coloring was done, I used the Fancy Edged Oval dies from Spellbinders to cut it out.  I adhered that to a Scalloped Rectangle that I cut using the Scallop A2 Frame dies from Honey Bee Stamps.

I adhered that to a piece of patterned card stock measuring 4" x 5 1/4".  I wanted even more yellow, so  I adhered it to a piece of yellow card stock measuring 4 1/8" x 5 3/8".

And finally, I adhered that to an A2 Top Folding card.  Viola!  All done!

Thanks for visiting today!

Wednesday, September 5, 2018

My Monthly Hero - August 2018

I decided to sit down and just play with the My Monthly Hero August Kit from Hero Arts and came up with 5 cards using a few different techniques.  This kit sold out so fast!  I sure am glad I got my hands on one!

{Supplies used are linked in the text in this post.
Compensated affiliate links may be used at no additional cost to you.
Thank you for your support!} 
Oh! And there's a video, too.


Okay. . . so here's the first card:


The kit came with this super cute Cafe Die.  To create the card, I inked up a white panel using Tumbled Glass, Salty Ocean and Blueprint Sketch Distress Oxide Ink.

I then placed the die on my inked panel and ran it through my Gemini Junior  (which cuts these detailed dies like.a.dream.!).  I adhered it to a white panel cut slightly larger than the die, and then adhered that to a top folding A2 sized card.

For the little coffee cup on the sign, I just ran the die through my machine again and cut out one of the cups that is sitting on the table.  I used a White Gelly Roll pen to add some steam coming out from the cup.  Easy Peasy!

Onto the second card:


I started by stamping the mug in Memento Tuxedo Black ink onto a piece of Neenah Solar White cardstock.  I colored that up using Copic Markers: BG02, BG05 and BG09. For the coffee, I used E23, E25, and E27.

Then I stamped the sentiment on the cup in Memento Luxe Wedding Dress ink and heat embossed it with Nuvo Glacier White Embossing Powder.

The next step was to create a mask so I could stamp a bunch of sentiments in the shape of a circle for a background.  I did that by using circle die on a piece of regular printer paper.  I used temporary adhesive to hold it in place while I stamped the sentiments.  You'll see in the video that I arranged all of the sentiments on one acrylic block to make it a bit easier.  For the stamping, I used Jumbo Java VersaMagic ink.

After adhering all the pieces to a card, I used foam tape on the mug for some dimension.  And there ya go! All done.

Card #3:


The first thing I did for this card was to randomly stamp the sentiment onto a piece of Canson Watercolor card stock.  I used Memento Luxe Wedding Dress ink so I could heat emboss it.  After that, I used Gathered Twigs Distress Ink to do a watercolor wash over the embossed sentiments.

The coffee cups were also stamped on watercolor card stock, but I used VersaFine Onyx Black ink and heat embossed with Nuvo Clear Embossing Powder.  Then I watercolored the saucers using Tumbled Glass Distress Ink, the cups in Broken China Distress Ink, and the coffee in Gathered Twigs Distress Ink.

Once it was nice and dry I stamped the foam in Memento Luxe Wedding Dress ink and used the White Puff Embossing Powder that came with the kit.  It doesn't show very well in the picture, but that powder really does get puffy!

I thought that at least one of those cups needed a spoon, so I used my Cricut to cut that out.  And there ya have it!  Finito.

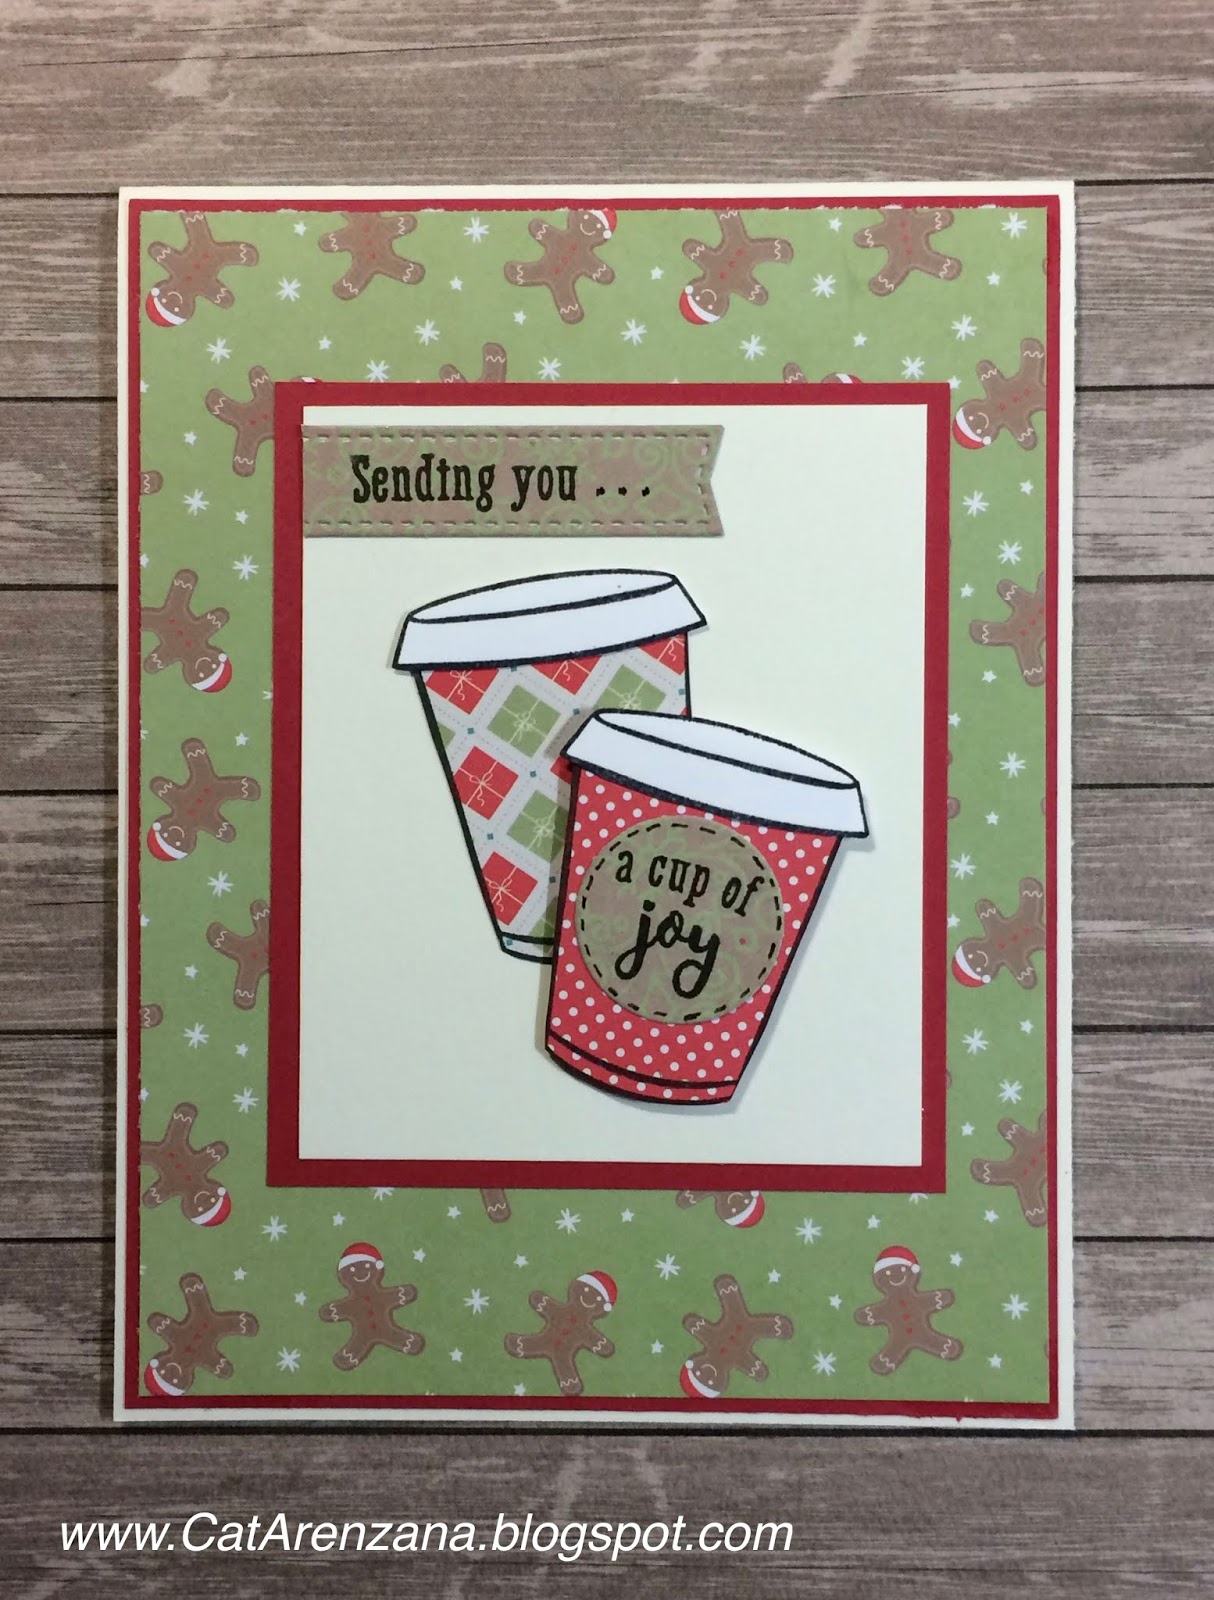
Ah . . .Card #4. . . Sunflower Cups


I was inspired to put sunflowers on these cups because they reminded me of cups that I actually saw at Pier 1 (at least one hundred years ago).  But I loved those cups.  I loved the contrast of the cobalt blue and yellow/orange sunflowers.

Anywho. . . to get those sunflowers on those cups, I created a "reverse" mask by stamping the images on a sticky note and I only cut out the inside of the image. (You can see how I did that in the video).  Once I placed the mask over my stamped image, I stamped the sunflowers from the Sunny Harvest Stamp Set by Power Poppy right over the mask.

Then I colored them up using Copics.  For the mugs, I used B23, B24, B18 and B27.  For the Sunflowers, I used YR12, YR14, YR18.  For the flower centers I used E23, E25, E27 and E29.  I used the same browns except E29 for the coffee in the cups.  For the shadow under the cups, I used C1, C3 and C5.

I put it all together, and Viola!  All done.

And here's the fifth card. . .


This card was pretty quick and easy.  I stamped the to-go cup using Memento Tuxedo Black ink onto patterned paper and cut them out with scissors.  Then I stamped the lids onto white cardstock and also cut them out by hand.

To get the "Sending you," I performed a bit of stamp surgery and cut the stamp apart.  The full sentiment reads "Sending you a Latte Love". . . but I wanted to send "a cup of joy."  Sometimes, surgery is necessary.

So, after the surgery, I stamped "Sending you" onto a fishtail banner that I die cut from patterned paper.  The circle is also a die and that sentiment fit on it perfectly!  Here's a little tip: stamp first and then die cut.  I added little dashes around the edge of the circle using a fine tip black pen.

I adhered the plaid cup with Tombow Mono Multi Glue and the polka dot cup with foam tape.  Put it all together and Ta-Da!  All done.

Thanks so much for stopping by today!

Friday, August 17, 2018

Bloom Wildly

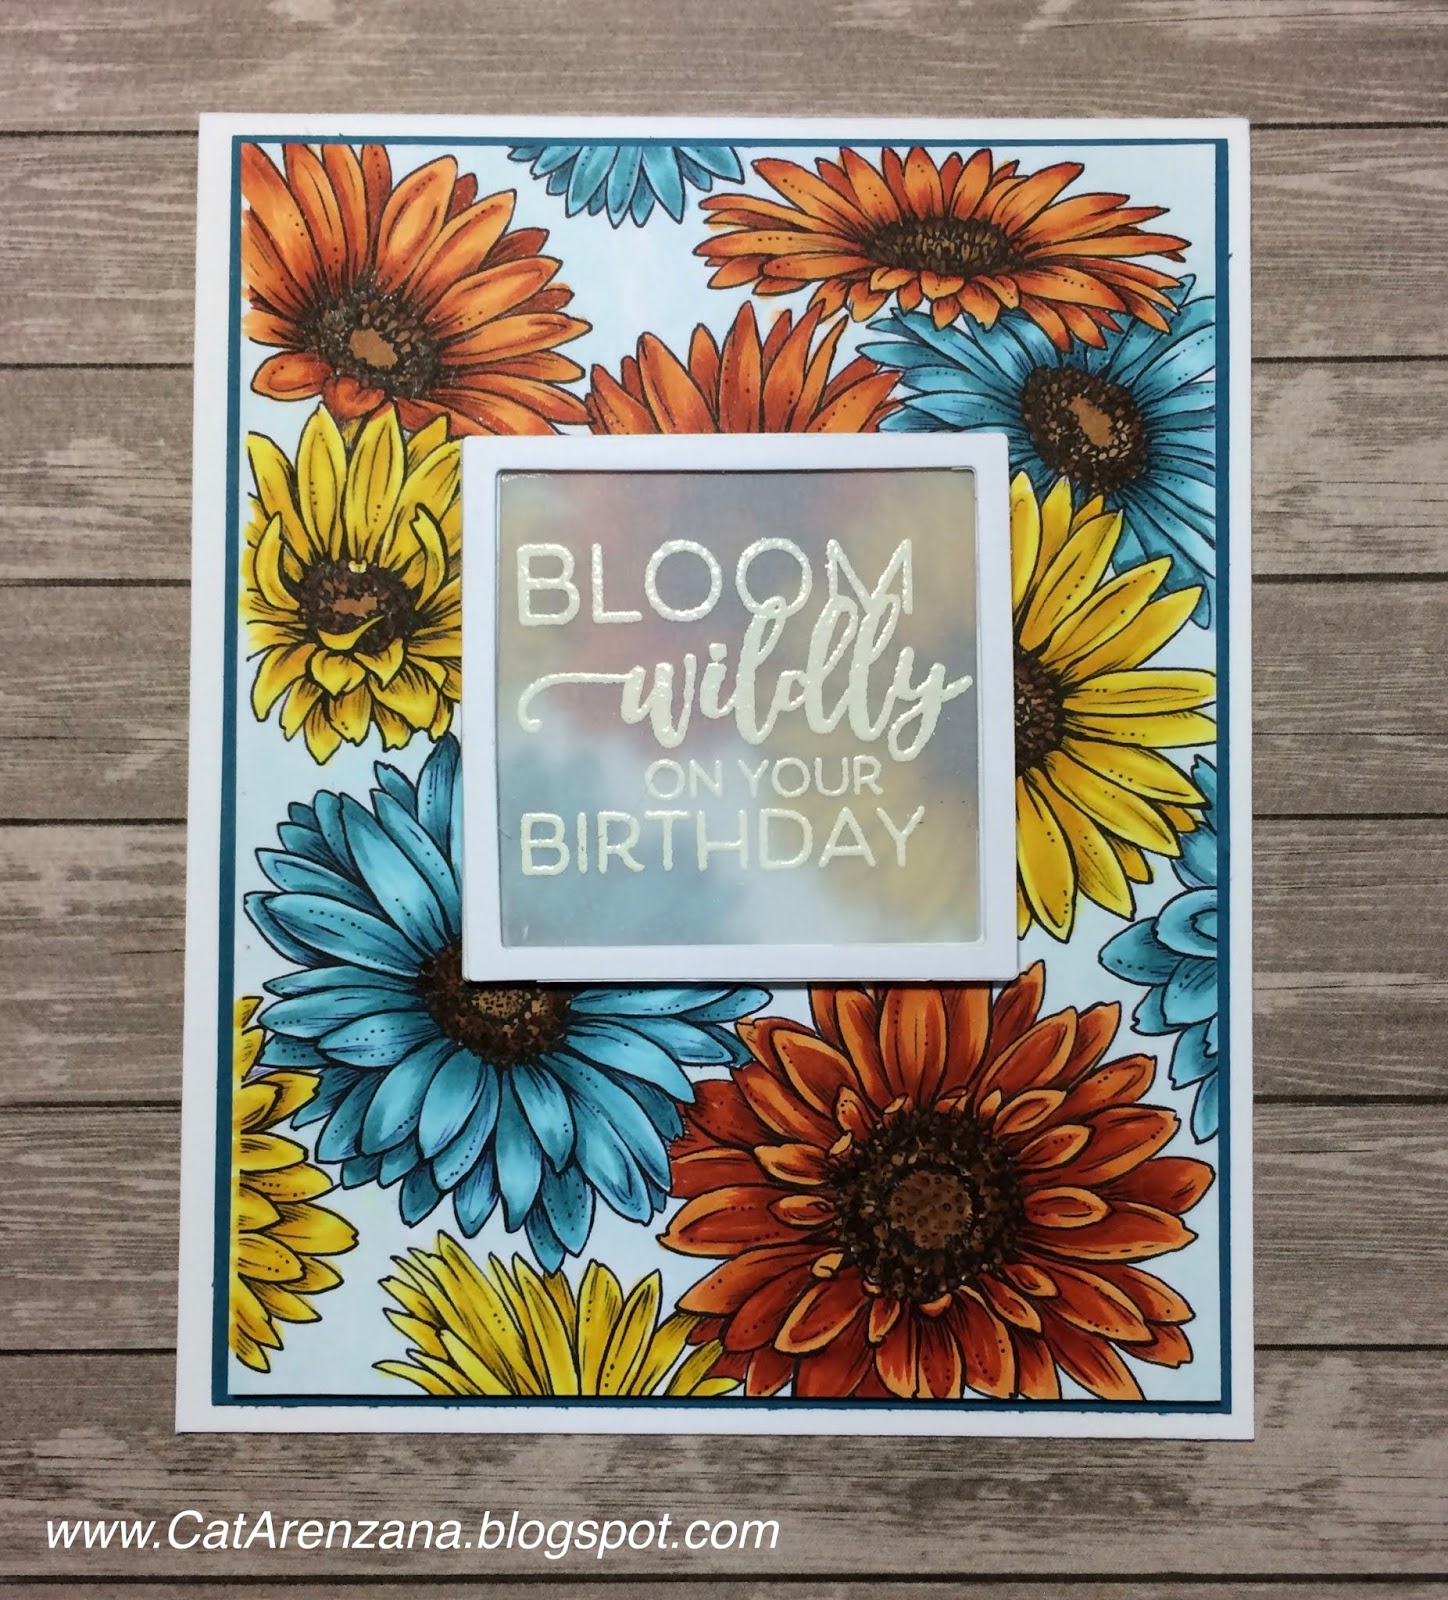
Oh, hi!  How's the weather where you are?  It's sort of starting to cool off here . . . Mid to Low 90s.  I am so ready for Fall.  so.very.ready.  And with Fall on my mind, I chose a Fall-ish color palette for this card.  I do love teal, orange and yellow together.

{Supplies used are linked in the text in this post.
Compensated affiliate links may be used at no additional cost to you.
Thank you for your support!} 
Obviously that's a whole lotta Copic coloring going on. . . but you guys, when a fabulous company offers a free digital stamp and another fabulous company offers a free class to learn how to color that digital stamp . . . well, you jump on that!

I have learned so much good stuff in this class offered by Kit & Clowder!  And the Kindness is the Way digital stamp set by Power Poppy is beautiful.  BEAUTIFUL!

I totally encourage you to check it out. . . did I mention that it's free?  As in, Zero Dollars.

Okay . . . on to the card.  I printed out the daisy background onto Neenah Solar White card stock.  I've always been afraid of digital stamps.  But you know what? This was super easy to download and you can even re-size the images.  By the way . . . there are a couple of different images in this digital set.

I colored (for days and days) using Copic Markers and when I was all done, I thought, "Well now. . . what am I going to do for a sentiment?? I don't want to totally cover up all that work."  Lucky for me, I had just watched a video by Jennifer McGuire where she used a frame with vellum so the background would be muted, but not covered up.  Perfect.

So, I cut three frames using the Large Classic Squares and Small Classic Squares Nestabilities dies from Spellbinders.  I stacked the frames just to give it a bit of dimension.

Then I stamped and embossed the sentiment from the Pure Prairie Spirit stamp set onto Vellum using VersaMark ink and White Embossing Powder.  I used the larger square die to cut the vellum so it would fit behind the frame perfectly.

Copics used: YR12, YR14, YR18, B00, B53, B57, Y08, Y11, Y13, Y15,
E23, E37, E29, E79, BG0000
I did use foam tape behind the frame for some extra lift.  Here's a hint . . . cut the foam tape in thin strips and only adhered it to the card stock frame.  I also used foam tape on the daisy panel. . . because, you know me. . . I love my foam tape!

Finally, I adhered that to a dark teal panel and then onto a white card base.  And there ya have it. . .


Thanks so much for stopping by today!

Sunday, August 5, 2018

Simply Camellias

In case you haven't noticed, I'm currently on a flower kick.  So many pretty flower stamps out there!  And flowers are always versatile.

{Supplies used are linked in the text and thumbnails in this post.
Compensated affiliate links may be used at no additional cost to you.
Thank you for your support!} 
When coming up with the layout for this card, I had fully intended on using a background die, but it just wasn't working for me.  I really wanted those flowers to be the focal point.


I did, however, want some sort of background so I opted for patterned paper.  And then I decided that I wanted the patterned paper to be behind the flowers so I created an open frame with dies.


And I finished it off with a few clear sequins.

Thanks for stopping by today!
Here's what I used:

Simply Camellias by Power Poppy

Saturday, August 4, 2018

One Layer Wonders - Day 5

A little bit of masking, a whole lot of coloring, and then using a ruler.  Oh mylanta . . . It took me 2 days to work up the courage for that.  TWO days.  I don't get along with rulers. Or, it could be that every ruler I own (and I have quite a few) is actually crooked because I can't draw a straight line with one.  Seriously.  Even with my clear ruler. . .I line up all the lines and my line still comes out crooked.  Am I the only one?

Anyway. . . here's my card from Day 5 of class:

{Supplies used are linked in the text and thumbnails in this post.
Compensated affiliate links may be used at no additional cost to you.
Thank you for your support!} 
That super fluffy peony is part of the Abundant Petals set from Power Poppy.  It is ginormous! And perfect for a card like this.  Actually, it's pretty much perfect for anything.

So, back to the ruler thing. . . those black label looking things aren't labels at all. Part of the lesson was to create a "label-look" and if ever I get over my fear of rulers, I'll probably be trying that technique again.


Now then, since those peonies are so big and fluffy, I wanted a really nice bold sentiment.  And the Wonderful Florals set by Concord & 9th fit the bill!  And the best part?  Each word is a separate stamp.  No surgery required!  And, using a stamp positioner made it really easy to line up.

The Copics I used are linked below.

Thanks so much for visiting today!

Friday, August 3, 2018

One Layer Wonders - Day 4

Seriously you guys . . . this is a fantastic class!  Especially if you're looking to stretch those creative muscles and try something new.

This class was about using neutral markers for shading multiple colors on an image. . . and a bunch of other good stuff too.

I learned that this particular technique is something that I definitely need to practice.  I think it is an amazing look, but I totally over-blended the colors.  However, with that being said, I'm pretty happy with how this turned out since this was my very first attempt with this technique.

{Supplies used are linked in the text and thumbnails in this post.
Compensated affiliate links may be used at no additional cost to you.
Thank you for your support!} 
Obviously, there was a whole lot of masking going on, which is something that I used to do way back when and then it kinda just went by the wayside.  I had forgotten how much I really like the look of masked images.

To create this bouquet, I used the Abundant Petals set by Power Poppy and the Beautiful Day set by Altenew.

I stamped all of the images in Tuxedo Black Memento Ink.  The sentiment was stamped in Onyx Black Versafine Ink.  For this card, I didn't use Neenah Classic Crest like I usually do.  I decided to use a different card stock because of the ink blending up in that top left hand corner.


Oh, HELLO!  The ink blended like butter on this stuff!  So, if you have a hard time blending dye based inks, including the Original Distress Inks, run! Don't walk . . .RUN and go get yourself some Cougar White Super Smooth Cardstock.  It's also really good for Copics.

Anyway. . .  to do that blending in the upper left corner, I used Frosty Pink Altenew Crisp Ink with a Mini-Ink Blending tool.  To get that sparkle, I splattered a bit of Perfect Pearls a la Kelly Latevola.

So glad you stopped by today!

Saturday, July 28, 2018

Pure Prairie Spirit Bouquet

This bouquet! So many details. So many fine lines.  I am truly in awe of Marcella Hawley (owner of Power Poppy)!  All of her stamps are hand drawn. . . hand drawn.  I can't even draw a straight line with a ruler!

Anywho . . . here's a card I made using the Pure Prairie Spirit Bouquet stamp set:

Copics used: Sunflowers - YR15, YR18, R59, E23, E27, E25, W1, W2
White Daisies - C1, BV31, BV34, Y11, Y13, Y15
Pink Flowers - C1, C3, RV00, R81, R83, R85, Y13, Y15
Red Flowers at the top - W1, W2, R02, R05, R08
Blue Flower - C1, B0000, B52, B45, C7
Yellow Sprigs - W1, Y11, Y13, Y15
Red Flowers at the bottom - W1, W2, R22, R24, R27
Stems and Leaves - C1, C3, G40, G43, G46
Bouquet Tie - E31, E34, E37, W1

I'm not sure if I chose Kraft and gingham card stock because of the name of the set, or what.  But, there is something organic about Kraft card stock and the word "Prairie" just conjures up visions of gingham tablecloths.  Anyway, when I was working on putting this card together, I knew that I did want to keep layers and patterns to a minimum.  I mean. . .that bouquet is the star of the show here.

I have quite a few Power Poppy stamp sets in my collection.  They stamp beautifully, the detail is incredible and they are perfect for practicing Copics.  If you haven't checked them out, I encourage you to do so. . .they are fabulous stamps!

Thanks for visiting today!

Wednesday, June 13, 2018

On the Windowsill

There's just something about flowers in a jar, am I right?  Especially when they're sitting so pretty on a windowsill all in a row.

Lucky for me, Power Poppy has a stamp like that in the Go Wild stamp set. . . especially because I do.not.have a green thumb.  So, my idea of gardening is coloring pretty flowers.  Now if I could just figure out how to get those stamped images to actually smell like flowers . . .

Anywho . . . on to my latest card:

Copics used: G40, G43, G46, YG93, YG95, G99, YR04, YR07, YR18, Y11, Y13,
Y15, Y08, YR27, YR00, W0, W1, W2, C1, C3, C5, E41, E42, E43,
E31, BV31, BV34, BG70, BG0000, B000
I really took my time when I colored this image. . . so many tiny spaces!  But it was quite relaxing to just focus in and spend time coloring. . . while listening to Joe Kenda: Homicide Hunter on TV.

Wait, what?  Yes, you read that right.  I was listening to a crime show on TV while I was coloring.  I almost always have the TV on while I'm working in my studio.  Mostly for background noise.  And it's usually a movie that I've seen at least 432 times. . . like Sing Street, Pitch Perfect, or Music & Lyrics.  But, when I need to be mindful of time or a reminder to get up and stretch, I'll listen to a TV show instead, because seriously. . .I could sit and color for hours upon hours.

What about you? Do you have background noise going when you're crafting?

Thanks for stopping by today!

Wednesday, June 6, 2018

Summer Came Early

Really early. And, it has been hot, hot, hot!  Triple digits in early June! This type of weather calls for ice cold lemonade. . . both literally and in stamp form.

So, I pulled out my Tea in the Garden stamps by Power Poppy and created a card for the current Power and Spark Challenge: Round and Round.


Copics used: Y02, Y06, Y11, Y13, Y15, Y08, YR24, YG01, YG03,
YG17, G40, G43, BG70, BG0000, B0000, B00, E0000, W0, C1, C3
The yellow polka dot paper is from My Favorite Things and the blue flower paper is from Hampton Arts KI Growing Garden Paper Pad.  I used gingham ribbon to "connect" the patterned papers and add some texture.

So, how's the weather been where you are?  Hot enough for lemonade?

Thanks for stopping by today!

Saturday, June 2, 2018

Mmmmm . . . Cake

After I colored this stamp from the Tea in the Garden set by Power Poppy, I suddenly had a craving for cake.  Can you blame me??  I mean, just look at it! Of course, I'd have to give the strawberries to my husband because I'm allergic, but that cake!  I could probably polish it off in one sitting.  Okay, maybe two.

Copics used: E00, E21, Y21, E0000, E23, E27, E29,
R24, R27, R29, R59, G82, YG63, YG67, C1, BG10, Y15
Oh, and the patterned paper?  I've had it F.O.R.E.V.E.R.  I've pulled it out a number of times to use it, but always changed my mind.  I guess I was saving it for just the right stamp.  Glad I finally found it.

So, do you have paper that you've been "saving" for the perfect project?  How long have you been saving it?

Thanks for visiting today!

Thursday, May 31, 2018

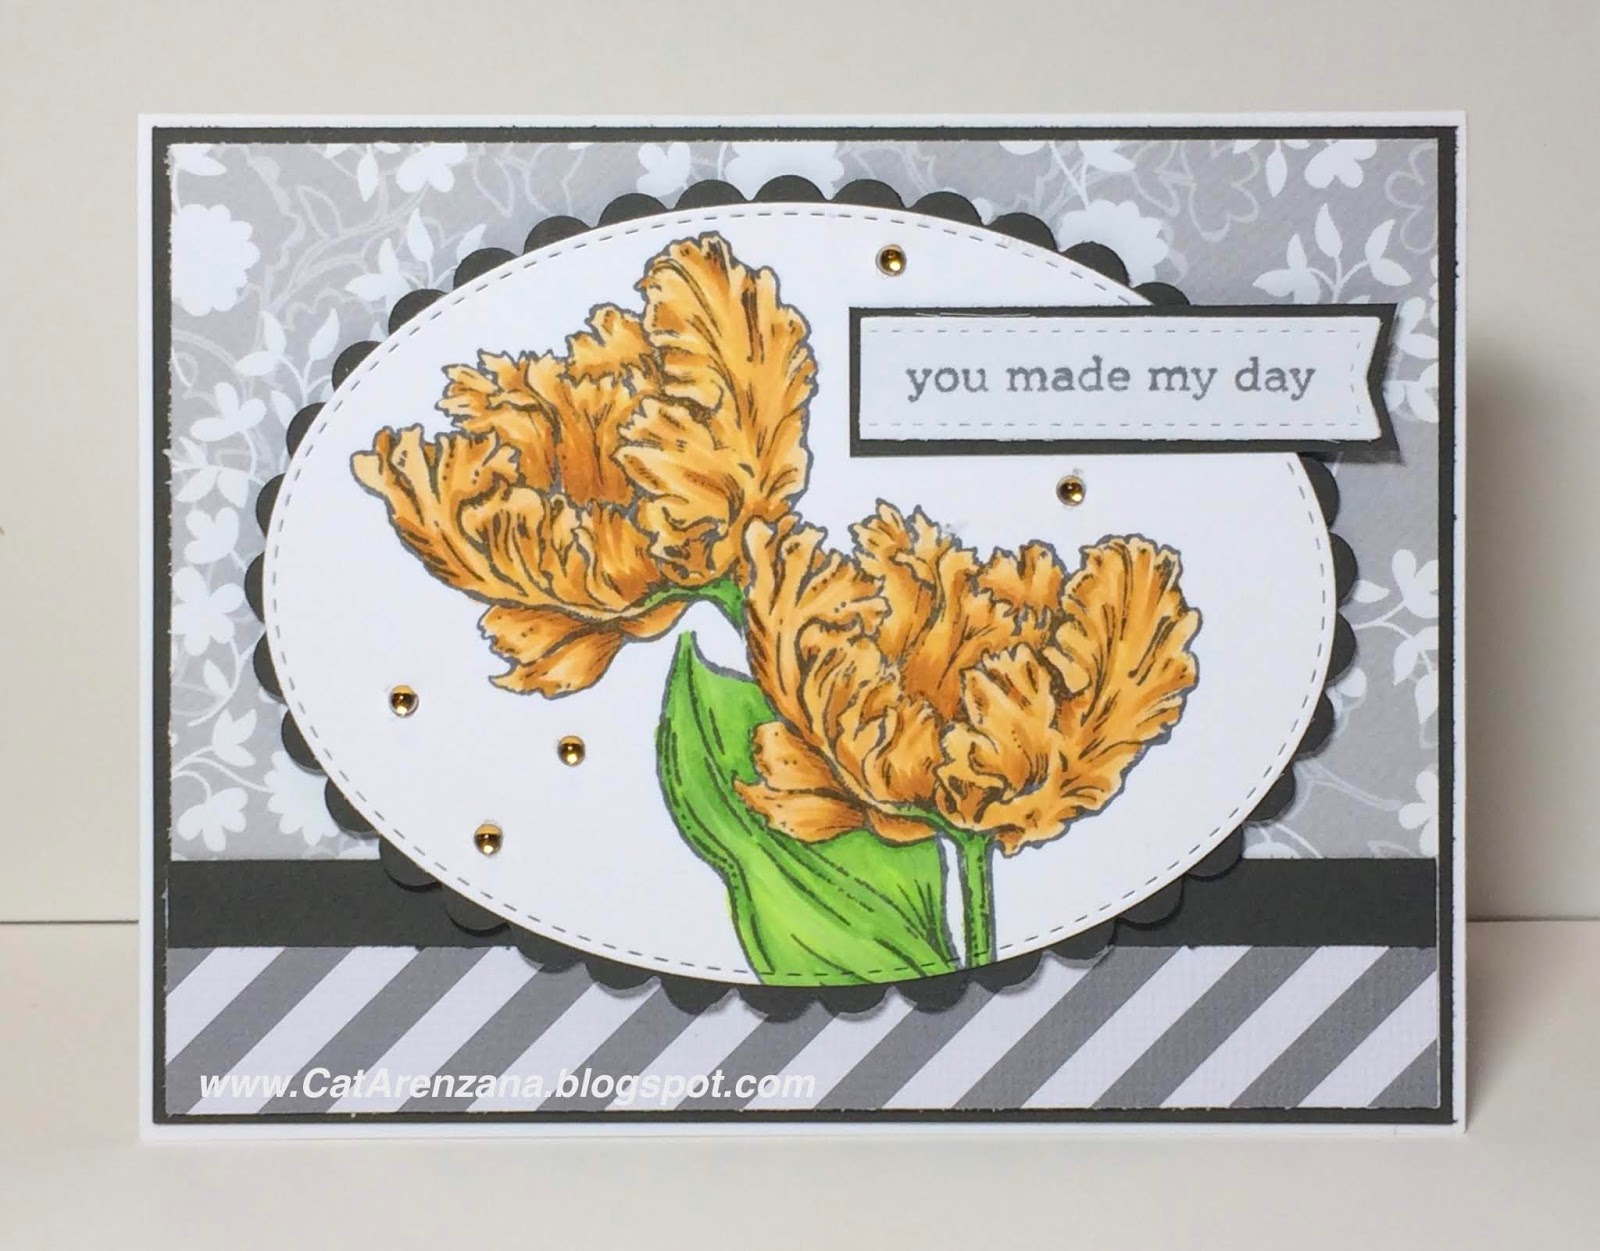
Fluffy French Tulips

You guys!  I am in love with the new Abundant Petals stamp set from Power Poppy!  And, with the latest Hues to Use challenge, oh you bet I was gonna be using the French Tulips from the set.

I mean, seriously . . . just look at these colors!


So, I pulled out my stamps and my copics and came up with this:

Copics used:YR20, YR21, YR24, YG01, YG13, YG17
I did a bit of masking on this one, even though I have the coordinating dies. I also decided to stamp the images in Gray Flannel Memento ink.  It creates a much softer look and that's what I was going for with these fluffy tulips.

I added some bling and the sentiment on a fishtail banner to help fill in some of the white space around the tulips.

So glad you stopped by today!

Wednesday, May 23, 2018

Sassy Succulents

Black and White with a Pop of Color?  Sign me up!  That's the monthly Power & Spark Challenge over on the Power Poppy Blog. (You can read all about it right here.)


As I was going through my Power Poppy stamps, I decided to use Sassy Succulents.  I don't know about you, but when I think of succulents, I automatically think of dusty green.  And those were the colors I went with when I first colored them up . . . dusty greens. 

And then I thought, "Hmph, that's not very dramatic at all.  Pretty, but not dramatic."

So, off to the Google I go and look look look what I found!  Squeeeeeee!  I am always drawn to oranges and corals, so I decided to use the photo below for my color inspiration.

Photo from www.simplysucculents.com
And, here's what I came up with:

Copics used: YR00, YR02, R05, G43, G46
I was originally just going to color part of the image and leave it flat, but decided to reach deep in the technique archives and do a true "Spotlight" by cutting the colored part down and mounting it on a piece of black cardstock.  So, glad I did!  I'm quite happy with how it turned out.

Thanks for visiting today!


Saturday, May 19, 2018

Roses & Berries

I hafta admit that I surprised myself using these peachy tones again. . . I tend to gravitate towards bright colors.  But, my friend who's getting married later this year, had shown me a bunch of pictures of bouquets that she leaning towards and the flowers were cream, ivory, blush pink and sort of peachy.  I guess that's where my inspiration came from for this card:


This stamp is from the Go Wild set by Power Poppy.  I know. . . I know. . . I've mentioned this in every Power Poppy post, but Gosh!  The quality of these stamps is amazing!  I just love them!

Any who . . . here are the markers I used for this card:


And the dies?  Oh . . . yes, the Stitched Oval is from Memory Box, the Scalloped Oval is from Spellbinders, and the Fishtail Banner is from Lawn Fawn.

So glad you stopped by today!

Friday, May 11, 2018

Just Peachy

Magnolias . . . aren't they so pretty?  We had a magnolia tree when we lived in California and I always looked forward to when the buds would bloom. . . they were so fragrant!  So, when I saw the Planning for Magnolias set by Power Poppy, I knew I had to add it to my collection.

And when I stamped the branch for the very first time, I was in awe of all the detail in the stamp!

I just kinda stared at it for a while, thinking about what colors to use.  I wanted soft, subtle colors, so I decided on shades of peach.  On a side note, I stamped the image in Gray Flannel Memento instead of black for a softer look.


After I colored it up, I decided to use this card sketch from MFT.  It was perfect for that Magnolia branch!

Here are the markers I used:


And I edged the tag with a little bit of Vintage Photo Distress Ink just to make it stand out a bit.

Thanks for stopping by today!

Monday, April 30, 2018

Wildflowers in a Jar

What says Spring more than wildflowers in a jar?   We had a few bluebonnets pop up in the field behind us and I was so happy because surely that meant spring was definitely here!

And then we had a cold front come through . . .wacky weather, I tell ya.

Anyway, onto the card:


This stamp is from Power Poppy's Go Wild stamp set..  It's a great set and I can't wait to color the other images.

Here are the markers I used:


Thanks for stopping by today!

Sunday, April 8, 2018

Everything Can Be Fixed

It's true . . . it's very rare that a "mistake" cannot be fixed when it comes to card making or any paper crafting project really . . . consider it an opportunity for embellishment, or practicing fussy cutting.

Hence, my next two cards.

Perhaps you recall the other Orchid cards?  There is a spray of unopened buds that comes out from the flower in the top right.  Well, I attempted to do a partial die cut on this one and all I can say about that is, "Whoops."

So, I just grabbed those scissors o' mine and cut it out.  See? Problem solved.


I used Gray Flannel Memento ink to stamp the orchids and I ever.so.lightly sponged Tattered Rose Distress ink on the oval behind the orchids.

Here are the markers I used:


On this next card,  I had originally covered the image with a mask and sponged around it, with the intention of having the focal point of the card be a rectangle.  But one slip of the paper trimmer, and whoops! Time to grab the scissors . . . 


For the background die, I used the Majestic Labels 25 from Spellbinders.  I am in love with all the intricate details in this die set!  I also sponged a tad bit of Antique Linen Distress ink around the edges.

Here are the markers I used to color the orchids:


Thanks for visiting today!

Friday, March 23, 2018

The Other Orchids

Gosh, you guys . . . the stamps from Power Poppy stamp so nicely!  Here are a few more cards using the other orchids from the Orchids Rock set:


Here are the markers I used:


Here are the markers I used:


Thanks for stopping by today!

Monday, March 19, 2018

Oh My Orchids

My mother-in-law has orchids. . . the most beautiful orchids.  She's definitely got a green thumb. . . maybe two.

I, on the other hand, can kill a silk plant by looking at it too long . . . sigh . . .

Good thing there are lots of stamps of plants and flowers and such out there. . . like these by Power Poppy.  Can't kill an image of a flower, right?


April's theme for stamp club happens to be "In the Garden" . . . so I decided to use these stamps.  I actually stamped and colored the orchids a number of times. . . just to play around with different colors. . . because orchids are available in at least a bazillion different colors.  I had no idea.

Here's what I came up with for my club card:


And these are the Copics I used:


The die cut label by Spellbinders was inked with Peanut Brittle Memento ink after I embossed it. The sentiment is by Kennedy Grace Designs and I used a banner die from Avery Elle or Lawn Fawn . . .I can't remember who makes those dies. . . to cut that out.  The little banner is also inked with Peanut Brittle Memento.

Now. . . I had no intention of cutting out that image . . . none . . . but one of my green markers decided to pool and drop a big old blob of ink . . . and there was no way I was going to start over, so I pulled out my scissors and a craft knife . . . see? Everything can be fixed.

And here's another card using the same stamp . . . but this time I stamped the orchids in Gray Flannel Memento ink instead of Tuxedo Black.


And here are the Copics I used:


The Stitched Oval dies are from Memory Box.  I also created a mask so I could sponge around the orchids with Antique Linen Distress Ink to make the "white" look brighter.

Thanks for visiting!

10