About Me

Showing posts with label Elizabeth Craft Designs. Show all posts

Saturday, March 23, 2019

Happy Easter Peeps

Oh, hi! I finally feel like I've adjusted to the time change. . . and the new set-up in my craft room. sort of.

One super fabulous thing about the new set up in here is that I can get to all my pretty little embellishments now without having to dig through mountains of stuff.  It makes it so much easier to actually use stuff.

Take for instance, this card:

{Supplies used are linked in the text in this post.
Compensated affiliate links may be used at no additional cost to you.
Thank you for your support!}

My glitter and sequins were right within reach and easy to get to, and seriously . . . how CA-ute are those bunny peeps??

And it's so easy to make them all sparkly in whatever color markers you might have!  Oh, yes, there is a video:


Supplies used:

Gina Marie Designs Bunny Peep Die
Gina Marie Peek-a-Boo Circle Dies
Elizabeth Craft Designs Adhesive Sheets
Elizabeth Craft Designs Cool Diamond Glitter
Gerda Steiner Designs Nerdy Easter Bunny
Versafine Onyx Black Ink
Copics used:

Y08
RV04
BV02

Wednesday, August 29, 2018

Glittery Goodness

Oh, hi!  I'm back with not one. . . not two. . . but 3 cards today!  I had a grand time playing with some new dies AND glitter AND Copics AND Alcohol Ink.  By the time I was done, I was a sparkly, inky mess.
{Supplies used are linked in the text in this post.
Compensated affiliate links may be used at no additional cost to you.
Thank you for your support!} 
Oh. . .and there's a video showing how I got all that glittery goodness, too!  Yep!  I finally got set up to do craft videos.  I'm pretty excited about that!  So, if you have 14 minutes and 8 seconds, please check it out and let me know what you think.  Feedback would greatly be appreciated being that this is my first video and all.


Ok . . on to the cards.  For all three cards I used Cool Diamond Silk Microfine Glitter and Double-Sided Adhesive Sheets by Elizabeth Craft Designs.


For the card above, I used the Lovely Lilacs Die by Spellbinders.  I love that it's a set of two dies because it makes it super easy to get all that glittery goodness.

After I glittered it up, I added color using R81, R83, R85 and G46 Copic Markers.  Then I cut an oval from Natural White Neenah card stock using my Large Classic Ovals Nestabilities and adhered that to a black scalloped oval that I cut using Fancy Edged Ovals dies.  The sentiment is from the Brushstroke Expressions set by My Favorite Things.

I used foam tape to pop up the flowers and the ovals on a panel of patterned paper, then adhered that to a black panel, and finally, added that to a top folding card from the same Natural White Neenah card stock.  Viola!  All done.

For the second card, I decided to try Tim Holtz Alcohol inks.  I figured if Copics worked, then they should too.  Ta-Da!  They do!


For this card, I used the Wagon Wheel Kaleidoscope die by Spellbinders.  I glittered it up and then applied Watermelon, Butterscotch, Meadow, and Aqua Alcohol Inks.  I adhered that to a white panel using Tombow Multi Mono Liquid Glue.

Those coffee cups are from the August My Monthly Hero* kit from Hero Arts.  I stamped them onto patterned paper and then cut them out.  I adhered the bigger mug onto a white circle using a tape runner.  Then I used foam tape for the smaller mug.  I thought the white circle needed a border, so I cut a circle from yellow card stock.

The sentiment is stamped on white card stock and I added a yellow frame to match the circle.  I used foam tape to adhere the circles and the sentiment on top of the Wagon Wheel die.  Then I adhered that to a yellow panel, and finally onto a white top folding card.  Ta-Da!  Finito!

*The August My Monthly Hero kit is already sold out, but these coffee stamps or these coffee stamps would work well, too.*

For the third card, I thought I'd try Copic Refills.  Lo and behold! They worked too!


For this card, I cut a black frame using Oval Dies from Spellbinders. For the glittered oval, I used the larger of the two oval dies.  The Bellina Butterfly Stem die is from Poppy Stamps.  I love how delicate it is.

I used G02 and BG34 Copic Refills and applied it using an Alcohol Ink Applicator Tool.  Easy Peasy, Quick and Easy!  I adhered the glittered oval to a white panel that was embossed with a Cuttlebug Folder.  Then adhered that to a black panel and finally, a white top folding card.  Viola!  All done.

And there ya have it!  Three cards full of glittery goodness!

Thanks for stopping by today!

Wednesday, May 16, 2018

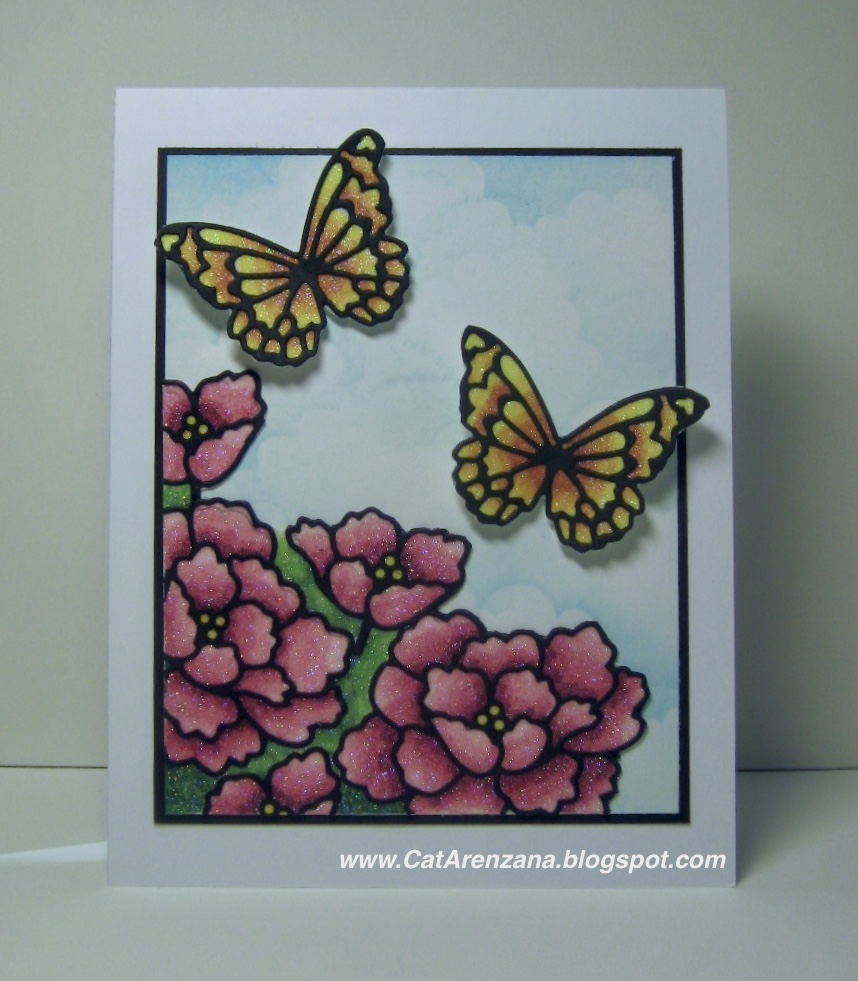
Butterflies & Peonies

Memory Box has another challenge . . .and you know how I love a challenge!

Maychallenge
I created this card using the Avezzano Butterflies and the Budding Peony dies . . . or pieces of them, anyway.  That's one of the many things I love about Memory Box dies.  So many of them can be used as they are, or they can be cut apart into smaller pieces.


There were definitely a few steps involved, but I'm so happy with how it turned out!  All that glittery goodness!


These are the markers I used:


This particular technique is one that I've taught many times and these dies . . . with the fine lines and all the detail . . . oh, how my heart fluttered! I knew they would be perfect for all this glittery goodness.

I know, I know . . . a video would be so much better for a tutorial, but I'm not set up for that (yet).

And, truthfully, I was just going to post the card without a tutorial, but changed my mind, because someone out there might like to learn how I did this.

So, here it goes.

Supply List:
  • Detailed die(s) like those that I used from Memory Box
  • Clear Double Sided Adhesive by Elizabeth Craft Designs
  • Cool Diamond Silk Microfine Glitter by Elizabeth Craft Designs (yes, the glitter makes all the difference. I've tried this technique with other glitters and they just don't work as well)
  • Various colors of Copic Markers (I've only ever done this technique with Copics. I don't know if other markers will work.)
  • Scraps of White card stock

Step 1: 
Die cut the small butterfly twice and the peony three times.


Step 2:
Trim the frame away from the butterflies and cut apart the peonies. I also trimmed around the top of the butterfly wings.


Step 3:
Apply Transparent Double Sided Adhesive to a piece of white cardstock.


Remove backing to expose adhesive on the front of cardstock and set the backing aside; you'll need that in a minute.

Step 4:
Place the butterflies on top of the exposed adhesive.  


Step 5:
Place the backing on top of the butterflies and rub over them really well to make sure they are stuck to the adhesive.

You can kind of see the butterflies under the brown release paper

Step 6:
Remove the release paper and pour glitter over the butterflies.

I have a tray that I use for glittery projects.  There is a sheet of fabric softener in the bottom of the tray to help reduce static.  The coffee filter creates a catch so it's easy to pour left over glitter back in to the jar and also helps reduce static.
Step 7:
Using your finger, "burnish" the glitter by rubbing in a circular motion over the entire surface.  The goal is to keep burnishing until you no longer feel any stickiness from the adhesive.  Shake off the excess glitter and then use a soft brush to get rid of the remaining glitter bits.

Step 8:
Time to add color!  But before we start, this is very important: do not color in a back and forth or circular motion; this will cause the glitter to start moving around. You literally want to dab the tip of the marker to the surface.  


And there ya have it. . . your butterflies are all colored!

Moving on to the peonies . . . the steps are pretty much the same, but here's how I figured out the layout and whatnot.

I positioned the peonies on a piece of white card stock and then used Scotch Removable Tape to hold them in place.


Next, I lightly traced with a pencil around the blooms so I would know where to place them after I put the adhesive on the card stock.  I left the removable tape on the blooms to make it easier to put them back into place.


After I put the adhesive on the card stock and repositioned the peonies, I gently pressed the peonies so they would stick, but was careful not to press too hard on the removable tape, because, well . . . I  wanted it to be removable and that Elizabeth Craft adhesive is super sticky.

Once I peeled off the removable tape, I put the release paper over the blooms and rubbed them really well into the adhesive, like I did in Step 5 for the butterflies.

Then, it was just a matter of repeating Steps 6, 7, and 8.

And, here's how I colored the peonies:


To finish up the card, I stenciled clouds using Tumbled Glass Distress Ink onto a piece of 3.5" x 4.5" white card stock. Then, I fussy cut the butterflies and fussy cut around the peonies.  I adhered the peonies using my ATG and used foam tape to adhere the butterflies.

I adhered that panel to a piece of 3 5/8" x 4 5/8" black card stock and then adhered it to my card base. Here's the completed card one more time.


Thanks for stopping by today . . . and if you decide to try this technique, please share your creations. I would love to see them!  And, of course, if you have any questions, please feel free to contact me; I'd be happy to help you!

Monday, January 29, 2018

A Moo-velous Birthday

One thing I love about being part of a Stamp Club is sometimes the themes really challenge me.  The theme for February is to create a Pop-Up card.  Yay!

For the front of the card, I kept it pretty simple . . . I stamped the cow on X-Press It card stock and colored with Copics.  Of course, I wanted to add dimension, so I cut it out and used foam tape when I adhered it to the circle.


For the inside of the card, I used the Lots of Pops die set from Elizabeth Craft Designs.  I gotta tell ya . . . that die set sure made making a pop-up card really easy.  I did use the same cow stamp for the inside, but when I cut it out this time, I left the flower in her mouth.

The sentiment was printed from my computer and then I used my Spellbinders oval dies to cut it out. There was a lot of detail involved adding that banner . . . and I had no idea I could even tie bows that tiny!


Thanks for visiting!
10