 |
| {Supplies used are linked in the text in this post. Compensated affiliate links may be used at no additional cost to you. Thank you for your support!} |
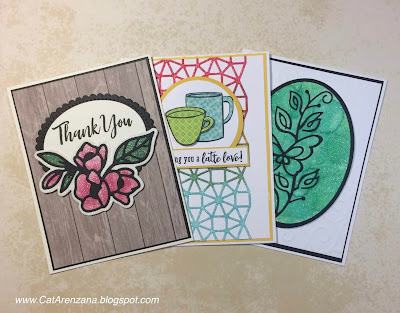
Ok . . on to the cards. For all three cards I used Cool Diamond Silk Microfine Glitter and Double-Sided Adhesive Sheets by Elizabeth Craft Designs.
For the card above, I used the Lovely Lilacs Die by Spellbinders. I love that it's a set of two dies because it makes it super easy to get all that glittery goodness.
After I glittered it up, I added color using R81, R83, R85 and G46 Copic Markers. Then I cut an oval from Natural White Neenah card stock using my Large Classic Ovals Nestabilities and adhered that to a black scalloped oval that I cut using Fancy Edged Ovals dies. The sentiment is from the Brushstroke Expressions set by My Favorite Things.
I used foam tape to pop up the flowers and the ovals on a panel of patterned paper, then adhered that to a black panel, and finally, added that to a top folding card from the same Natural White Neenah card stock. Viola! All done.
For the second card, I decided to try Tim Holtz Alcohol inks. I figured if Copics worked, then they should too. Ta-Da! They do!
For this card, I used the Wagon Wheel Kaleidoscope die by Spellbinders. I glittered it up and then applied Watermelon, Butterscotch, Meadow, and Aqua Alcohol Inks. I adhered that to a white panel using Tombow Multi Mono Liquid Glue.
Those coffee cups are from the August My Monthly Hero* kit from Hero Arts. I stamped them onto patterned paper and then cut them out. I adhered the bigger mug onto a white circle using a tape runner. Then I used foam tape for the smaller mug. I thought the white circle needed a border, so I cut a circle from yellow card stock.
The sentiment is stamped on white card stock and I added a yellow frame to match the circle. I used foam tape to adhere the circles and the sentiment on top of the Wagon Wheel die. Then I adhered that to a yellow panel, and finally onto a white top folding card. Ta-Da! Finito!
*The August My Monthly Hero kit is already sold out, but these coffee stamps or these coffee stamps would work well, too.*
For the third card, I thought I'd try Copic Refills. Lo and behold! They worked too!
For this card, I cut a black frame using Oval Dies from Spellbinders. For the glittered oval, I used the larger of the two oval dies. The Bellina Butterfly Stem die is from Poppy Stamps. I love how delicate it is.
I used G02 and BG34 Copic Refills and applied it using an Alcohol Ink Applicator Tool. Easy Peasy, Quick and Easy! I adhered the glittered oval to a white panel that was embossed with a Cuttlebug Folder. Then adhered that to a black panel and finally, a white top folding card. Viola! All done.
And there ya have it! Three cards full of glittery goodness!
Thanks for stopping by today!


No comments:
Post a Comment