Thursday, May 31, 2018

Fluffy French Tulips

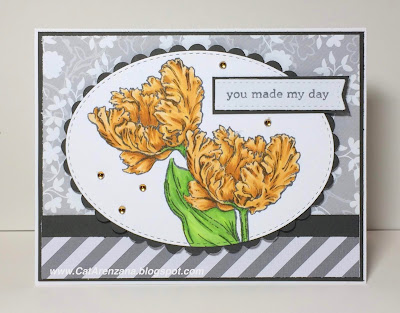
You guys!  I am in love with the new Abundant Petals stamp set from Power Poppy!  And, with the latest Hues to Use challenge, oh you bet I was gonna be using the French Tulips from the set.

I mean, seriously . . . just look at these colors!


So, I pulled out my stamps and my copics and came up with this:

Copics used:YR20, YR21, YR24, YG01, YG13, YG17
I did a bit of masking on this one, even though I have the coordinating dies. I also decided to stamp the images in Gray Flannel Memento ink.  It creates a much softer look and that's what I was going for with these fluffy tulips.

I added some bling and the sentiment on a fishtail banner to help fill in some of the white space around the tulips.

So glad you stopped by today!

Wednesday, May 30, 2018

Brianna the Butterfly

The color palette I chose for this card was very heavily inspired by a card I found on Pinterest created by Michelle Boyer.  Her color combinations are Ah-mazing.

And I admit, I was a bit nervous about using some of these markers together because I was so afraid of ending up with a muddy look.  But, lo and behold! I did it!

This stamp is by Stamping Bella.  Isn't she so sweet?!  I can't wait to try different color combinations, now that I'm feeling brave and all.


Here are the markers I used:


So glad you stopped by today!

Tuesday, May 29, 2018

Oh My Goodness!

This totally made my day!  What an honor to have been spotted by MFT!  You can check it out right here . . . and please do, because I wasn't the only one . . . there are some amazing cards here!


Thanks for visiting today!

Monday, May 28, 2018

Can You Dig It?

I know, I know. . .cheesy.  But this little guy does have a shovel, so, there's that.

Copics used: Snail: E41, E42, E43, YG91, YG93, YG95  Mushroom: YR00, YR02, YR07. YR18, E41, E42, E43  Gnome: YR00, E11, E21, E04, C1, C3, C5, R05, R08, E07, BG10, BG53, BG18, BG57, Y00, YR21, YR23, YR27, E31, E34, E33, E57, E79, W0, W1, W3

I purposely left space at the bottom so I can add a sentiment later on.  I do that quite often just in case I need a card in a pinch.

Thanks for visiting today!


Friday, May 25, 2018

Hello Gnome

I've been obsessed with the You Gnome Me set by My Favorite Things for quite some time.  I still don't know why it took me so long to actually purchase the set!  So, be forewarned, there are gonna be a whole lotta Gnomes on the Blog over the next few days.


And the markers I used:


Thanks for stopping by today!

Wednesday, May 23, 2018

Sassy Succulents

Black and White with a Pop of Color?  Sign me up!  That's the monthly Power & Spark Challenge over on the Power Poppy Blog. (You can read all about it right here.)


As I was going through my Power Poppy stamps, I decided to use Sassy Succulents.  I don't know about you, but when I think of succulents, I automatically think of dusty green.  And those were the colors I went with when I first colored them up . . . dusty greens. 

And then I thought, "Hmph, that's not very dramatic at all.  Pretty, but not dramatic."

So, off to the Google I go and look look look what I found!  Squeeeeeee!  I am always drawn to oranges and corals, so I decided to use the photo below for my color inspiration.

Photo from www.simplysucculents.com
And, here's what I came up with:

Copics used: YR00, YR02, R05, G43, G46
I was originally just going to color part of the image and leave it flat, but decided to reach deep in the technique archives and do a true "Spotlight" by cutting the colored part down and mounting it on a piece of black cardstock.  So, glad I did!  I'm quite happy with how it turned out.

Thanks for visiting today!


Tuesday, May 22, 2018

Hippo Bird Day!

Oh . . .you betcha!  Another Hippo card!  This time I had to incorporate those sweet little birds and the festive balloons, too.


Here are the markers I used:


I also used another sketch from MFT . . . I don't know about you, but I could literally spend hours searching for sketches to jumpstart my creativity.  Well, I used to anyway. . . now I tend to just go straight to the MFT sketches. . . they are all so versatile!

What about you?  Do you have a favorite place to find sketches?

Thanks for visiting today!

Saturday, May 19, 2018

Roses & Berries

I hafta admit that I surprised myself using these peachy tones again. . . I tend to gravitate towards bright colors.  But, my friend who's getting married later this year, had shown me a bunch of pictures of bouquets that she leaning towards and the flowers were cream, ivory, blush pink and sort of peachy.  I guess that's where my inspiration came from for this card:


This stamp is from the Go Wild set by Power Poppy.  I know. . . I know. . . I've mentioned this in every Power Poppy post, but Gosh!  The quality of these stamps is amazing!  I just love them!

Any who . . . here are the markers I used for this card:


And the dies?  Oh . . . yes, the Stitched Oval is from Memory Box, the Scalloped Oval is from Spellbinders, and the Fishtail Banner is from Lawn Fawn.

So glad you stopped by today!

Wednesday, May 16, 2018

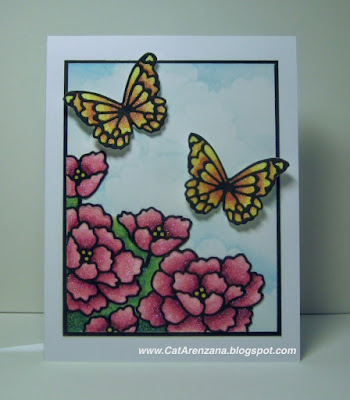
Butterflies & Peonies

Memory Box has another challenge . . .and you know how I love a challenge!

Maychallenge
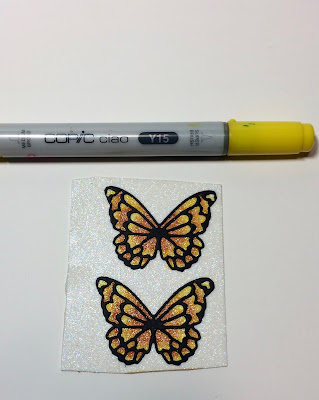
I created this card using the Avezzano Butterflies and the Budding Peony dies . . . or pieces of them, anyway.  That's one of the many things I love about Memory Box dies.  So many of them can be used as they are, or they can be cut apart into smaller pieces.


There were definitely a few steps involved, but I'm so happy with how it turned out!  All that glittery goodness!


These are the markers I used:


This particular technique is one that I've taught many times and these dies . . . with the fine lines and all the detail . . . oh, how my heart fluttered! I knew they would be perfect for all this glittery goodness.

I know, I know . . . a video would be so much better for a tutorial, but I'm not set up for that (yet).

And, truthfully, I was just going to post the card without a tutorial, but changed my mind, because someone out there might like to learn how I did this.

So, here it goes.

Supply List:
  • Detailed die(s) like those that I used from Memory Box
  • Clear Double Sided Adhesive by Elizabeth Craft Designs
  • Cool Diamond Silk Microfine Glitter by Elizabeth Craft Designs (yes, the glitter makes all the difference. I've tried this technique with other glitters and they just don't work as well)
  • Various colors of Copic Markers (I've only ever done this technique with Copics. I don't know if other markers will work.)
  • Scraps of White card stock

Step 1: 
Die cut the small butterfly twice and the peony three times.


Step 2:
Trim the frame away from the butterflies and cut apart the peonies. I also trimmed around the top of the butterfly wings.


Step 3:
Apply Transparent Double Sided Adhesive to a piece of white cardstock.


Remove backing to expose adhesive on the front of cardstock and set the backing aside; you'll need that in a minute.

Step 4:
Place the butterflies on top of the exposed adhesive.  


Step 5:
Place the backing on top of the butterflies and rub over them really well to make sure they are stuck to the adhesive.

You can kind of see the butterflies under the brown release paper

Step 6:
Remove the release paper and pour glitter over the butterflies.

I have a tray that I use for glittery projects.  There is a sheet of fabric softener in the bottom of the tray to help reduce static.  The coffee filter creates a catch so it's easy to pour left over glitter back in to the jar and also helps reduce static.
Step 7:
Using your finger, "burnish" the glitter by rubbing in a circular motion over the entire surface.  The goal is to keep burnishing until you no longer feel any stickiness from the adhesive.  Shake off the excess glitter and then use a soft brush to get rid of the remaining glitter bits.

Step 8:
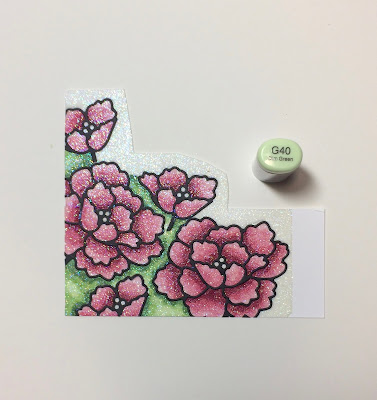
Time to add color!  But before we start, this is very important: do not color in a back and forth or circular motion; this will cause the glitter to start moving around. You literally want to dab the tip of the marker to the surface.  


And there ya have it. . . your butterflies are all colored!

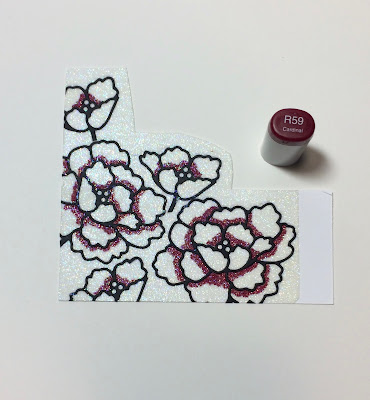
Moving on to the peonies . . . the steps are pretty much the same, but here's how I figured out the layout and whatnot.

I positioned the peonies on a piece of white card stock and then used Scotch Removable Tape to hold them in place.


Next, I lightly traced with a pencil around the blooms so I would know where to place them after I put the adhesive on the card stock.  I left the removable tape on the blooms to make it easier to put them back into place.


After I put the adhesive on the card stock and repositioned the peonies, I gently pressed the peonies so they would stick, but was careful not to press too hard on the removable tape, because, well . . . I  wanted it to be removable and that Elizabeth Craft adhesive is super sticky.

Once I peeled off the removable tape, I put the release paper over the blooms and rubbed them really well into the adhesive, like I did in Step 5 for the butterflies.

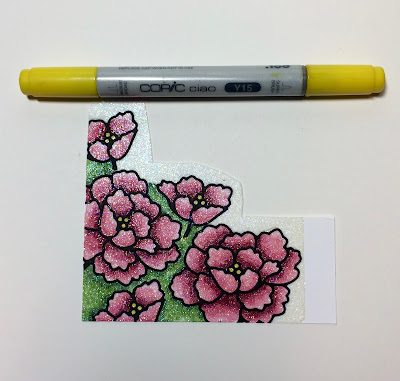
Then, it was just a matter of repeating Steps 6, 7, and 8.

And, here's how I colored the peonies:


To finish up the card, I stenciled clouds using Tumbled Glass Distress Ink onto a piece of 3.5" x 4.5" white card stock. Then, I fussy cut the butterflies and fussy cut around the peonies.  I adhered the peonies using my ATG and used foam tape to adhere the butterflies.

I adhered that panel to a piece of 3 5/8" x 4 5/8" black card stock and then adhered it to my card base. Here's the completed card one more time.


Thanks for stopping by today . . . and if you decide to try this technique, please share your creations. I would love to see them!  And, of course, if you have any questions, please feel free to contact me; I'd be happy to help you!
Monday, May 14, 2018

Harriet & Henry

So, my friends took their daughter to the Dallas Zoo not so long ago and my friend was telling me that their daughter's favorite animal was the Hippos.

Well, since I have that adorable Happy Hippos set from My Favorite Things, I thought it would be fun if Miss E received a card from the Hippos thanking her for visiting them.

I asked what her favorite colors are and it turns out that they are "pink and pink," so here's what I came up with:


Thanks for visiting today!

Friday, May 11, 2018

Just Peachy

Magnolias . . . aren't they so pretty?  We had a magnolia tree when we lived in California and I always looked forward to when the buds would bloom. . . they were so fragrant!  So, when I saw the Planning for Magnolias set by Power Poppy, I knew I had to add it to my collection.

And when I stamped the branch for the very first time, I was in awe of all the detail in the stamp!

I just kinda stared at it for a while, thinking about what colors to use.  I wanted soft, subtle colors, so I decided on shades of peach.  On a side note, I stamped the image in Gray Flannel Memento instead of black for a softer look.


After I colored it up, I decided to use this card sketch from MFT.  It was perfect for that Magnolia branch!

Here are the markers I used:


And I edged the tag with a little bit of Vintage Photo Distress Ink just to make it stand out a bit.

Thanks for stopping by today!

Wednesday, May 9, 2018

Mushrooms & a Fairy


PoppyStamps has a monthly challenge going on to incorporate Patterned Paper into a project.  I was delighted to see that because I've been hoarding collecting patterned paper for a very long time.

05-18 copy
And here's my card:


For this card I used the Thoughtful Faerie Die and the No Truffle at All stamp set.  That little butterfly in her hand is from the Blooming Chrysanthemum die from Memory Box.  I used Wink of Stella to add a little sparkle to her wing (because of course faeries have sparkly wings!)

Here's a close up picture:


I also used White Signo Gel Pen to add spots to the mushrooms.  As far as all the other inks and markers, well . . . here ya go:


Thanks for stopping by today!
10